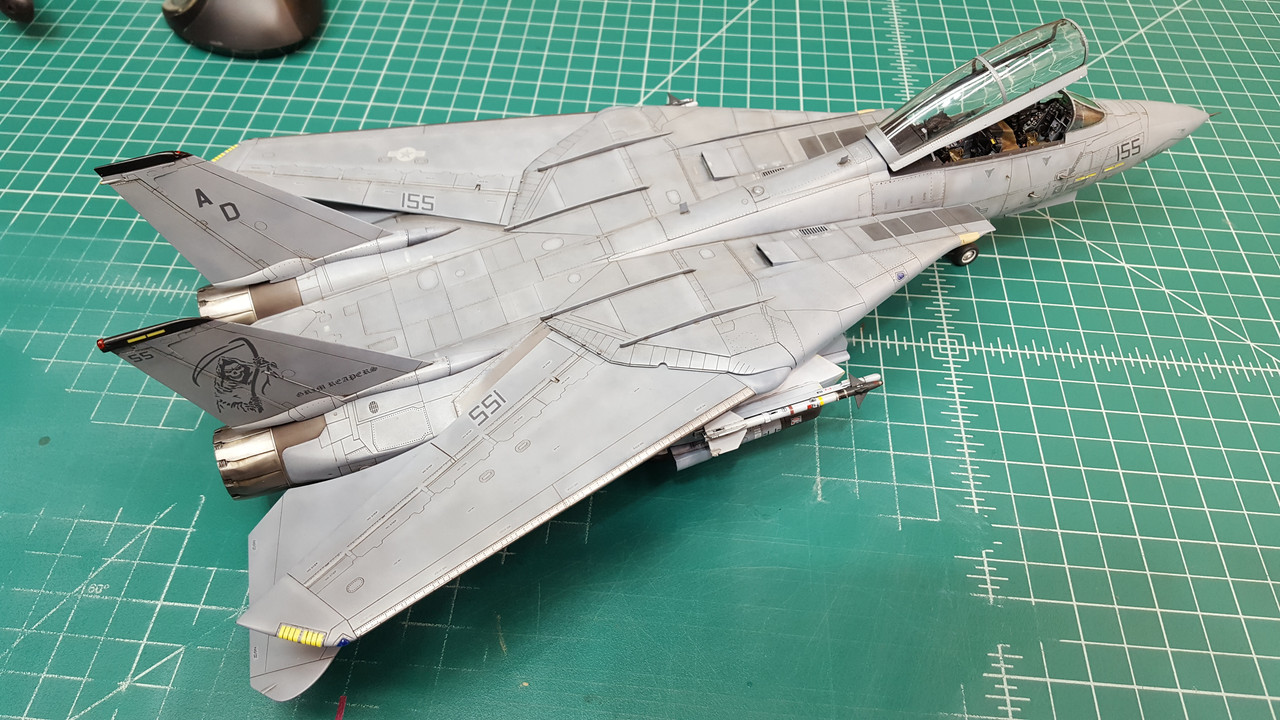
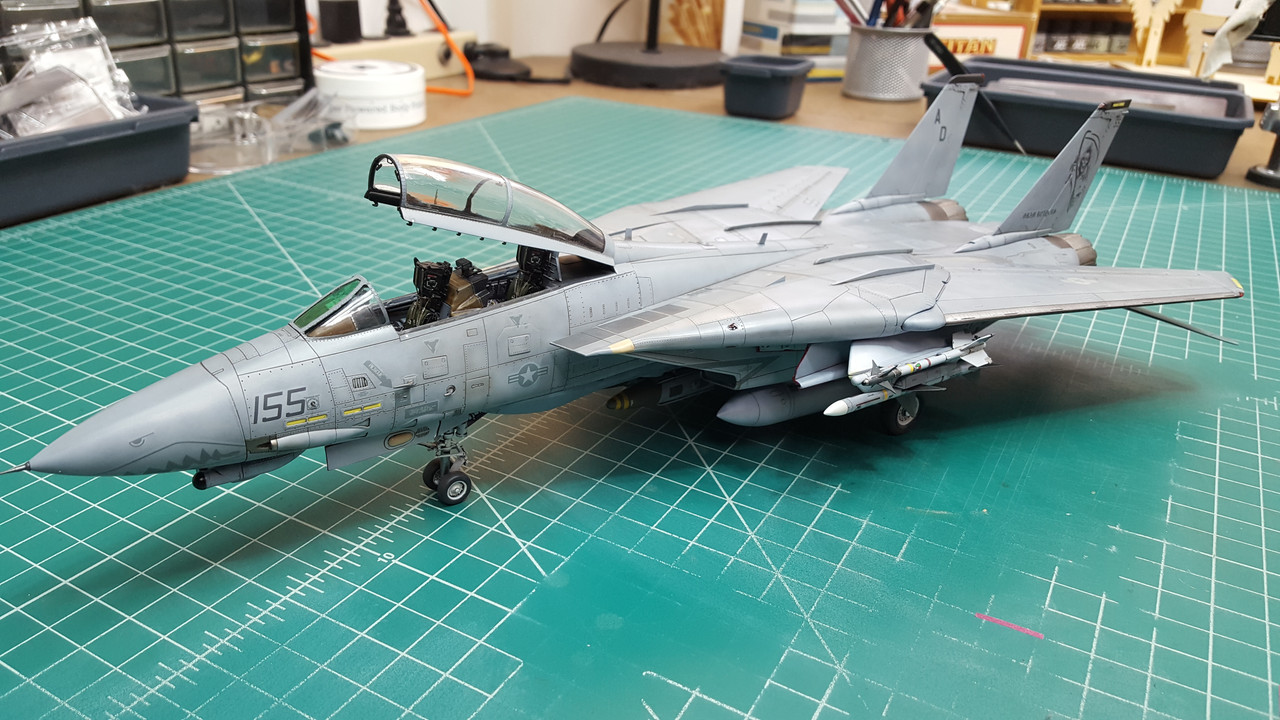
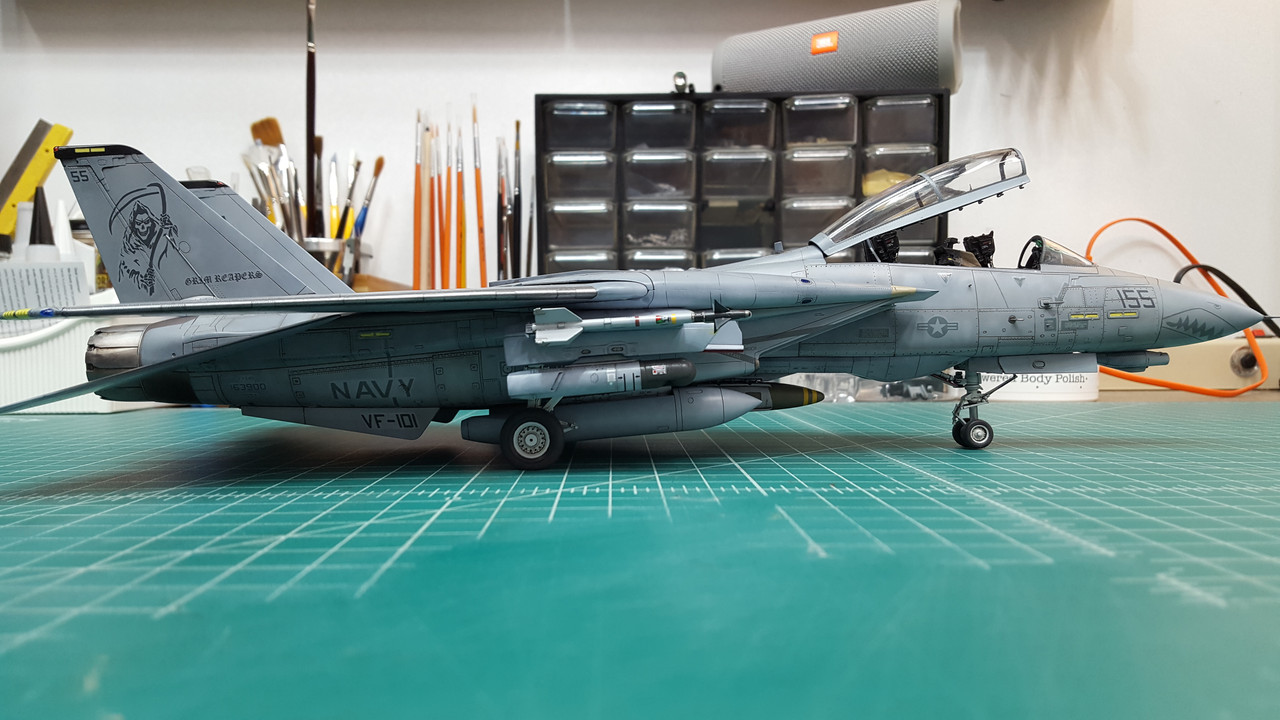
So… this is my first (serious) venture into building a modern day fighter jet. I have to say right off the bat that I have developed some mad respect for all that build these things. They are super complicated machines. I bought this kit because it was slightly cheaper than the Tmaiya kit and had some pretty glowing reviews. I’ll have to admit that after building it, I wish I had just spent the extra cash and got the Tamiya kit. Even though I have never built it. At first glance, the AMK kit looks pretty decent. But I grew weary of ejection pin marks (deep ones at that) and seam lines. Even the 1-piece ordanance had 4 seam lines down each piece. And on top of that a lot of the JDAMs were warped to the point that they couldn’t be used. I really wanted to include the LANTIRN pod, so bombs were gonna take the place of those AIM 54 Phoenix missiles. I have to admit that I really struggled with this kit, from the fit to all that sanding and filling. Maybe it was to big a bite? I also found the instructions to be quite confusing. A few wrong part numbers as well as ambiguousness that left you scratching your head. Especially if you are somewhat unfamiliar with the aircraft. Anyway, along with all of that, I made mistakes along the way that really cost me in the end result. It still turned out to be a decent looking aircraft IMO, but holy cow was it a struggle to get there. I think there were a couple instances where it alomost ended up in the bin. So, many lessons learned, many mistakes later, I present to you the finished product. I suppose that is part of hte journey of model making…
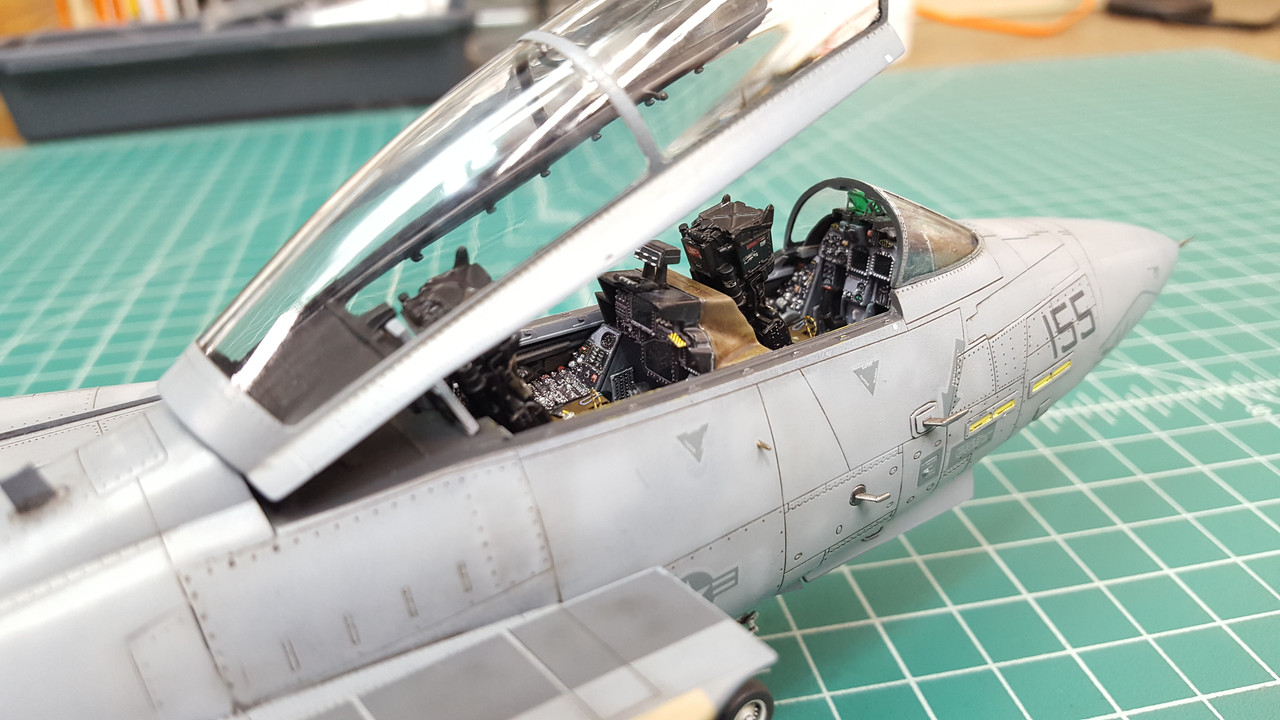
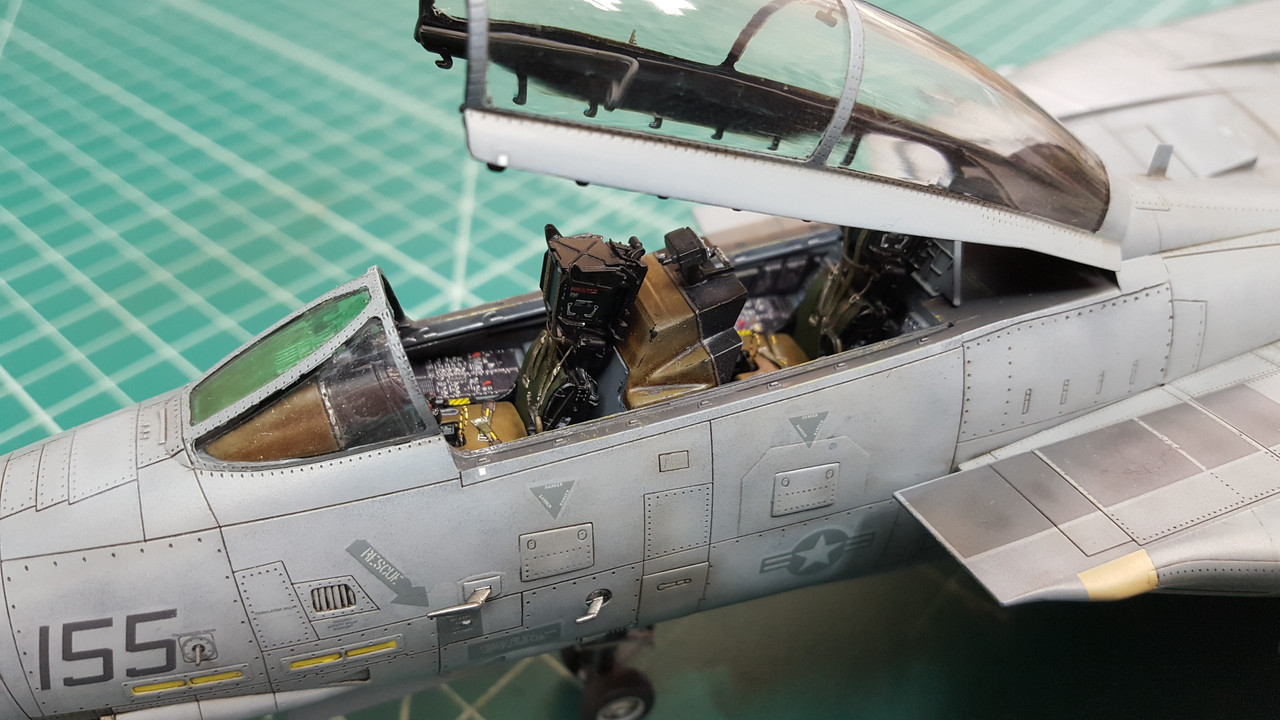
** Aftermarket = Quinta Studio 3D Color cockpit decals ($$$, but awesome) and Brassin SJU-17 Ejection Seats. Kit seats are ok, but these are better.
** I can’t remember now if I used MRP or AK Real Color Paints for the main scheme.
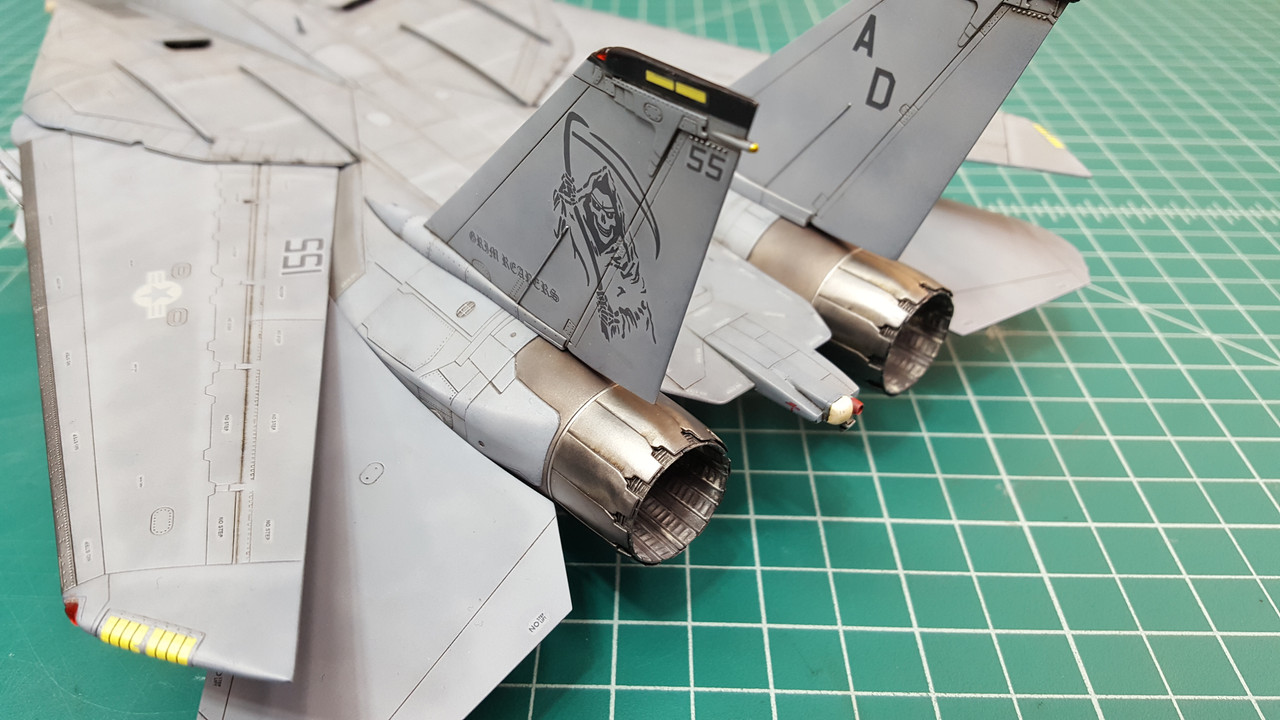
** I accidentally used the hi-vis stencils on the upper wing(s). Doh!
** Somehow the clear coats I put on worked their way under the decals and “lightened” the paint beneath the carrier film - so now it’s super visible. Also had some lifting of the decals during subsequent masking. Totally f-up the port upper marker. The clear parts straight up did not fit and are complex enough in shape that there was no way I could sand them down to fit, so I tried to fill with CA glue and of course touched the unset glue TWICE and had to fix that area. Sigh.
So, let me know if you have any specific questions about the build and I’ll see if I can answer them. Enjoy!
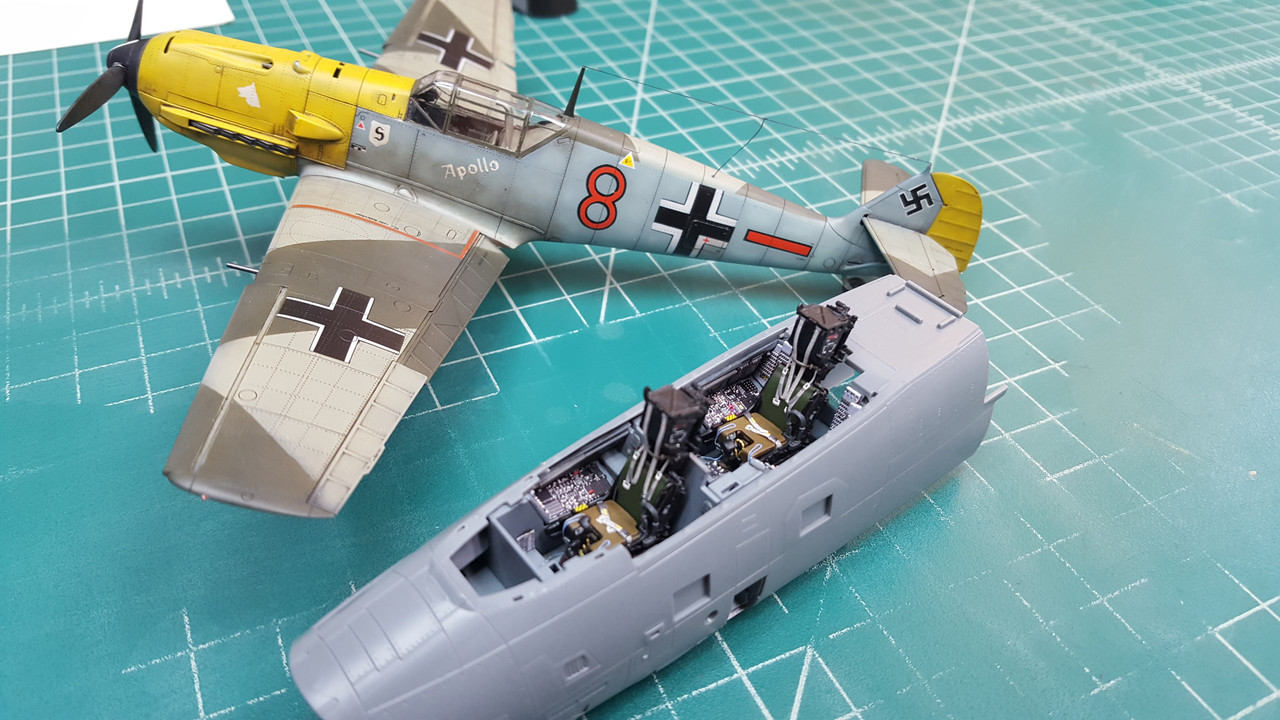
So, just a shot to show how much bigger a modern jet is compared to an early WWII fighter…
Don’t know much about these AMK Tomcats, other than that they’re on the pricey side, but it looks like you got quite a nice result regardless of all the trouble the thing gave you. Great first effort (and you can never go wrong with a Grim Reapers bird). As far as the goofs, we all make them, even those of us who have been building for years. We live and learn and strive to make the next one just a little better. How’s working with the Quinta decals? I have the set for the HB IAR.80 but haven’t gotten around to the kit. Did you have to take any special precautions using them?
Like the Bf, too. I’m contemplating jumping into the Edward E-1 soon myself.
Thst is really impressive,the Quinta stuff came out nice,great first effort.I love the markings,I did my Tamiya with Grim Reapers Livery,it had the bright red tails and strakes.
My goodness from your description I was expecting to view a nightmare. I say it’s a hell of a build. Nice going. Despite the rough going it looks nice. Here’s the good news-the Tamiya F14 has a reputation for being one of the best 1/48 kits around. So if you want to tackle another F14, and buy the Tamiya kit, it will be modeling bliss.
Hey Omni, thanks for the comments. Yep, that’s the journey of model making. I suppose what I was really getting at here was this was a complicated kit with a lot of areas that took special attention, and maybe because of that it wasn’t the “best” choice for a first jet.
As for the Quinta decals, I remember gluing them on with CA instead of relying comletely on the adhesive. So in the water to detach them from the carrier paper and then I dried them and glued them into place. The side walls intruded a tiny bit on some of the more vertical panels, so a little trimming took place. But other than that they look great IMO.
Thanks Lurch. Of course I wanted to be a F-14 pilot back when I was graduating HS. you know, Top Gun and all. LOL! So, very cool that you served with them. Also cool that you at least know what aircraft were present on the deck. I’ve met a few carrier guys that swear they had F-16s or F-15s doing ops from their boat.
Thanks Tojo! I appreciate the comments. I’ll do another for sure sometime in the future. Probably an A or B with a hi-vis scheme. I have visions of making a diorama with one just above the deck/traps on landing… so, we’ll see if that actually materializes.
Yeah, I know, right? I was really torn between the 2 (AMK and Tamiya) because the price difference didn’t really mean the world to me. I ended up with this one because it had some cool features, like the extended flap wings that I didn’t use (more for space reasons than anything else). So, with the great reviews I thought I’d give it a chance. It has a lot of great detail and then a lot of places where I was like WTH are they thinking here? I am pretty sure I have one of the initial runs. I know they have updated the instructions and the kit some since. So, maybe it is a bit better now. But my next Tomcat will probably be a Tamiya A. I’m in the middle of doing a triple comparo build of Pz III H/Js (Old Dragon Imperial, Smart Kit and RFM) and still have a few other planes I’d like to get to before I even contemplate that so who knows how far off that is.
Well, if there are mistakes on it, I sure as hell can’t see them. Nice work! Since you mentioned lifting some decals with masking, just wanted to offer something I tried recently that prevents that. What I do now is to just use a paintbrush and dab a little toothpaste on the decals that need protecting. If you let that dry a couple of hours before masking, the toothpaste will protect them from the adhesive on the masking. To clean that off afterward, just a little water and gentle wiping with a sponge will clean it off. Had to use that method several times on the F-4B I’m working on right now.
If I remember correctly back then f-16;s didnt have tailhooks. Not sure about the 15;s tho. I worked the catapults and arresting gear arming and dearming all the ordenance that was on all the aircraft. It was an interesting job. also very dangerous too.
If either of those ever came close to touching a carrier deck I will be 100% shocked. I have never seen it and I don’t think any Navy versions even exist. F-4s were replaced by F-14s which were replaced by F-18s (and now F-35s).
That’s pretty cool. I would imagine that most jobs on the deck are pretty dangerous let alone arming and disarming large amounts of explosives!
Most jobs were dangerous. I worked the night shift . 7pm to 7am. When I was in from 1982 to 1988 and from 1989 to 1995 I dont remember many air force planes having tailhooks. Although the F-4"s did but they were common in more than 1 branch of service. If memory serves me correct they were originally desighed for the navy but the other services found they performed excellent for there needs as well. Working the flightdeck had alot of hazzards that most people dont even realize. I was on an older ship first, USS America CV-66 then the USS Rosevelt CVN-71. Big differance between the two. I seen alot of things while I was in the navy. Both good and bad. I wouldnt trade it for anything in world. It was the people I met along the way. They were the reason it was interesting.
Pretty much every Air Force fighter or attack aircraft has a tailhook, and that includes F-15s and F-16s. The reason Air Force aircraft like that have tailhooks is for emergencies where they have to do an arrested landing on an airfield. Here’s a video of a Colorado Air National Guard F-16D doing an arresting gear test for arresting cables installed at Denver International Airport. They had to make sure the system was operational and working at DIA before closing the runway at Buckley AFB for upgrades. This is why smaller AF planes (with the exception of the A-10 and a handful of others) have them. The arrested landing is at time mark 2:38.
WOW I didnt know that. It does make since if they have an emergency like a hydrolic failure or something. I guess you are never to old to learn something. Thanks for the info. I was always under the impression that the airforce never used them. Guess I was wrong.
Regardless of the issues you had, it turned out looking fantastic. I have built at least 6-7 Tomcats and Tamiya’s is by far the smoothest one to build of the bunch.