1/350 USS Yorktown (CV 5) Build/WIP

Recently, my LHS gave me a deal on the new Merit International 1/350 scale USS Yorktown (CV 5). The kit was packaged so nicely, I almost didn’t want to begin pulling out the part bags. I was impressed that the aircraft and all the photo etch was included in the kit so little, if any, aftermarket purchases should be required.

While this will be my seventh carrier model, and the fourth of the Yorktown-class model I’ve built, it will be my first in this scale and my first full hull carrier.

The Merit folks put lots of emphasis on the hull plating as you can see from these photos of their build of the model posted on their web site.

I decided to sand a lot of that detail down, but the Yorktown-class plating is visible if the light is right as you can see from this photo of Yorktown’s sister ship Hornet taken in dry dock in 1941.

I tried to keep the sanding reduction consistent, but as the plastic around the bow began getting thin, I left well enough alone. While emphasizing the hull plating, Merit didn’t include the armor belt, so I added it using strip. The strip is somewhat over scale which is a bit ironic after doing all the sanding, but I think it will all balance out.

As you can see from the Merit web site shots, the model has molded the small hatches on each stern quarter shut. I decided to open them up.

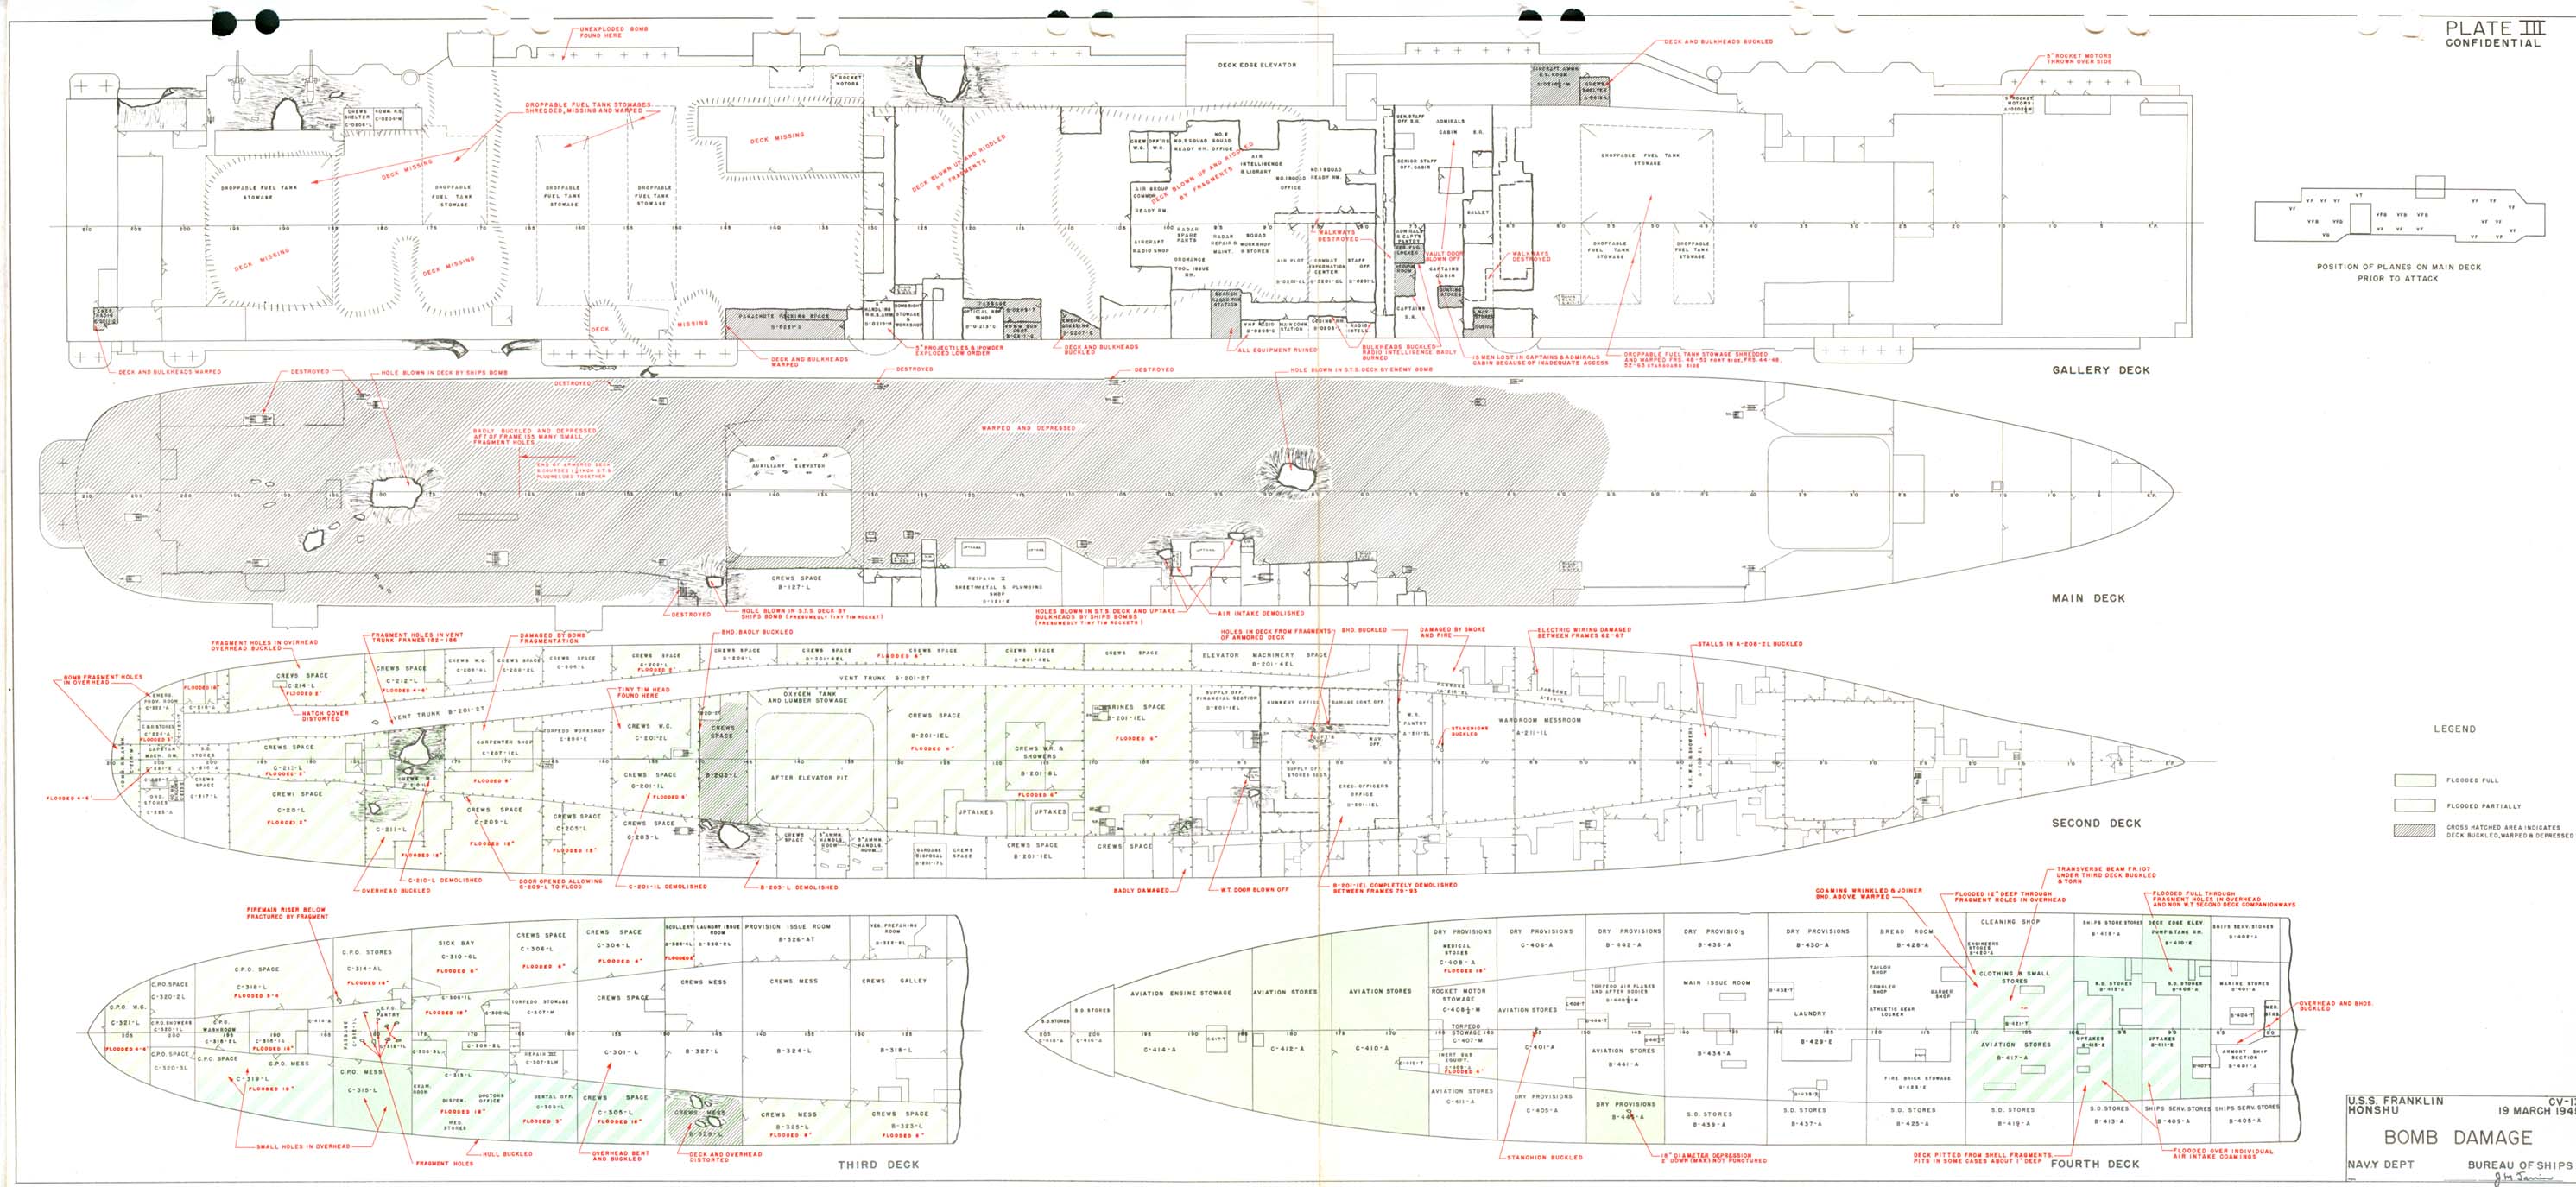
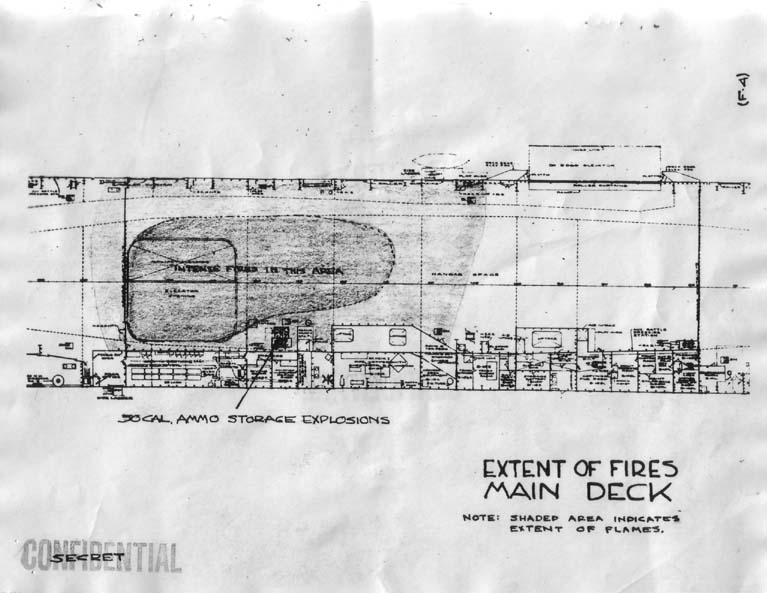
The model is designed around the ship at Midway and I plan to stay with that time frame. I’m going to attempt to represent the quickly patched-up Coral Sea battle damage Yorktown received at Pearl Harbor prior to her departure for Midway. There isn’t a lot of available photo evidence and the battle damage report sketches leave plenty of guess work left.

Gonna be fun, you bet.

Nice start. I’ve only done 1/700 carriers, not done a 350 carrier yet - several in the stash - will be watching this with interest.

EJ

Lookin’ good Mike. I think the plating detail will look fine under a coat of paint. There’s no doubt that this kit is worth the trouble - and the subject certainly deserves everything the manufacturers and the modeler can do for her.

Mike,

This has always been one of my favorite ships, and I am glad that there is finally a decent kit of her. It looks like you are doing a terrific job! I will follow this thread with keen interest!

Bill

Mike,

Hope you don’t mind me pulling up a seat on your WIP. My family gave me this kit for Christmas and I have been biting at the bit to start it… I need to finish what I have going first! Looking good so far.

Steve

EJ, John, Bill and Steve,

Thanks for your comments and are all welcome to sit in on the WIP.

Here’s another view of the completed model from Merit’s web site. The island “void” is represented by an indentation molded into the one piece island. I suppose it could/should have at least been painted black or dark gray in their build and not left as they did it.

Since this area aboard the ship was open, I decided to remove the indentation entirely and attaching the island’s top piece, I cemented a length of stock tubing inside.

The tube represents the forward uptake and along with the visible interior will be painted dark gray. The tube follows the slant the actual uptake took. As I discovered on my 1/700th Yorktown-class builds, once the platform and railings are added this void area becomes hard to notice. Simply painting the original indentation would suffice, although there is no mention in the kit’s instructions to do so. Having built the other Yorktown-class kits though, and knowing what was actually there, it was an easy enough change to make.

Hey-

Great! Thanks for taking the time to post your progress. I have started on mine as well, so I plan to follow along closely. I have started to sand the hull, though I’m working slowly and not sure how far down I will take it.

Thanks for the tip on the island, I’m still still researching the ship and it’s nice to know about these little mods before I get to that point. I usually find these bits after it’s too late.

Thanks again,

Phil

I’m jumping ahead to do more of the island. I’ve added the PE ladders, prifly and the signal flag lockers and opened up the kit’s bridge windows.

I thought the bridge windows looked weird as molded, particularly since the other windows on the island are opened as shown from the Midway shot after Yorktown received her first attack.

I’ll prime the island and work it in with the hull painting, etc.

Impressive work!

I have the lamented Tamiya 1/700 version of Yorktown, so I’ll be following along to see what I can pick up from your build to improve her.

The island is looking very good!

I’ve started painting the hull and done some detail work. With the hull painted, it looks like the sanding of the hull plates was about right.

I’ve had to fudge the boot top somewhat because Yorktown’s was very wide. I’ve started to work on the weathering and as it goes along I believe everything will balance out. So often in my weathering of models the object is to blend colors. This has been something new, weathering while trying to keep a sharp edge on the boot top.

The starboard side was much more weathered than the port side as can be assumed by some historic shots.

Trying to match the weathering is a challenge, and I intend to use an additional color on the underwater hull. Looking at current color shots of ships in dry dock you can see a fair amount of yellow. I’m not sure this is an underneath coat of primer used today or not. I’ve got reference material to the WWII USN underwater hull painting procedures, so I’m thinking of checking that primer as a possible color. I’ll tone it down regardless.

This port view shows a cleaner boot top but I’m curious about a stain on the bow that you can see in this crop of the above photo.

Since there are so few photos of Yorktown during this period, it does give you some choices.

While I research and work on the weathering, I’ve been doing some batch work on other steps. I’ve painted the island and gave the decks a quick brushing of Deck Blue. Of course, everything will be touched up as the railings, etc., are added.

[URL=http://s188.photobucket.com/user/CVNClicker/media/Painted-island-STBD.jpg.html][/

Here’s a couple of the 5"/.38 guns. The kit uses 10 parts per gun.

And here’s the 1.1 gun mount on the clip shack.

Still being fun you bet!

This is really looking spectacular.

Anyone have a good source to go to for pictures or drawings of the hangar deck on the carries Essex or Franklin? Can’t seem to find visual references to those areas. Thanks

What years?

EJ

Franklin 1944

Essex early war

thanks

dan

I posted Frankl

I posted Franklin’s post-war Damage report here, Plate 3 has a wee bit of a hint of structure but more so some of the hatches on the hangar deck. The Captain’s report had some 8 x 10 photos of plans that I scanned in, but they weren’t very large; Main Deck Structural Damage and Main Deck Fire show a little bit of the internal lateral supports that protrude into the deck space from the hangar deck bulkheads. Otherwise, I’d suggest the “Anatomy of the Ship - Intrepid” book as it has some decent drawings and is only about $15 right now.

Returning to the Yorktown-class…

Here’s the latest WIP shots.

You can see my work space, set up for 1/700th scale ships up to smaller 1/48th scale aircraft, is being somewhat overwhelmed by this kit.

I’ve installed the hull bulkheads and the gallery-level walkways.

While the hangar deck is detailed well, I’ve decided not to bother with the photo etch and whatnot on this deck. I intend to mount the model in a case. Even with the hanger opened up, looking inside the hangar will be difficult from the case restricted distance. I’ve painted the bulkheads white and I’ll mount some aircraft in there, but I’ll leave it at that.

Here’s the fantail. I like the support pieces being separate pieces and that you can add the photo etch bits before mounting the flight deck. While much of the part fit is good, as with any WW II carrier kit, all of this stuff must line up well to keep the flight deck level. I’ve held off on some of the railings, etc. for the time being.

There are a couple of discrepancies with the model if you intend to open up the hangar as it was at Midway. The kit has several separate bulkheads for the hanger interior. These are good to show hull thickness, etc., but two of the bulkheads are solid and if you plan to leave the shutters open the view inside the hangar will be blocked.

Here’s the exterior of one on the forward, port bulkhead.

Here’s the interior.

You can see there’s no provision for that shutter door to be there. I left this one as is, but cut the second one apart so you can see into the deck.

I’ve toyed around trying to figure how to represent the hull repair the ship received after Coral Sea. The exterior below the waterline damage from a bomb near hit ruptured some welds. It was easy to locate where the damage would have been, but the only photo I can find is in Chessman’s “That Gallant Ship.” While there must have been some misshaping to the hull as indicated in the ship’s damage report, it doesn’t show in that photo.

So, I just put a piece of strip the length of the frame damage and painted some unweathered hull red over it. I’m not really satisfied with it, but unless there’s some better info out there to find, I suppose it will have to do.

There’s still lots of work to do, paint touch-up, etc., and I’m not happy with the weathering yet.

Still, it is fun.

She’s looking good Mike!! Can’t wait to see more!

Steve

A little more work.

I goofed on the bow gallery deck walkways because I’d installed two bulkhead pieces (parts G2 and G3 for Phil and Steve and anyone else building the kit) in reverse. This would cause the walkways to extend too far beyond the flight deck. Lucky I caught it while test fitting.

I’ve added the large gallery deck section between the bulkheads on the hanger deck. I didn’t paint it but it helps pull everything to pull together and will supports the flight deck. I’ve decided not to add the hanger deck overhead structures for the same reason I mentioned in the last post. Nobody will ever see them with my model in a case. Besides if you install them per kit instructions, they block the amidships flight deck elevator.

The tripod mast went on without much difficulty. Getting that lined up correctly is vital. It isn’t any easier installing the long ladder in 350th scale than it is in 700th scale.

I’ve started outfitting the island too since I’m doing mostly PE stuff now.

The deck blue paint will all be touched up after the railings are installed. I won’t install the platform and railing above the stacks, nor the masts and radar until after the island is mated to the deck.

The kit does not include the YF homing or the smaller radar antenna, so I’ve gone after market with a Toms’ Model Works USN WW II radar PE fret.

Lookin’ good, Mike. I admit I had my reservations about that weathered underwater hull, but it looks great now.

You’re right: when all the island parts come together The Gap is almost invisible. But not quite. The addition of the funnel trunk was, I think, a good idea.

I’m really impressed with what I can see of the detail in the kit. This is going to be a mighty impressive model.

Looks really good!

Quick paint question. What paint did you use for the Hangar deck floor? it’s was painted in standard Navy deck gray?

Thanks,

Phil