Right there with you on being in the mud repairing stuff Mark. Frickin’ nasty work …but somebody’s gotta do it right? ![]()
Hello everybody!
@jeaton01 - thanks for the link, it will help me a lot!
@mustang1989 - thanks a lot for your kind words! I’d say I didn’t use all too many techniques here… First would be airbrush and preshading the engine in “Vietnam red” - Humbrol 113 in this case. OD - Humbrol 66 went on top of that. Then I used some Citadel acrylics - Nuln Oil black wash mailnly, and that would be about it. I also used different colours for the exhaust to show it rusted - that didn’t convince everybody, so I re-did it now.
@CapnMac82 - thanks for the correction Cap’n, belly pan it is for me now. Working on it must have been something. I have a similar pan on my VW van, but it isn’t armored. Helps to keep the motor clean for sure.
Back to my model - I tried to make some changes that were suggested, then I mounted the engine in the frame together with the radiator. The shaft from the engine to the transmission needed shortening about 1mm to fit. I also made the hose from the radiator to the water manifold. And here’s what it looks like now:


Now I’ll try to cover the engine a little and then mount the tracks permanently. Thanks for looking and have a nice day
Paweł
6 Likes
Thank you for breaking down the process @Pawel and this is all looking just great. You’re progressing quickly through this build bud.
Coming together all nice and grimy.
1 Like
On a cat (or similar dozer) it’s not so much armored as a “for sure” protection against getting “high centered.” Allows use of “ordinary” automotive components on the bottom of the engine, too.
Those drive shafts are finicky on the 1:1 versions, too. It really looks good so far.
Luckily this will be of an age to not have a pile of electronic things wired in. Pretty much the wiring will be to the starter and the head lights, then an oil pressure line, and not much else.
The filters probably could be a different (or just very clean if recently replaced) color. The metallic color on the laternator is just right.
US Army Cats sometimes got yellow replacement engines, for those keen to build this kit with a bit of “pop”
Hello everybody! Thanks a lot for your comments!
@mustang1989 - my pleasure! Yeah, the build goes quite fast, the parts are mostly large and fit together well. Sometimes I have to do some surface prep where the 3D print artifacts show up.
@SprueOne - thanks!
@CapnMac82 - Thanks for the clarification. Yeah, there are some photos out there of OD tractors with Cat-yellow parts
I hope to get back to you shortly with the chassis built up.
Thanks for reading and have a nice day!
Paweł
3 Likes
Hello everybody!
The construction goes on - I installed the belly pans and the “nose” - here the part also had those funny distortions, so instead of filling and sanding I decided to cut the affected parts off and scratchbuild them out of styrene sheet:

Then I put on some more “Vietnam red” and installed the suspension permanently:

As you can see the fuel tank needed some filling (and still needs sanding), also because of the distortions/sinkholes:

There is a very interesting part with all those lines - unpainted in the photos:

I have also found a place where the kit is inconsistent with the instructions:

The throttle pedal is different then in the instructions which has you install three pedals in the three slots in the floor. From what I’ve seen it should be installed diffrently. @jeaton01 @CapnMac82 - maybe you can tell me more exactly how… I tried to research this detail on the net, but got no real results - the closest was a video of a D8 being started after 15 years…
Now I’m trying to put the tractor together and paint it, but in parallel I start working on the blade.
Thanks for looking and have a nice day
Paweł
3 Likes
You’re progressing through this one in quick fashion @Pawel .
Would this be of any help to you? If it is, here’s the site where you can see the rest of the photos at: Caterpillar 1947 D7 Dozer

1 Like
Hello!
Thanks for the photo. Unfortunately, no - this is the earlier dozer family, like the one Miniart issued in their kit, but the ones in Vietnam were from the next generation , with three pedals on the floor and controls mounted at the console, with no “sticks” sticking out of the floor.
Thanks again and have a nice day
Paweł
1 Like
Should’ve paid more attention. Sorry about that @Pawel
What about this shot of a D7F’s pedal arrangement?

D7E’s and F’s were built with both powershift and manual transmissions, one or the other. Pawel’s is a powershift which I prefer for dozer work because you can go from forward to back in a much shorted time and less effort. Powershift D7E serial numbers start with 48A, manual transmission tractors start with 47A. D8H’s were also made in both versions, 46A and 36A, 46A being powershift.
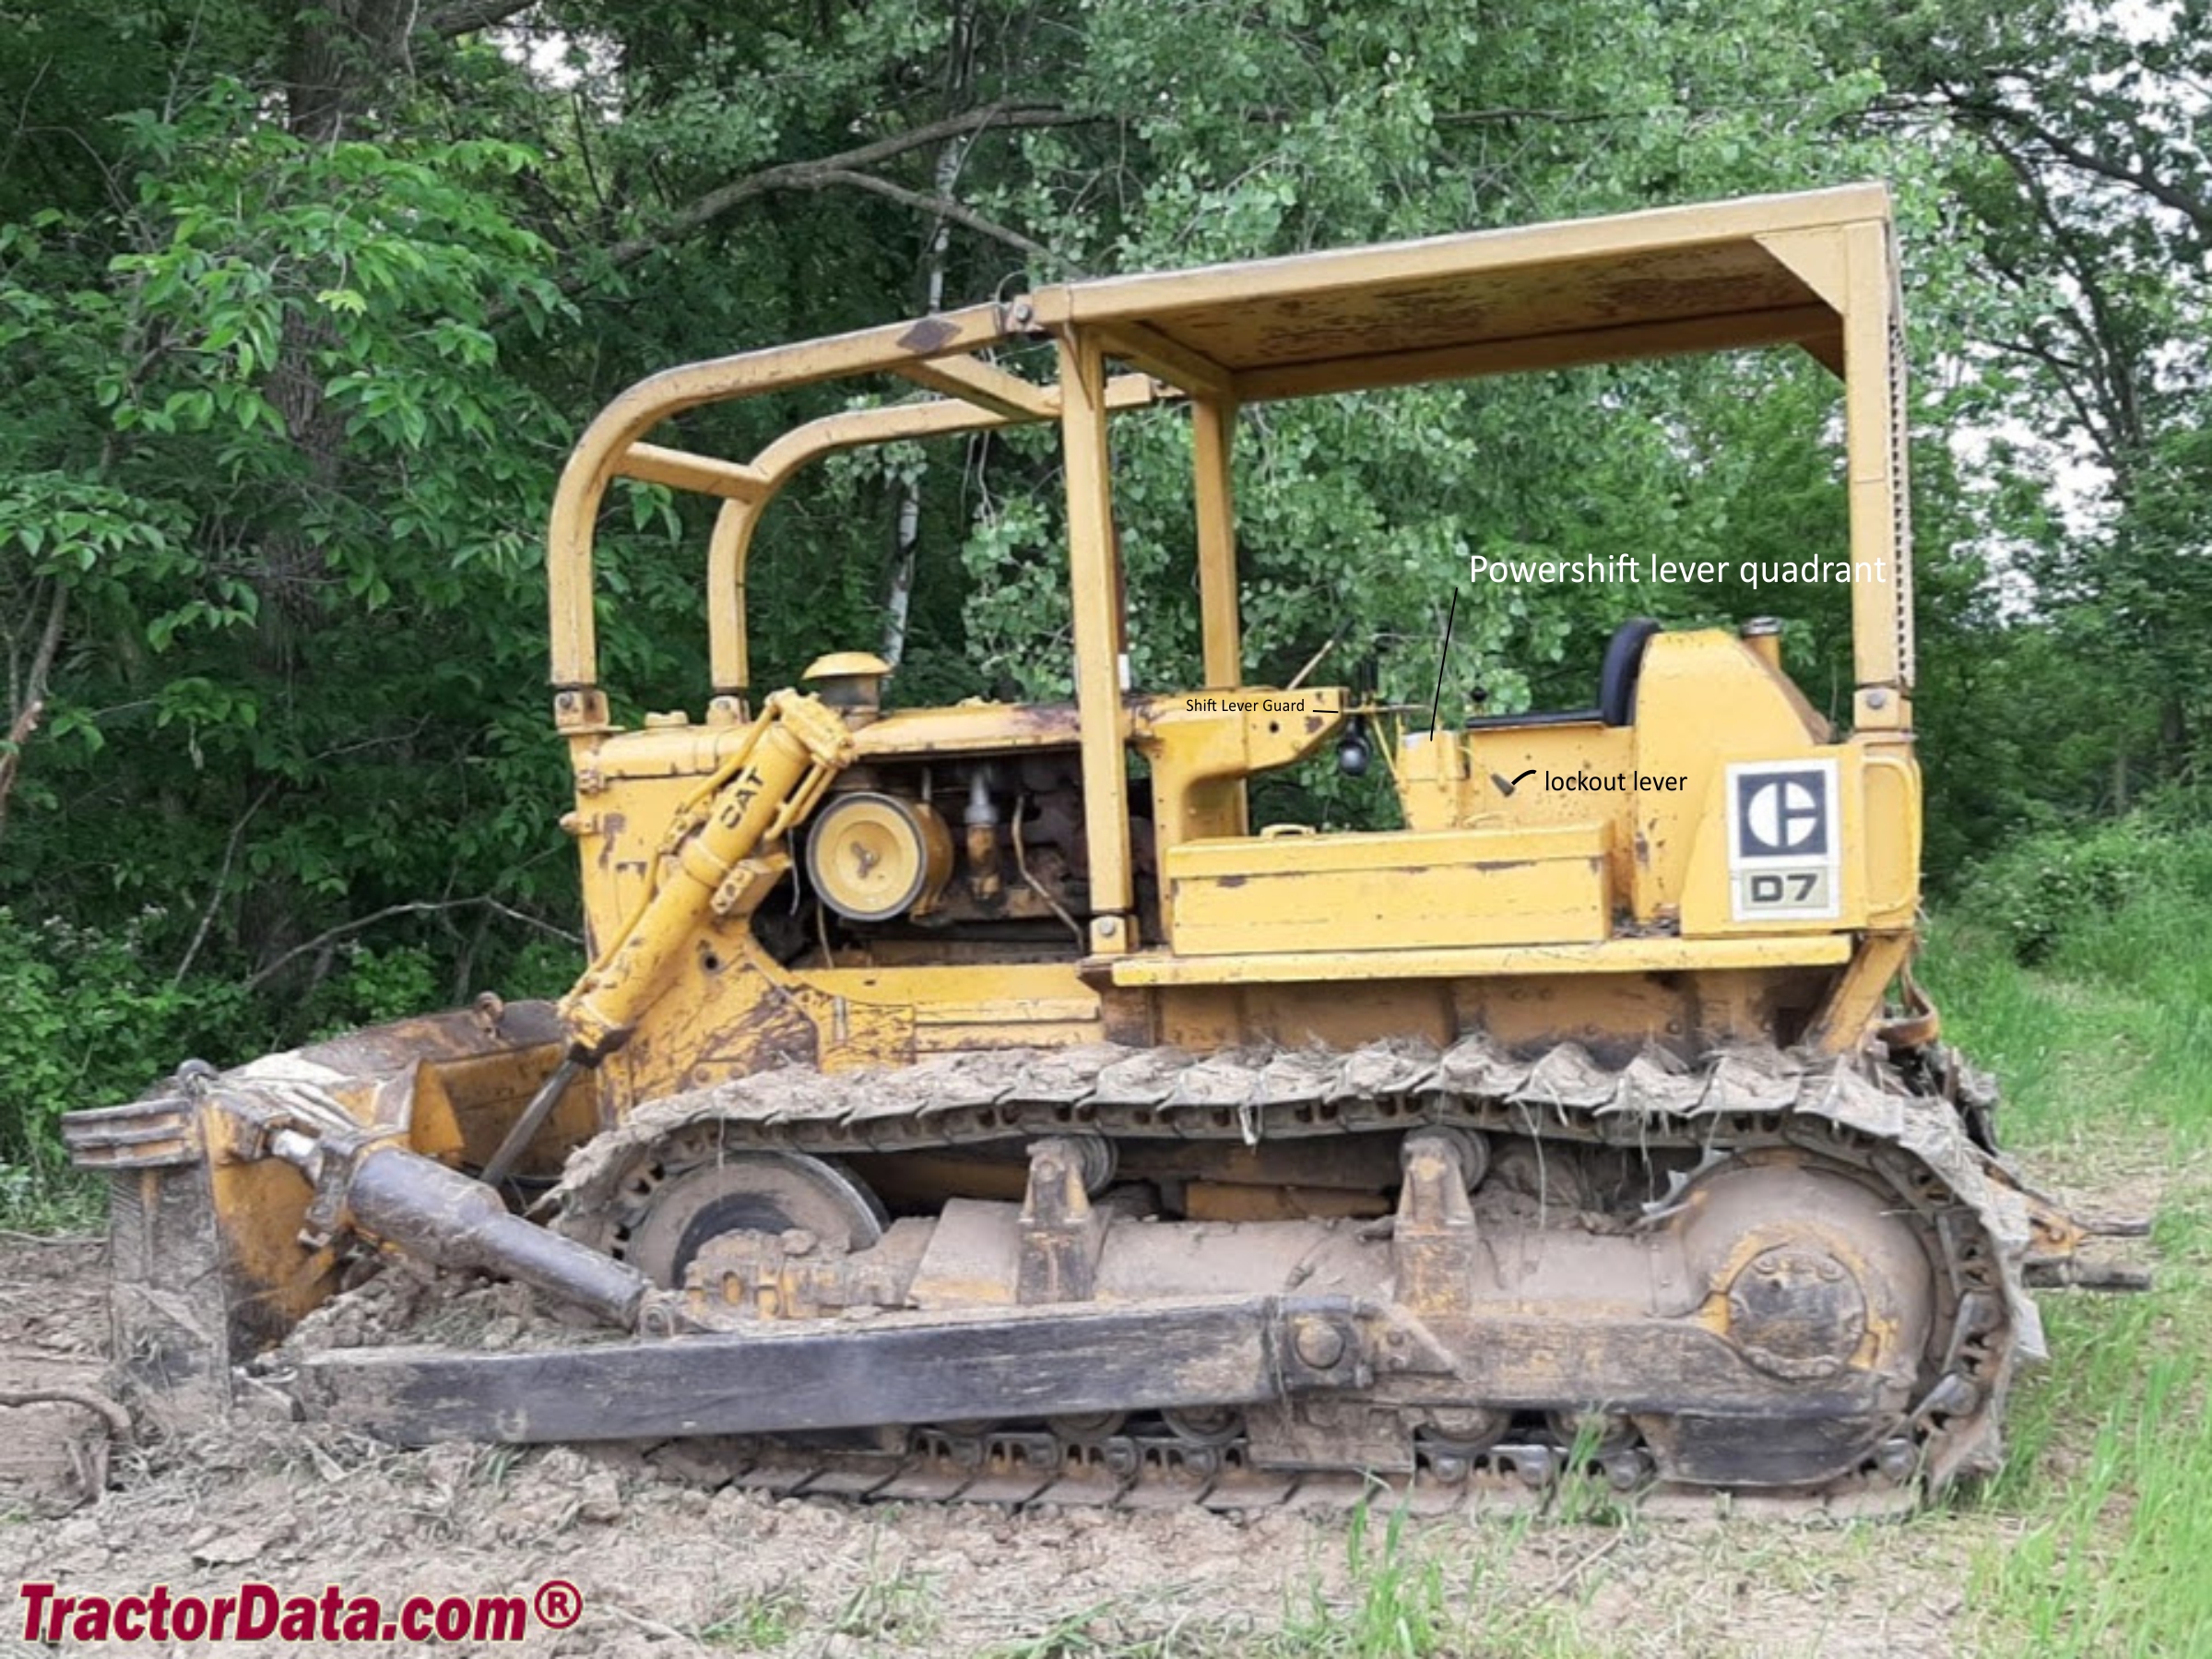
Here is a picture of the controls which I have labeled, Not that great a photo but it is what I could find.

1 Like
Thanks a lot guys! I knew I could count on you!
@mustang1989 - the D7F looks a lot more like my machine, thank you!
@jeaton01 - thanks a lot for the photos and for your comment. A few more questions if I may: How do you tell a powershift equipped tractor without taking off the covers? Wanted to ask about those grey handles - now I see you marked them as clutches - my guess pull to disengage the drive, am I right? So the actual throttle is the lever to the right of the clutches and the pedal is decelerator - how do those work? Looks like the throttle lever is missing from my model, should I add it, or can the throttle be somewhere else?
Dang, it’s a lot of questions! But it sure would be nice to know more about the thing I’m building!
Thanks again and have a nice day!
Paweł
1 Like
Glad to answer, Pawel. I’m waiting for a decal to dry on my Mk.5b before I go further on it.
I’ve marked the Powershift controls on the picture below, if the tractor has this assembly then it its a powershift. All the shifting on manual transmission tractors is done with a normal shift lever mounted on top of the transmission, and a second lever next to it that shifts the forward and reverse. There is also a large clutch release lever to the operator’s left on manual shift tractors.
When you are operating a powershift tractor all the shifting is done with a small lever on top of the quadrant, inside the guard on top. It runs in a U shaped track, with forward on one side and reverse on the other. You have to move it to the forward position to cross it over to the other which passes the transmission into neutral. When the machine is parked the lockout lever blocks the shift lever in the forward neutral position. The further back you pull the lever brings it into higher gears each of which has a detent so you can feel where you are. You can reverse direction without throttling down but that is very hard on the undercarriage (and your neck!) so as you move the lever forward you also depress the decellerator pedal which if pushed long enough brings the engine to idle, and then release it after you have shifted directions. It’s all a matter of timing but if done right it’s very smooth. The main throttle lever to the right of the steering clutch levers is left alone during dozing operations except when you need to slow things down for some reason.
There is no differential in crawlers, usually. Instead the transmission output shaft has a pinion that drives a bevel gear. On each side is a friction clutch, similar to multiple disc brakes on larger airplanes. Each can be released individually by the levers, usually called friction release levers. In addition, there are brake bands around the frictions, and that is what the brake pedals are for. To steer the tractor with a dozer, the first thing you do is make the blade work harder on one side of the other, made easier if it is equipped with a hydraulic blade tilt cylinder, then the friction clutch, and then add the brake. Steering by loading the blade is by far the best way as you don’t usually turn much while you are pushing, and turning is usually done while you are backing up, and then the frictions and brakes are used.
3 Likes
I don’t have quite the extensive knowledge on these pieces of machinery as Jeaton (John) does but I’m glad I could at least be of some use to you and your build here bud. ![]()
Well, a forum is a compendium, a collection, of shared knowledge.

Here’s a start-up video with plenty of details:
https://www.youtube.com/watch?v=iYhYNtY6vU0
Ought to be an Army Operator’s Manual, but I cannot find one.
2 Likes
Ok, Pawel, what’s the next level above WOW! ?.. EGAD! ? … HOLY COW! ??.. You get em all! Beautiful work, my friend. Can’t believe that engine is really a model! ![]() Can’t wait to see the finished product!
Can’t wait to see the finished product!
Cheers,
Russ
Hello everybody!
Thanks again for all your comments and for your kind words!
The knowledge you shared let me do the controls (hopefully) right. I added the missing throttle lever and made the clutch levers out of wire instead of using the kit supplied levers because I was afraid they would accidentally break on me. Handles are made of white glue:

Here also levers are made out of wire - thanks to you I know know what they do!

And finally the pedals - the kit supplies spare pedals, so I took a second decelerator, cut it down and got the second footrest this way:

I also started to work on the blade - as you see the parts need some filling and sanding:

The references you got me didn’t let me rest:


And in the kit it looked like this:

I couldn’t let it this way and I broke out my saw. It was a little gory but now it’s more correct:

Now I’m starting to paint the tractor, thanks for looking and have a nice day
Paweł
6 Likes
Loving this great detail-mining collab – and you’re bringing it right to life, @Pawel! Fun.
@Toimi_Tom - thanks a lot for your comment and for your kind words!
That reminds me that I wanted to ask one thing - there’s an extra seat in the kit and holes for mounting it to the right and forward of the operator’s seat - but it isn’t shown in the instructions. Would it be correct to install it for the Vietnam variant with the “house”/ROPS on?
1 Like
Dang, it gets nicer with every post.
The foot rests on the OD examples tend to “highlight” a touch white, rather than rusty. The foot brakes will be OD but the raised details go silver. Of corse all that gets clumped up with mud when it’s wet out–and you’re not to that step yet.
Those rubber handles, from my experience might benefit from being a dark panzer gray, with nato black drybrushing. They are a disitinctly matte black that’s porous up close.
Have to stick an edit in; some Cats had glossy vinyl handles & knobs. Eventually, they’d be mix-n-match.
1 Like