Looks great Mike! Man, finding that old and long OOP Verlinden Fire Base… WOW!.. good haul! Lovin’ what you’ve done to it too!
The Home Stretch… bring it on!!! [:P]
Looks great Mike! Man, finding that old and long OOP Verlinden Fire Base… WOW!.. good haul! Lovin’ what you’ve done to it too!
The Home Stretch… bring it on!!! [:P]
Nice job on the base Mike! Very realistic looking. Wish I had your patience on those individual track pieces…My Marine M26 has been on hold due to the tracks,can’t get into the tracks…
So is your next piece a Marine vehicle after visiting the Marine Museum?? [whstl]
Kevin
Kevin – Thanks….yep, the old OOP Verlinden base saved a LOT of sandbag time for this old bag [;)]
Kevin – Thanks….indy tracks can be a big time PITA. I usually use TV time to cut and clean the parts. Then I keep them ready until the mood is right….if I am in the right mood I can bang them out….if parts are a struggle, it’s best to wait for another day.
The Marine museum was fantastic and would recommend it to everyone……now to think it might influence my building……well they do have artillery [:O]
Rounds Complete!!
Nice to see some progress on this one Mike, the FB looks like it’s ready for some action. [B]
Looking great! [Y] I haven’t thought about using one of those Verlinden diomara bases for my previous builds. Gonna look into it and see if anything will work.
Bet you had fun at AMPS, now it is coming back to Aubrun, IN and I will be there! [:D]
Mike that looks really perfect.
The whole scene should be just a peach!
Mike’s stuff always looks perfect.
So neat and clean.
Hi Doog, I am working on a similar M48 to yours, I don’t think it will look as good but I used a lot of your tricks, thanks.
I’m curious to see if Mike is going to make his diorama neat and clean…
OR
What I see in all the pictures of Vietnam, chaotic, dirty, messy and many of the equipment looks jerry rigged in some way or another. Which works out great for me because I am a little sloppy still with my work.
Bill – Thanks…looking forward to position occupation shortly [;)]
Andy – Thanks for stopping in. As for the Verlinden base, be patient and search. I had been looking on ebay and they were going for quite a sum. I did an internet search and found a “gamer” who was selling it on a game forum for a very reasonable price. [:$]
Karl – Thanks….look at the actual pictures on the first page…then go to the Verlinden base….I thought of this base from the moment I started this build!! Always a pleasure to have you peek.
Noah – Thanks for stopping in. Neat….hummm that’s a new one….organized maybe!! Yep there will be more….I am just getting the basic colors in place. I will be spending time with the actual pictures from the firebase to find the right “junk”. And there will be dirt everywhere!
Thanks guys
Rounds Complete!!
You have to be organized to be neat…Yeah your work is neat and organized looking.
Yeah like I look at pictures constantly trying to figure out what half of the things are. They just grabbed anything they could and used it. Like in Hue the Marines went into the battle with most of their equipment left back at their base. So they stuffed their pockets with grenades, you won’t see them hanging John Wayne style. And used any bag they could like empty Claymore bags and demolition bags.
The fire bases I have looked at were crazy unorganized looking. Again they grabbed whatever they could to make shelters, any type of those wood ammo boxes pilled up and 55 gallon drums filled with sand. I have a diagram somewhere on how a mortar or howitzer pit should be built. They did try to follow the basic idea but just wow, especially after a fire mission, what a mess…LOL. I guess the SPH pit would be different, much different. But if they were there for a while I did see them set up those RPG barriers made of mesh screen.
By the way if anybody is reading this please let me know if y’all have pictures of a M48 Dozer tank.
From one mother to all you others….Happy Mothers Day!! In a nice way!!!
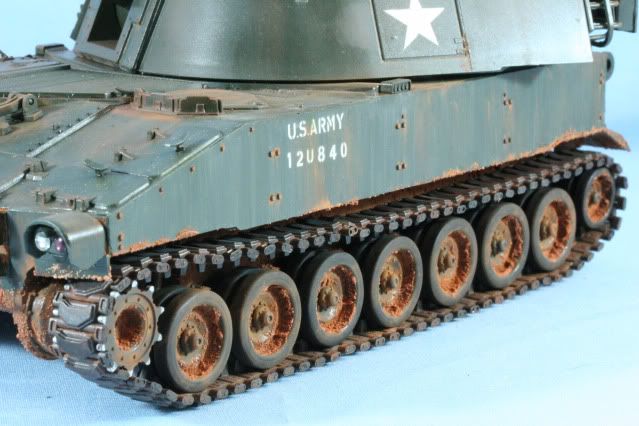
The tracks were washed with a burnt sienna wash and then dusted with MIG Viet Nam earth pigments. The road wheels received a coat of my stucco mix, mostly around the outside part of the rim where it would normally accumulate. After drying, they were dusted with MIG Viet Nam Earth pigments. The drive wheel tips were dry brushed with Alclad Steel.
After gluing the drive wheel in place, the tracks were then put on and the ideler wheel glued. Finally a light dusting with some more MIG VN Earth to make all the parts flow together.
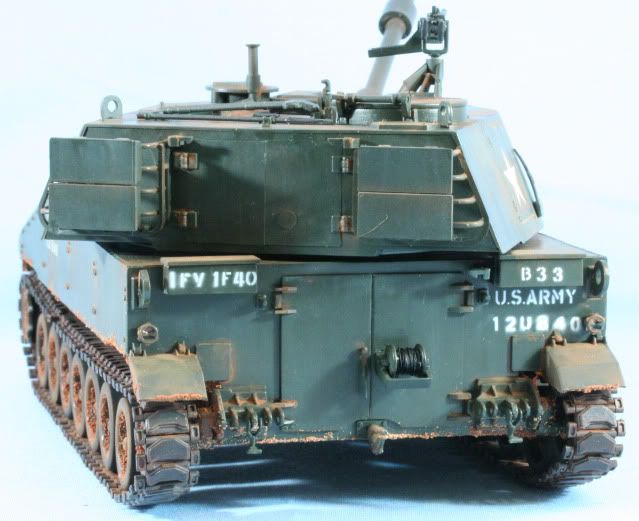
Some details on the back. You can see the tail lights done with Clear Red and Smoke. The communications wire spool was done with some painters tape to make under bulk. Then it was wrapped with 32 gauge SS wire to cover the painters tape. Then the wire bundle was painted Flat Black
I finished the turret similar to the chassis. The vertical sides was given a dot filter using White, Flesh and Green oil paint dots and stroked to create the stain effect. The top surface was given a coat of MIG Grey for Dark Green filter. Then a solution of MIG VN Earth pigment and Mineral Sprits was used for pin washing. Nest a #2 pencil was used in some high spots to create ware. Lastly some dry dusting of MIG VN Earth was used to create highlights.
I have mounted a few tools, the tripod for the M2 and the M2 itself. The last few little items to complete are some ammo cans and ammo for the M2 and adding some straps on some of the storage, otherwise it is essentially complete.
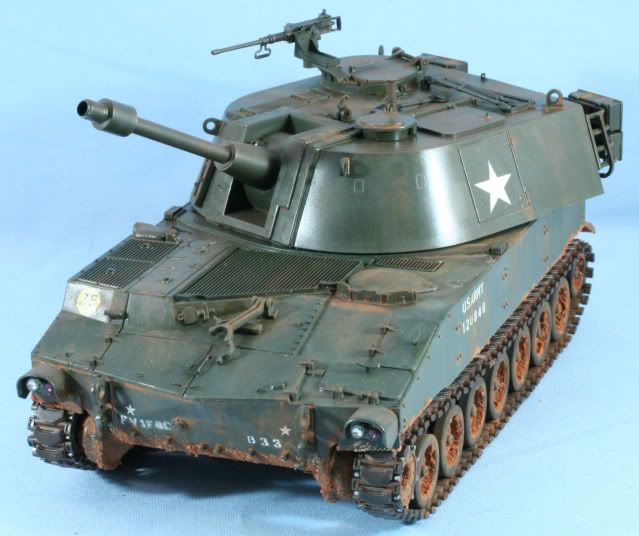
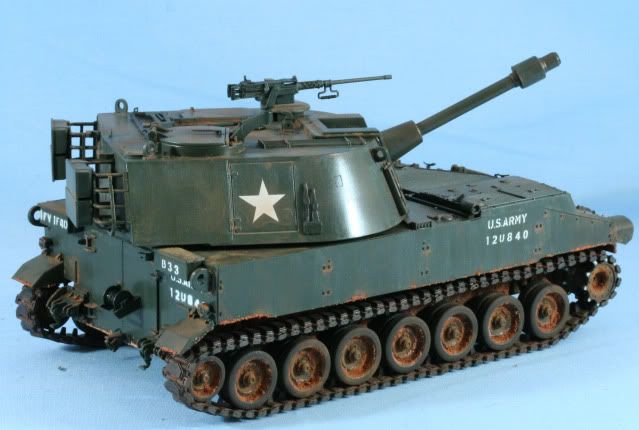
On to finishing the base for my final and next update
As always thanks for stopping by. Your comments good or bad are always appreciated.
Rounds Complete!!
Seriously cool Mike. !http://i792.photobucket.com/albums/yy205/bloody_bagheera/Smileys/blush2.gif
Of course you gotta know I luv the mud and the traces around the drivers area.
The evidence of any mods on the top of the turret are very well done.
Steve - Thanks…like you, it’s the little things that make a build [;)]
Rounds Complete!!
Nice to see someone else got some time at the bench for Mother’s Day. Looking good Mike, now on to the base! [Y]
I like it! I like it! I like it! [:D] You did an outstanding job weathering and applying pigments to your build. The soil reminded me of my days living in NC…
It looks great!!!
I just almost finished my tracks on the M48A3, I was going to do the same thing with the silver, that’s were they wear and get shinny. Right in there…A lot of the weathering was lost when I sprayed the cover coat of clear. I was like were did all that cool stuff go??? So I’ll add some on now. I didn’t want to over do it but maybe I should have if I would have known that most of it disappears with a coat of clear dull coat.
I bid on a M108 on ebay but lost it. I bid $95 and it went for $96. I just was not going to go to $100. I’ll keep trying for this and a M125.
Bill - Yep…it takes a mother to get on the bench on mother day…(actually the day before [whstl] )
Thanks for stopping by
Andy - Thanks for the love…good old red clay! [:O] Thanks again
Noah - I am sure you did that because you just enjoy weathering details sooo much you wanted to do them again [whstl]…lol. Hey, we all have done worse things…but I am sure you won’t do that again.
Thanks for stopping by
Rounds Complete!!
Just caught up to your build, and it looks great!
Looking forward to seeing it continue before I brave an M109.
Chris - Thanks, enjoy the M109, the entire series all are great kits.
Rounds Complete!!
Oooooh, nice! Looking forward to seeing this in September at AMPS! [:D]
Side query - have some questions about the M110A2…might you be the guy to ask?
OK…first thanks for the comments. Now, you will not see it at AMPS as this is a commission job and will be off to the client before then!!
As far as the M110A2, yep, by all means send me your questions. Hit me up on my email or PM!!
Great to see you come up online…have not seen you in awhile!!
Rounds Complete!!