This unit is what I’ve been using for the past few years. I’m sure by now, it cost more than $150 easy. It has a water container in it that automatically shuts off when it’s full of water. I have a huge garage, and this unit works perfectly for me.


2 Likes
I use the thinning ratios suggested by the Model Paint Solutions web site.
Primer: 60% primer, 40% MM thinner
Paints: 60% Paint, 40% MM thinner
I don’t use the MM poly mix additive. If i want an eggshell finish on the MM paints I’ll thin it with “CP30”, another MPS suggestion. CP30 is MM Clear Primer (MMS-007) diluted to 30% with 70% MM Thinner.
The resulting finish is very hard with a nice semi-gloss sheen.
CP30 also makes a great clearcoat in preparation to washes and other weathering.
1 Like
@Aggieman : Your progress on this 88 is looking good despite some of the setbacks that you’ve been having Steven. Like you, I do miss my MM acrylic line of paints. I still have a good number of them but over time they are slooooowly starting to either harden or clump and that really sucks.
I will say that I’m having a good amount of luck with the AK lineup of acrylic paints and clears. They behave pretty close to what MM acrylics through an airbrush did.
@dadoffour : That was a GREAT reference you posted up Eric. Thanks for doing that man.
Got more paint work done tonight after work. All of the RLM70/71 paint is done. I still have to redo parts of the underside with RLM65. That will finish the primary paint for this build. I don’t expect too many more hurdles, but with the way things have been going for me the last few months, I suppose I should.
1 Like
Glad you didn’t have any hiccups. You’ve been up against with painting lately.
A little bit of progress this morning before we head out for a family gathering.
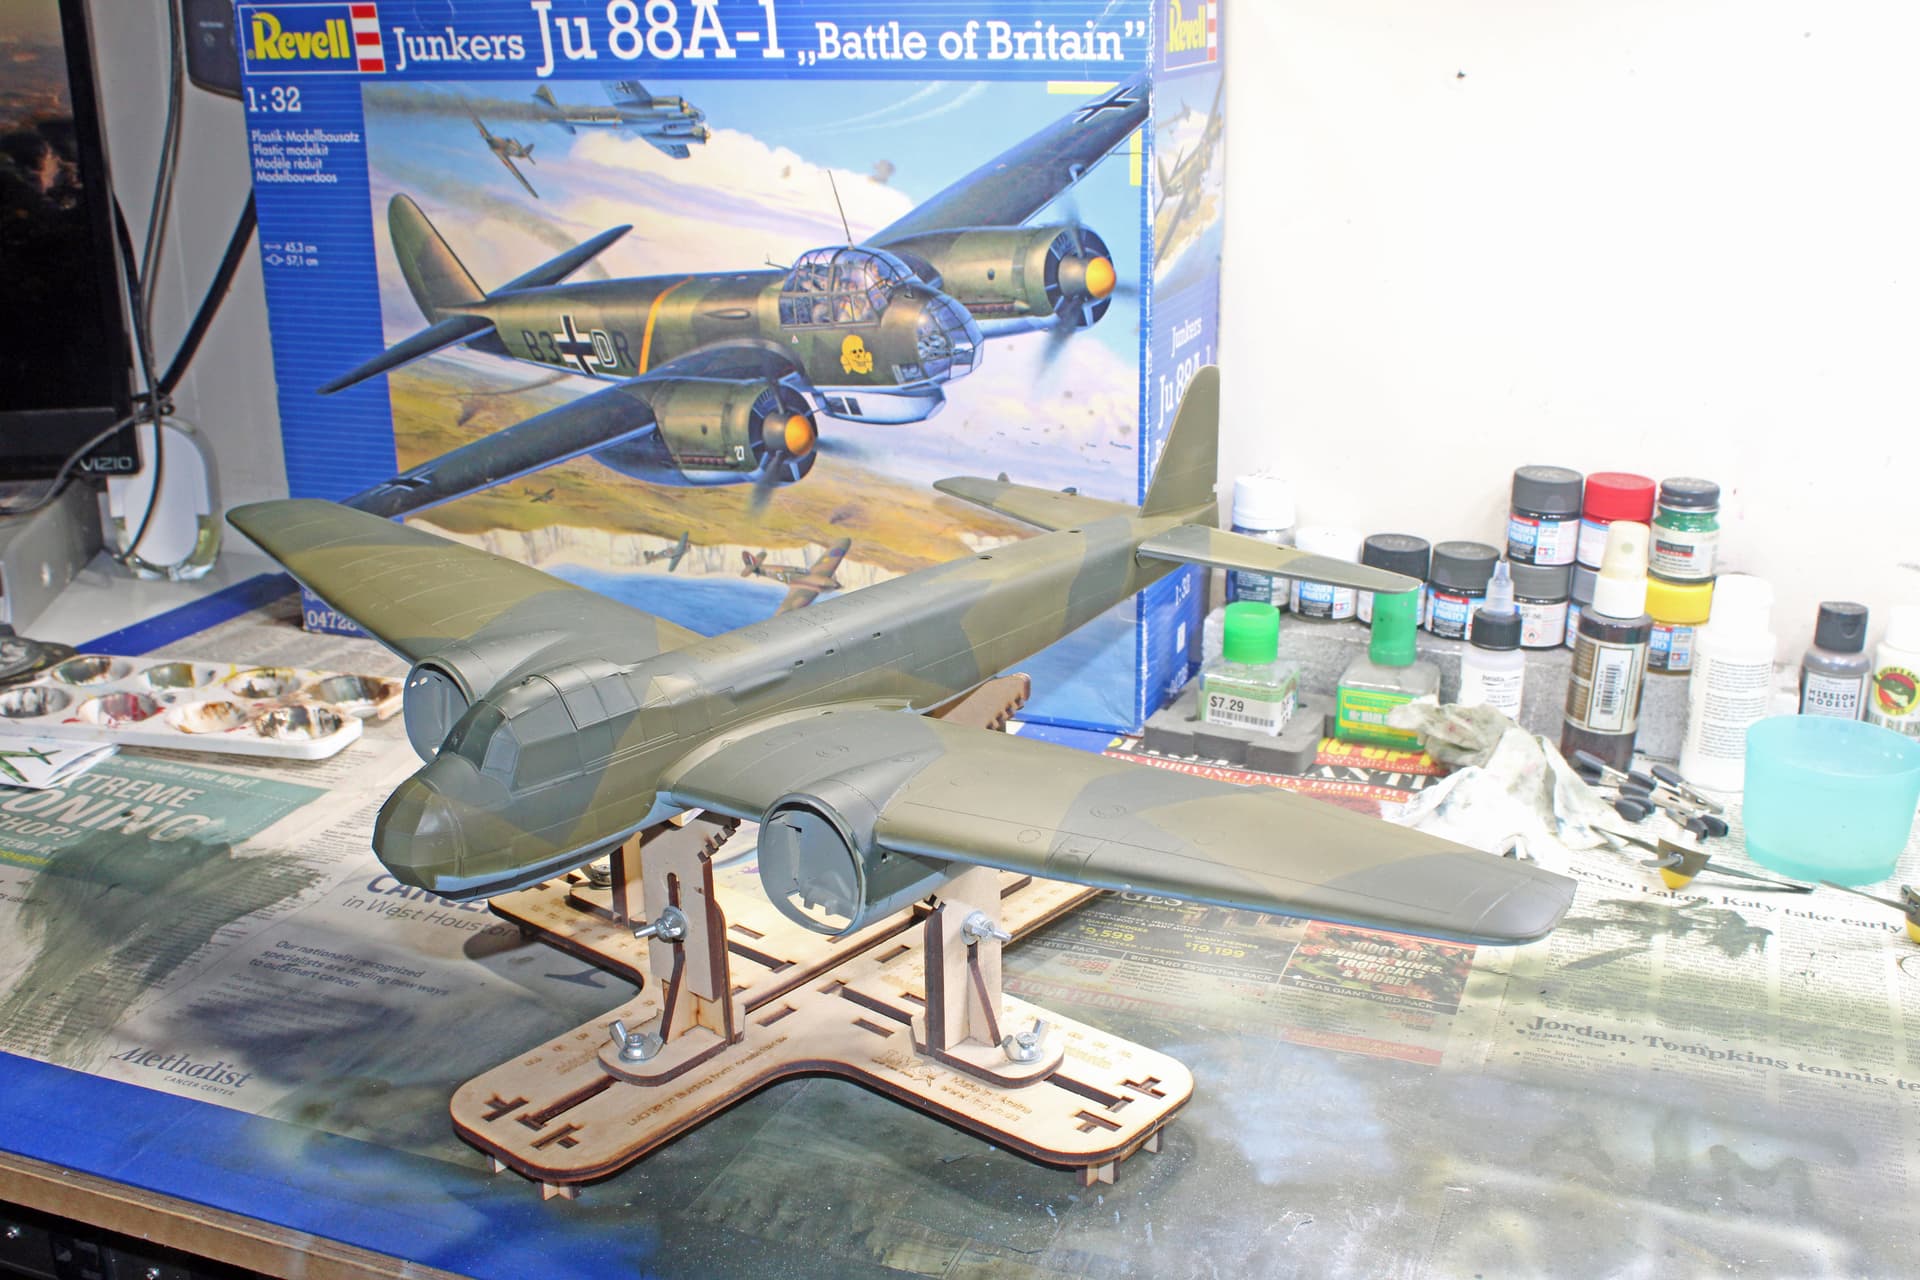


The engine nacelles are still a work in progress. I have more paint work to do with the big grills up front. There are also clear pieces that go into the round opening you see (one on each side of the both nacelles). I’ll leave those off until I get the weathering done around those exhaust stacks.
I have attached the stabilizers. The wings are only slid onto the spars but are not yet glued. My plan is to put down a gloss coat later this weekend to prepare the way for decals and weathering. It will be easier to complete the weathering with the wings not attached. I have a couple of shades of Abteilung oils that I am going to try out on this build, to effect the exhaust stains. I will use a paint mule to practice with as this will be my first effort with these oils.
Overall, I plan to keep the weathering to a minimum. Reason being, the Ju88A-1 was a new aircraft introduced during the BoB, so other than the exhaust stains and dirt on the tires, they probably weren’t terribly dirty. Maybe a little chipping in some spots, props or around access panels on the nacelles.
A word on my painting problems now. I was able to complete the exterior painting with my stash of Vallejo paints. But this was not without a lot of trouble and a smattering of choice words. It didn’t seem to matter how well I thinned them - they clogged. I also noticed that many times while squeezing paint from the bottles into my mixing cup, I would get a “snake” of paint slithering out - think coagulation is what is going on with that. Despite having used these paints successfully for years, I no longer have any trust or faith in them. I will not be using them for airbrushing going forward, but I will keep them to use with regular brushes. I did pull them out of my primary paint storage drawer, though, to keep me from picking one up by accident and going through all of this maddening trouble again.
4 Likes
Today I got started on the decal process. All of the major markings are in place. They settled down very nice under some Mr. Mark Softener. I then started work with the seemingly endless stream of stencils, but only worked on the upper inner starboard wing before my eyes started to roll into the back of my head. The instructions are pretty poorly done in this area. It was difficult to determine the correct placement of the red dashed wing walk lines. I started looking at online references, but I could only take so much of that this afternoon. And it’s not like I am in a rush to finish.
2 Likes
Looking forward to seeing the completed model. Amazing work!
I’m part of a group on Facebook called cockpit 360. Right now they’re providing 360° views from a JU88D-1/Trop. It’s pretty cool to see. Probably way too late for your current build though. Here’s the link in case anyone is interested:
1 Like
Decals are complete. They went on well, except for the wing walk decals. But even those I was able to get on mostly right, though thankfully they don’t show up brightly against the RLM70/71
Looking forward to seeing her finished. Should be great!
Gary
Today I pulled out some old paint mules to practice with the Abteilung oil’s, of which the two I have are engine grease and raw umber. Aside from a WWI biplane I did more than a decade ago, I haven’t spent much time with oils, so this is a newish thing for me. Not counting time in junior high art class when I did some oil painting (badly, I imagine).
Anyone used these before that might have some use tips on them?
What I did was to get some on the tip of an old brush and dab it into the spot where I will want it for the 88 (immediately above and below the exhaust stacks). I did this with both colors. Then I dipped a fan brush into white spirits and simply streaked at the paint until I had swept it back and diluted it sufficiently as it proceeds farther back along the fuselage. I can see how it will be way too easy to overdo this, so probably will continue practicing with less oil paint applied.
An update on my suddenly slow build:
I did a barely acceptable job with the raw umber/engine grease oil application. Then a purchase arrived that included a box set of Abteilung oils for aircraft. I added smoke to the mix for the exhaust stains. The result looks much better, but is still not quite to what I want. I know that with oils, there can be substantial drying time involved, which partially explains my suddenly slow progress. All of this oil work has been happening over the course of 2-3 days already. I did lightly touch it this morning; while it is technically dry (nothing came off on my finger), it felt cold, best way I can describe it, not tacky but probably not ready for my weathering work to continue.
I will give it another day or so. If I feel better about the condition of the oils to accept additional mediums for weathering, then I’ll proceed. I want to add some ground pastels to augment the oils. I don’t plan to dirty this one up too much. I’ve already done the tires with some ground pastels to effect dirt in the treads. I will do my standard Flory washes, and a little chipping where it would have been (but looking for photo evidence of this).
I also am considering a dot weathering approach. The set that I bought also has a green, blue, cream brown, and a couple of yellows. I’ve never done this on an airplane, but think it could knock down some of the newness of this paint work that I’ve done.
Then the problem. There’s always a problem, isn’t there? Or so it seems with me lately (cracked and not replaceable canopy on my recent Hellcat build). I am missing part B253, which is a cover (?) for the forward-firing machine gun. I have the opposite part, B252, but not this one. I am pretty sure it was in the box when I received the kit, but the kit was not new, i.e., the seller obtained it from someone’s (likely a deceased person) stash. I did check the sprues when I removed them from the protective bags. Part B252 was not on the sprue but was in the bag, and I set it aside in a parts bin as I normally do for such situations. I have cleaned my work bench but the part is not there. It’s not in the bin. It’s not in any of the bags or the box itself. I opened a parts replacement request with Revell this morning, so I am in a wait-and-see mode. My Junkers might just have to roll off the bench without that cover on the gun.
I would suggest making a sacrifice to the Black Hole Fairies. A six pack of your favorite beverage and a bag of Cheetos usually does the trick. ![]()
Gary
![]() Thanks for the morning laugh!
Thanks for the morning laugh!
1 Like
Not sure what the cover looks like but could you form a reasonable replica out of a piece of sheet styrene to lay on the ground under the plane while the mechanic works on the guns?

The brown cover (maybe not the right word) is the cover that I am referring to. It is 2 halves, of which I have one.
2 Likes
Looks like a leather boot to cover the opening, allowing the gun to be moved for sighting in on the target. Any chance you feel up to making one from scratch?
I’ve considered just making one from scratch. Possibly from a section of sprue, or even from a piece of styrofoam. I might end up doing that, depending on what I hear back from Revell.
Or even sculpt it with a bit of