1:32 Cletrac M2 Tow Tractor Build

A few years ago, I created a custom 1:48 model of the Cletrac Tow Tractor for Brian Bunger, the proprietor of the one of the best hobby shops in the USA (Scale Reproductions, Inc. - Louisville, KY). It was a decent rendition, but not perfect. The scale wasn’t big enough for my 3d printer at the time to reproduce them. Recently, Brian was contacted by a fellow in Minn. asking if someone could build him a 1:32 model. This person is fortunate enough to own a real one. He had seen a post about the one I built for Brian. Brian contacted me and my new client and I got going.

In the ensuing years I upgraded to a new Elegoo Saturn 4 Ultra. Not only is it big enough to handle the larger scale, it’s also much faster, more accurate and can produce ridiculously fine details. Some of you may be following my build thread on the New Jersey Engine Room that is really putting this machine through its paces. (Battleship New Jersey BB62 #3 Engine Room Start-to-Finish Build - #2 by Builder_2010).

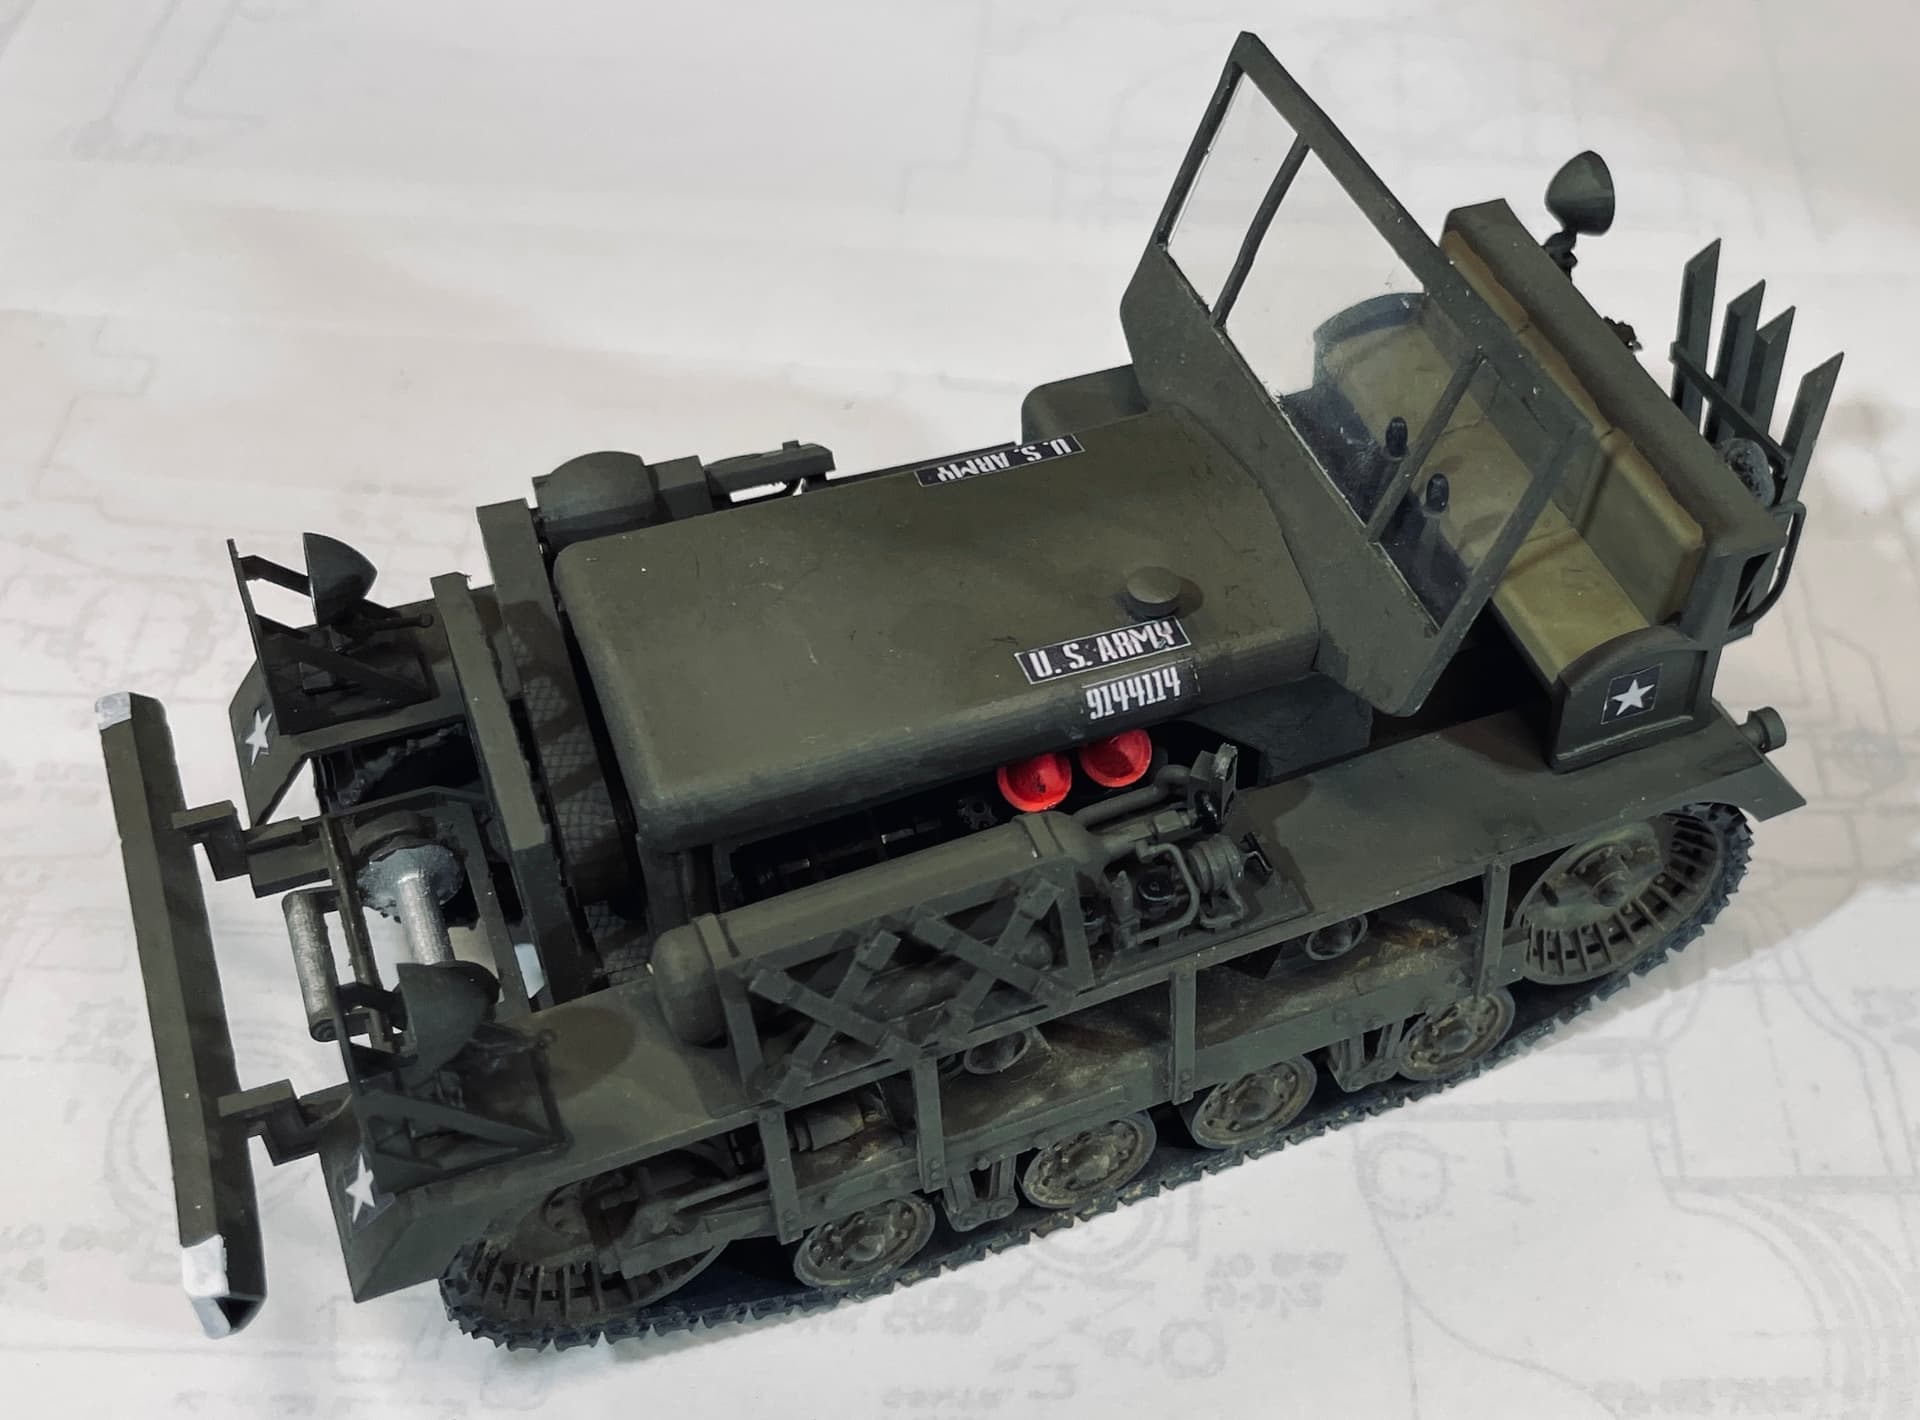
This project has come alive again. Brian Bunger (of SRI in Louisville) was contacted by a fellow who owns a real Cletrac and wants me to make a model in 1:32 for him. With the new Saturn 4 Ultra and the success I’ve been having building the Big J Engine Room #3, I changed the drawings to refine some of the coarser details. Here’s the refined drawing and some of the enhanced details. I also changed the drive and idler wheel designs based on pictures sent by the client. There are still some minor differences, but they wouldn’t have print well with them included. In the few years between the first design and this version, my SketchUp skills also improved letting me enhance the project.

Rendered in V-Ray

Screen Print out of SketchUp.

I was thinking about individual track links, but the 1:1 track is a rubber belt with cleats bolted to it. Individual links, therefore, would be untrue. I was able to draw (and will print) tracks with some corect sag in them.

I drew and was rewarded by the printer reproducing the fan and double v-belt.

Here’s the print;

I didn’t know it that would work since the fan blades are really thin. Last night I printed the entire frame with the grill guard in place and the driver’s compartment. It’s not cleaned up yet. Next up with be the entire running gear. The gear will fit the frame with integral alignment pins. All of the accessory parts will be printed in the next couple of days.

The refined brush guards as drawn:

And as printed:

Painting the headlight lens will be tricky behind the grill.

The hardest parts about printing some fine details are getting supports that are small enough (and strong enough) to help in forming the part without destroying it in the process, and trimming those supports from the part without cutting the part. That’s why for these tiny things I make a lot more than I need.

I also thinned the air hose rack tips from the 1:48 version.

With the refiinements I’ve made it should go together as a kit pretty nicely. The last iteration was not engineered as well. I will post further developments going forward. Not a lot of parts count, but that’s the 3D printing effect.

5 Likes

Interesting project. Developments will be followed by me.

Exciting… looking forward to your seeing progress on this project.

More parts done. In fact, with what’s hanging on the machine dripping excess resin, is all the parts are now printed. The running gear came out better than expected and showed that I can print good looking tracks with some droop built in. There are still some minor supports to be removed. I left these on until after post-curing along with some support nub sanding.


I had couple of minor breakouts when doing the support removal which I fixed with Bondic UV filler. First the bumper.

And another spot on the rear of the driver’s seat.

The frame with the integral grill guard worked as planned.

And the operator’s levers also worked nicely.

When I post this, I’m going downstairs and clean up the rest of the parts. Assembly, paint and decal making are left to complete.

5 Likes

Everything is printed except for the windshield (which I forgot to load). While prining this, I’m reprinting the compressor and air deck due to some minor details that printed poorly. It doesn’t add any time to add more things to print as long as they aren’t taller on the Machine than the initial parts. Tomorrow, I’ll start assembling and painting. Decals will be designed last since I need to match the background color to the paint after it’s applied. To make white decals I have to use white background inkjet decal paper. You need special equipment to print white. If I don’t match the background, I’d have to razor cut the image out of the paper. Not impossible with a simple 5-point star, but near impossible with stenciled lettering. Problem is that it takes at least 10 samples to get the colors right since inkjet color and screen color aren’t the same. It’s all trial and error.

Windshield will be done in 12 minutes.

5 Likes

Everything is successfully printed. I mounted the windshield. BTW: Broke one end of the thin frame separators on it, but I print 2. The second one was perfect. The re-printed air deck and compressor were also very fine. I added some tulle to create the screen that sits on the radiator grill guard, and painted everything. I airbrushed straight Tamiya O.D., then lightened it up with some Khaki Tan and sprayed the upper surfaces. I will go back and do some minor weathering when the paint is fully dry tomorrow and pick out the details on the running gear, engine and other apparatus.

Bridal Tulle is probably the cheapest modeling material you can ever buy. Less than $1.00 for enough to do a lot of models.

I coated the grill with accelerator then applied the tulle, pulled it tight working around it and tacked it with CA with Rubber (my new favorite CA). It cured quickly. After curing I used a brand new #11 blade and trimmed it close.

All the painting took very little time. What took all the time was cleaning out the bottles of dried paint and the airbrush suction cap.

The grill after painting looks just like I wanted it to.

I painted a large test patch of the two shades and will scan them into my computer to start the decal making process. I’ll have to match the OD in the inkjet as close as possible. I’ve had mixed results with this, but it can work.

2 Likes

I’m still wrestling with getting the OD background color correct for the white decal sheet. I thought I had it with the north window lighting upstairs in the room where the inkject printer lies, but it was not correct when I took it to the shop under the different lighting. Went back and made more changes, but then the printer ran out of cyan and yellow ink. I’ve got another cartridge coming on Monday from Amazon. OD is a tough color to match. What the scanner sees and what the printer prints IS NOT the color of the paint. I wish there was a way to fine tune the scanner at the get go so it would be closer.

Did detail painting today. The tracks look really nice and that’s without any dust weathering. I used a gray black to paint the rubber portion of the track and Tamiya Dark Iron with some added red for the metal track shoes.

I painted the seat and the details on the air deck.

I looked at some reference pics more closely and noticed that the headlight brush guards protrude forward of the fender. Then I realized that the intergral light/guard print I made would be very difficult to paint the headlight reflector surface. I separated them and reprinted. Then I tried using Molotow chrome decanted from a 2mm pen. The reflector looks terrific. I’m toying with either making a round, clear piece of styrene for a lens cover, or filling it with Bondic. Bondic is pretty clear. I made a separate test piece to try both ideas.

I had dropped the engine. I didn’t think it suffered any damage until I was starting to paint the details and saw one fan blade missing, the fan belt damaged and the power-take-off pulley was broken free of its shaft, only held by part of a fan belt. I might have let it go since seeing it will be difficult. But then I also realized that I never drew or printed the engine with a distributor. This bugged me since I printed beautiful little spark plugs. I redrew the engine with a distributor and reprinted three of them. They’re fragile. You never know what I might break next.

Everyone have a nice rest of Valentines Day and I be back on Monday.

4 Likes

This whole build is just intense @Builder_2010. I like where you’re going with this build and sorry to hear that the engine suffered the damage that it did, but it looks like you’ve got things sorted out with printing not one but three replacement engines. Will be watching for more on this one bud.

1 Like

I broke all the engines. I was using a spring tweezers to hold them for painting and no matter how I tried to position them, they kept popping out and hitting the concrete. Each time, the fan and belts got whacked. I ended up cobbling together two fans from two engines. Got it all painted an lovely, and in the model you can’t see any of this. Nada, Bubkis, Nothing. Lots of useless time wasted.

I continued fussing in CorelDraw to get that olive drab color, but still missed it. It looked red when I held it one way to the light from the window and green when I viewed it another way in the LED lighting in my computer/music/exercise room.

I had put in a clear sheet styrene window of .005", but it was a pain in the butt to get it to stat put. I was a little too conservative in my design making the rabbet groove just a bit too shallow and close to scale. It was just not enough to give a glue surface to hold the glazing. I ripped it out today and installed .015" clear styrene with (I hope) better success. That was a bit harrowing…

In fussing with the windshield, the left headlight brush guard bought it. That’s why you print extras. The extras I had were version 1s that had the headlight printed with the guard. I carefully extracted it from the assembly and sanded the floor so the separate light would fit nicely.

I painted it before attaching the headlight.

I used the best of the decals I made. Not perfect, but the buyer is happy with the work, so I won’t go crazy. I will keep working on getting the OD formula since I know I will need to do something with this in future.

I applied a bit of AK Aqua Clear Gloss where the decals were going. I was annoyed that my scaling was a bit oversized on the decals. I also tried to make decals for the few instruments there are. They too were oversized and ridiculously small, so I scrapped that idea and just painted the faces gloss black. These white background decals are a bit thick and needed both Microscale decals liquids to get them to conform.

The model is done except for some focused light airbrushing of flat to kill the shine from the decals.

The numbers are from the customers actual Cletrac.


Now to packing this for shipment.

I’m using the same scheme as is done with fine glassware. I carved a cavity out of some packing foam I had lying around. I then made a bridge that contacts ONLY the barest area of the hood, avoiding anything else. The rest of the packing supports the box flaps which will hold it all in place. I may hot glue the bridge in place from more security. The key to packing models is keep them from moving and have nothing touching delicate aspects. In this case there are delicate aspects all over the place.


It should be ready to go tomorrow or Friday depending on how well the clear coat dries and if I don’t break anything else.

3 Likes

That turned out really well!

Thanks! It actually exceeded my expectations. it’s finished and shipped. All I had to do today was protect the transparent parts and sprayed some Tamiya flat clear on yesterday’s decals. Here are the final shots.


Work continues on the engine room. If you aren’t following, please go here:

4 Likes

Your builds always amaze me.

1 Like