Okee dokee folks. I’m still working on the Ta-152 and am taking my sweet time with it to make sure that it turns out just the way I want it as well as not to rush something that I’ve spent the last 11 months building. In order to keep the urge to rush to the finish line down, I’m going to start a side build just to actually complete something for the year. A few weeks ago I had a friend of mine complete one of these and it inspired me to buy one and give one a go myself.
I will be replacing the wheels and tires with something of my own choosing and adding a couple of things here and there to make things a little more interesting. I have a set of Tru Wire wheel/ tire assembly’s that I have been chompin’ at the bit to find a project for and this one looks like the ticket.
The kit:
1 Like
Excellent! Hope to see Tim Boyd stop in and check this build out.
1 Like
Thanks Tim! Would love to see that guy around. Has he made it back yet?
Funny thing about this kit is that Testors markets it as Ultra Detail. The only thing Ultra Detail about it is the pre-wired distributor for the engine.
Those of you who know me, know that I can’t leave well enough alone…even for a pre-painted kit. For starters, I had to do something with the wheel and tire arrangement on this. This is not to say that the ones that came in the kit were all that bad BUT…I’ve been itchin’ for an opportunity to use some wheels and tires that I’ve had in the parts stash for such an occasion. The wire wheels included in the kit are among the best I’ve seen in plastic, and I will keep them around for a future build. What’s really going to help throw this build over the top is the use of Tru Wires from Minicurtr8zing.
A quick side by side comparison will show that the kit wheels aren’t all that bad but these Tru Wires are definitely “all that”.
Rear wheels in the kit were a Cragar SS design but I had something more in mind. I got these from Teds Modeling Marketplace and these IMO are the best wheels anywhere in being aluminum and PE.
I also had a set of 1/25 tires in the parts stash that these will fit perfectly in.
2 Likes
I also didn’t like the rather predominant seam going right down the middle of the oil pan as well as the top and bottom of the transmission, so I glued the engine halves together instead of using the screw supplied in the kit to join the halves. Then I busted out with the sanding sticks and went to work removing all seams and primed everything in black.
Started here with the pre-painted long block freshly sanded with all seams and sprue joins removed. It was a shame to remove all of the pre-painted orange from the block but I think I’ve got just the right shade of orange to go right back on.
Then black based everything. No more seam lines! 
And shot the engine color right back on.
2 Likes
Thanks John! This is actually a fun little build and the wheels were the perfect choice for me on it.
Here’s after a couple of touch ups with some Tamiya Smoke applications over the kit chrome, painting a few details on the engine and adding some eye candy like a lettering decal on the blower drive belt and an AC Delco decal on the oil filter. I also spent some time picking out some of the details on the drive belt pulleys. I’ve still got some things to do in the clean-up department. Believe it or not, this kit comes with a prewired distributor and blued chrome for the headers right there in the box. Pretty cool feature and I’ll be adding that coming up next.


3 Likes
Here’s with the radiator hoses, headers & piping and the distributor and wiring installed, routed and hooked up.
Been working on the interior and since interiors are one of my favorite parts of any auto build, I’m having a tad bit of fun with it. I got the floor painted a different color than the gray that it was, touched up all of the accelerator, brake and clutch pedals with a little additional paint work, cut the shift lever from the floor rubber boot and am fabricating my own from a bobby pin with a black “shifter knob” on it and am currently working on the instrument panel.
The IP, which is nothing more than a instrument panel bezel pressed onto the chrome gauges…simply aint going to do it.
I sanded the chrome instrument panel gauges down pretty close to the base of the IP backing plate. I’ll either be painting the backing plate red or re-chroming it for some contrast.
and will cut gauges from this decal sheet in my stash to the back of the bezel for a LOT better detail.
Stay tuned…there’ll be some “fun” stuff going into the interior. 
2 Likes
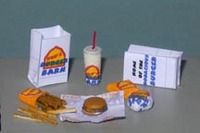
Here’s some of the “fun” that I was talking about. I had a bobby pin to replace the chrome plated bulky and clunky shift lever that I sanded the black “shifter knob” smooth and painted the “8 ball” number onto. I also had a Bob’s Burger Barn bag kit and built the bag up this morning and glued that into place. I’m currently waiting on a set of 1/24 scale soda cans so I can put a Coke beside the bag in the seat.


4 Likes
That’s awesome nice job! Just for fun I did a search for this kit, not a whole lot of them out there it looks like.
1 Like
There are still a few @Demolition . I got two of 'em off of ebay and gave one to a friend for Christmas just this past month. There’s several of them on ebay right now: Testors T-Bucket
I just might have to grab one next payday. Looks like a fun build so far. Thanks for the link to that bud.
1 Like
You’re quite welcome Demo. They aren’t a bad build really but I will say a different set of wheels and tires goes a LONG way on the look of these kits.
1 Like
I bought a hole punch from Micro-Mark that helped out a LOT with cutting the gauges out. Here’s after gluing them on the back of the bezel. MUCH better now!! Just a couple of rounds of Future to go in the gauge faces and this part will be done.

2 Likes
Short build at only 5 weeks but I managed to squeak this one under the wire. This one has its problems, but it did go together fairly easily. Even being painted up already it still took me the better part of 5 weeks to finish this one. Most of it was me adding details where I thought it would benefit the car the most. The addition of the aluminum Tru-Wires from Miniscurtr8zing up front and the aluminum Weld Aluma Star wheels from Futurattraction out back were the biggest improvements. Most of the other additions were subtle but made the car more enjoyable to build which was stuff like the Bob’s Burger Barn bag from Scale Modeling Equipment and the Coca-Cola can from AK in the seat, bobby pin with “8-ball” pained up shifter knob for a shifter lever and some details picked out on the engine like the AC Declo decal on the oil filter, belt part number scripts on the blower belt and starter painted up and detailed out.
If you’re looking for a fun build where you only have to add a few choice extras to make it “pop” then this little kit is the hot ticket. Aside from a few minor issues to contend with, this thing was a complete BLAST to build.
The Kit:

Accessories used to make this build happen:
AC Delco Decal for oil filter and scripts for belt part number on blower drive belt.


Tru Wire Spoke Wheels & Tires from Miniscurtr8zing: (kit wheels in foreground in R/H photo)


AlumaStar Aluminum Wheels from Futurattraction (tires from AMT 66 Nova kit)


Lugnuts & Studs for rear wheels from Spot Model and gauge decals from Gofer Decals


and finally Bob’s Burger Barn Bag from Scale Equipment Ltd (if you want any of these you’d better order quick because SEL is closing for good) and Soda can from AK


6 Likes
That’s incredible. Those wheels in particular take this thing to the next level, and the extra fun details you added are the icing on top. Awesome work!
1 Like
‘Preciate that Tom. I’d been just itchin’ to use those TruWires on something and this was the perfect ride for them.
1 Like
[quote=“Demolition, post:19, topic:372551, full:true”]
That’s cool, nice job!
[/quote] Thanks Demo and this was definitely a fun build. There were a couple of hang ups that I didn’t much care for like the windscreen framing looking like a house window frame. The one that is on this car is after I shaved some off of the outside of all edges and it STILL looks oversized.


