WWII Warbird Build (B-17G)

Hi, new to the forum here. I figured I would make a thread of my builds. I have built many plastic models but now I want to take my modeling to the next level. I will be starting with an Academy 1/72 B-17G that will be done as “Little Miss Mischief” and will be my first model to have “weathering” so any tips welcome. I have been reading the group B-17 build and you guys have pure talent!! After I complete the 1/72 scale I will build a Revell 1/48 B-17G and P-38 Lightning. I found a few pictures already of “Little Miss Mischief” but if anyone has more in large pictures I would greatly appreciate them if you have any. I am fortunate to live down the street of where the well know B-17G “Sentimental Journey” is stationed and go alot to just look and take pictures of it once or everyother week. I am also using the Squadron Signal books walkaround and in action as some more reference in my builds.

My first major thing is I do not have an airbrush kit as I shoot paint from rattle can or brush and I want to know which rattle can paint best simulates bare aluminum?

Anyway great builds and I will be learning from the great “B-17 Group Build” Thread!

Howdy… Und Welkommen…

Krylon Premium Silver Foil Metallic…

It’s the brightest, most reflective rattle-can paint I’ve ever seen… About 5.50 for an 8oz can at Hobby Lobby… Look in the rear of the store, where the craft paints are located, not the hobby and model paint area…

After you shoot it, let it sit for 48 hours and you can handle it without any “silver” coming off on your fingers…

Thanks for the heads up, I did an image search of what that paint looks like and it lookslike what iWa Im looking for!

Story behind the different colored tail is when it was it by flak by the ball turret the tail was replaced from another B-17 thus giving it a different color…

Well Shot the paint on there and now I realize that this model has very little detail and the paint doesnt like to show it. Now I have cleaned the model like normal before painting and the paint sprayed fine but while drying gave the model a “used” effect if you want to call it that of it seeing a little action as where its not a fresh off the show room floor look. Seeing as I want it to look a little used with some slight weathering and this is the first time using this kind of paint, and I know this model build will not compare to that of those in the 1/48 scale builds. Live and learn!

Before:

After:

**Update: here is a better shot, only downfall right now is this kit doesnt show detail very well from the get go (which is why I prefer the Revell B-17 model) and this paint choice looks great in person but my iPhone 3mp camera is not doing any justice since it just reflects alot of light.

(I know I forgot to cut out the waist gunner on the right fuselage half, will be fixed.)

After the paint is fully cure as per Hans von Hammers instructions I will be painting the interior as from the photos I have of Sentimental Journey. Once I get the decals I ordered I will post the pictures up of that too.

Question I have is how would I weather this kind of finish?? I want the usual exhaust staining and oil, but since the real Sentimental Journey is kept clean all of the time its hard to gauge weathering on bare aluminum. Now with Little Miss Mischief, it is painted aft of the radio room on the outside in normal olive drab or green.

Let the madness begin…

*****After comparing this model (Academy) with Revell’s version of the 1/72 I find that Academy lacks much detail compared to Revell (which from now on I will stick with Revell like I have from the past) and makes me a little dissatisfied with this kits potential (even though I am no where near skilled as most of you). But I will continue on and learn techniques with this kit and try to make it as best I can. The panel lines were shallow to begin with, the flight controls are not textured with fabric like on the other model. The interior has no detail at all, very little at most. So stating all that if you are looking to make a highly detailed 1/72 scale go with Revell or if you do use this same kit, be a better skilled modeler than me, lol!

While waiting for the paint to cure on the 1/72 I started painting on the 1/48, it too will be done as Little Miss Mischief:

Ordered the decal set today for 1/48 scale, will post pictures of that too!

After Painting the 1/48 the details are perfect and looking really good! Picture not doing this justice, once I get a new memory stick for my camera I will show the better pictures. Thanks again to Hans von Hammer for the paint tip!

Gosh, I wish you’d said that you were gonna shoot it this early, I’d have stopped you… You’re going to have all kinds of problems with the joints… They, plus every little glue-smear, knick, cut, and scratch will show up like a turd in a puch-bowl…

Make double sure you’ve removed all traces of the paint from the mating surfaces…

Slow down a bit… Maybe we can save those birds…

It should be fine, I have to have each part painted before I assemble and then touch up little imperfections (mask off affected area after clean up and spray a small section). I use little glue as I learned about the turds that develop from the joints, let alone the “flak” damage when using too much glue. The 1/72 interior fuselage is already painted now I’m going to work on the components for the interior. I see alot of you paint the exterior after assembly of most components. What would you suggest? I’m used to painting one piece at a time and then assemble the model. Is the way most of you do it, give it that top notch realistic look? Again the 1/72 model barely has any detail so its going to be my practice for weathering along with all the spare parts that dont even belong to that kit I want to practice weathering on. I tried a few times to do major painting last and everytime it turned into a mess. Again I’m still learning to paint realism instead of what the picture shows on the side of the box.

It’s always best to paint the exterior after assembly, ESPECIALLY with metallics… See metalics, buffing and non-buffing metalizers, which are used to recreate an unpainted aircraft in an NMF (AKA Natural Metal Finish), magnify every little imperfection and nick, cut, scratch, and seam-crack about a hundred times, it seems…

By painting the exterior after assembly, you can do all the filling and sanding needed prior to painting in order to get the best, smoothest finish… “Mess” or not, you won’t get what you’re after painting the exterior prior to assembly… What you’ll have to learn is using proper masking materials and their uses, how different types of paint act, alone and with each other, whether they come from a can or an airbrush, weathering techniques (washes, pin-washes, filters, dry-brushing, chipping, fading, etc.) and materials (paint, pencil, powder,and pastel)

Many of us started out by brush-painting, only after that became old- hat did we move on to spraying with rattle-cans and airbrushing… It’s a crawl-walk-run process… BTW, don’t think that some stunning results can’t be had with a brush… I’ve won awards with brush-painted aircraft and armor… There’s as much science as art in brush-painting…

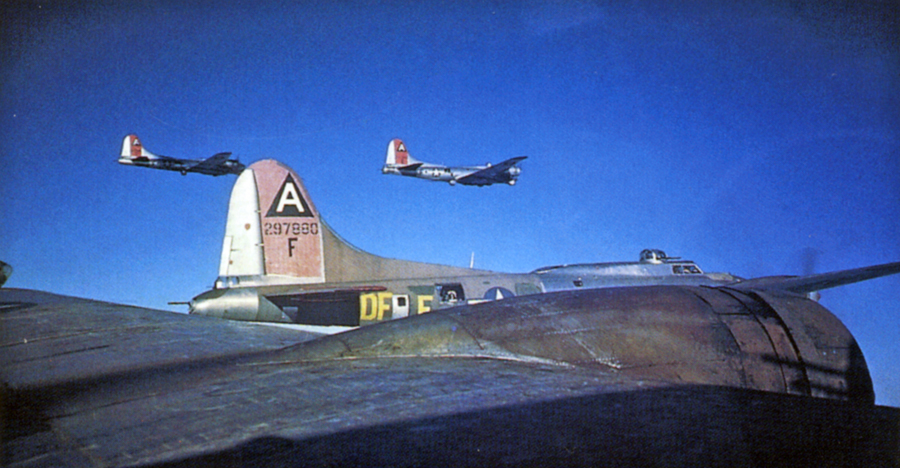
It takes a lot of work to get a great NMF, and there are certain things one MUST to do to acheive it, and it’s not negotiable (but there ARE shortcuts, like painting with metallic silver then shooting it with clear flat to represent a weathered, oxidized aluminum)… Now, if you’re doing a finish that’s representing an aluminum-painted surface, it’s easier… Many aircraft, which may look unpainted, are in fact, painted with aluminum laquer… Pre-WW2 US Navy aircraft are good examples of this practice… Study photos of the real things.

Rather than go into all that it takes to accomplish a good NMF in this thread, I suggest you look into this thread…

/forums/t/127602.aspx?PageIndex=1

In it ,you’ll find about everything you’ll ever want to know (and more) about doing a “silver bird”… Also, Aaron wrote an article that’s a must read on painting highly reflective NMFs in the latest issue of the magazine…

Also…

/forums/p/133276/1361068.aspx#1361068

is another Group Build you’ll want to take a look at…It covers all kinds of weathering tecniques, both for armor and aircraft, which are quite different, as the techniques used for armor are usually a bit too heavy-handed for aircraft, since Armor get filthy, airplanes merely get dirty…

Also, one last thing… Use the whole forum, not just the Aircraft fourm… Check the Painting Forum for weathering tips and techniques, various painting tips and techniques, and masking materials… Use the Search Function, located at the right side of the screen, about 1/2 to 3/4 down the page, under “Search Our Community” for specifics stuff, using good keywords… Don’t type into the search box, for instance, just “NMF”, but rather, “NMF with Enamels” or “What Metallics to use for best NMF?” You get more to look at that way, and then you can narrow it down to special or specific questions for forum members… And if you don’t understand somethig, try using the glossary at the top of the page… Hold you cursor over the “HOW TO” and it will drop down. Use the Articles and Tips Database too. They’re located there as well…

But we’ll try to save that 1/48th B-17G for ya… But there won’t be any saving the finish… That’s a goner…

But it’ll serve as an undercoat for now, just get all the paint off the mating surfaces…

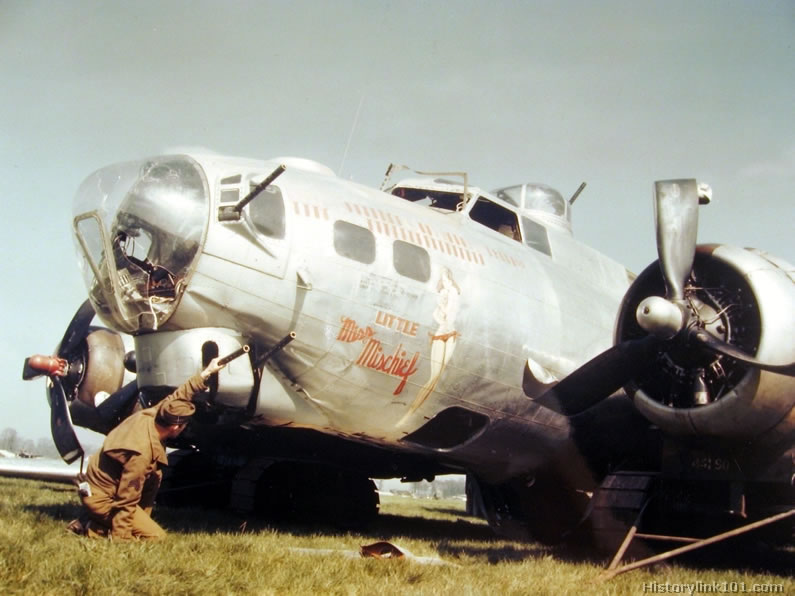
Since you’re doing “Little Miss Mischief”, it’s OK to have the silver foil inside, as she was unpainted in the fuselage from aft of the flight deck… Start work on the flight deck first… And you might want to consder starting your build-log in here:

/forums/t/105108.aspx?PageIndex=1

All the refs, techniques, and materials, are already in this thread, so it’s handy for you to look in that thread for help… Even some photos of “Little Miss M” are in there…

for “weathering” an aluminum finish i just try to take high-traffic areas (walkways, electircal/hydraulics access, etc) and try to “scuff” tha erea, i tend to go a bit overboard with mine, but otherwise just the basic exhaust and oil streaks work pretty well. i cant believe how good that paint looks out of a rattle can, i know guys that cant get a sheen like that with a good airbrush (i still remain confident that its the operator, not the airbrush). looksgood so far, but as previously mentioned it is alot easier to paint aircraft in metal after assembly. it isnt nearly as forgiving as OD or grey colors.

Keep in mind that aluminum oxidizes as it weathers, and takes on a chalky look… That means it doesn’t stay shiny very long as long as it’s exposed to the elements… Dulls down to “flat silver” pretty fast, especially in the Western European climate, like the Fort would be exposed to… In fact, rubbing on a weathered aluminum panel will leave a white residue on your fingers…

Thanks for the very informative tips! Good thing I only sprayed a base coat on the 1/48… [:O] I figured I would respray it again because I only had enough paint for the first coat, so I will save can #2 for final spray. The 1/72 has all of its coats done and has about 12 hours till fully cured according to your guideline. I am learning alot from your tips, and the paint you reccomended works extremely well. So I figure now when it does come time to really start that model start from the inside out and do what you said to do. Thanks again, its help like this that will really make my models look better than the picture on the side of the box! I will just stick to the 1/72 to be my practice of weathering on bare metal finish before I take on the 1/48. Thanks again Hans von Hammer and TheWildChild for your guidance!

All the fabric surfaces will be a brighter silver than the aluminum because they are doped.

I like Testors Chrome too.

You can always do another paint coat or two after assembly.

I like the Academy forts ok, they have less overdone detail than the Revell ones. Also they go together better.

BTW how are you going to get rid of the inaccurate recessed panel lines? That always screws me up…

From what I see on Sentimental Journey the flight controls are grey in color and since thats where Im getting most of my reference from due to limited pictures of pre-flak damaged/tail transplant, Im using that plane as my guide. So these two B-17 models will both be done the same theme. The Academy model is ok but like you said the panel lines are a disapointment to me… Im just going to live with it, gottan learn techniques somewhere on some model so it will be this one. I was planning on putting thie 1/72 in my daughters room hangine from the ceiling with gear up, bombay doors down with bombs departing. But that part might change. But first thing on the list is to get some different paint for the interior that will match better, see if I can still get the Tamiya paint I bought years, years ago that I used to use.

!(http://img.photobucket.com/albums/v233/HansvonHammer/Aircraft Profiles/B-17/SentJournstabs.jpg)

Don’t, if you want to model an accurate WW2 Fort… SJ’s control surfaces are metal-skinned, not fabric… They’re not grey either, that’s just the look they take on when they’re slightly deflected from the rest of the stabilizer…

This photo might help you with the patterns and locations of exhaust and oil stains of an in-flight B-17…

!(http://img.photobucket.com/albums/v233/HansvonHammer/Aircraft Profiles/B-17/B17underside.jpg)

!(http://img.photobucket.com/albums/v233/HansvonHammer/Aircraft Profiles/B-17/B-17Explodedview.jpg)

Here’s an interior shot, looking forward towards the open radio room door of Little Miss Mischief after she took the flak-hit that necessitated the replacement of her rear fuselage… Note it’s unpainted, and that the ball turret and it’s hanger have been removed…

Here’s the exterior…

My only modeling experience was back in the 60’s and 70’s with hot rod models. After 40 years off I’m now starting again with airplanes. I have a Revell 1/48th B-17G in a box that I’ll be starting next year, so I will be following your posts carefully. Please keep them coming for “old beginners” like me.

Yeah the last time I did an airplane was about 10 years ago and it was a Mig-29 (one of the few jets I did) then went through building cars (which is why I’m used to making things look new). Thanks agains Hans for the pics! I am headed off to the store to go pick up that good ol paint I used to use back in my airplane days for interior and details. I cant wait to be at the point of the build where I learn weathering. Thanks to academy for supplying the kit with far extra pieces that are not used in this kit to practice first, till then just have to take it slow and make this one look good before I go after the 1/48 (even though it is very tempting to just work on that one)

Hope you remember that Tamiya ain’t worth a damn for brush-painting… Airbrushes well, but brush? Nope… It lifts itself off with every pass of the bristles over bare plastic, and if you prime the parts, even then it’ll lift after a couple of passes…

You’re much better off with Testor’s Model Master acrylics or (my favorite) enamels… Price is about the same…

Cotton, welcome to the forums, and don’t forget to take a look at the threads I linked to on the previous page for B-17 advice and tips, as well as some outstanding work by other members here…