Frankly, I wouldn’t know how to apply a wash - the way I understand this - with an airbrush.
A wash is made with heavily thinned paint, preferably applied on a smooth surface (future or gloss paint), with a brush. The paint then flows into gaps and along engravings.
Using an airbrush would (probably) lead to a thin coat all over the model, not accentuating any detail, as the wash needs some ‘volume’ to make it flow along the detailed surface.
Usually black, or a Revell 9, or a darker color than the base coat will do the trick. Overthink what effect you want to accomplish. If you base coat would be white, using black to put on a heavy wash, in my o so very humble opinion, it will turn out to be a cartoonlike model. When you don’t use enough contrast, it will keep it’s plastic or fresh-from-the-factory look.
So: my advise would be: be gentle: you can alwasy put another wash on your previous washes. Well done on starting with the gloss coat!
First, never, I mean NEVER apply an overall wash. That’s a surefire way to ruin your paint scheme and decals. Think you’re going to wipe off the excess? You’re going to smear the wash and absorb the stuff in the crevaces.
Paint thin enough to be a wash is going to spider if shot from an airbrush and ruin your paint an decals. Plus it will dry even faster than when applied by brush. In short, do this and you’re (choose your explitive)ed.
Apply the wash at the base of raised details, in panel lines and where two surfaces meet with a fine brush and allow capillary action to draw the wash out. Don’t scrub or drag your brush over the model. The solvent can weaken the base coat and make an unholy mess.
For your darkened olive drab you could try a sand colored wash. Kind of a reverse wash. Test it first on the underside to see if it shows up.
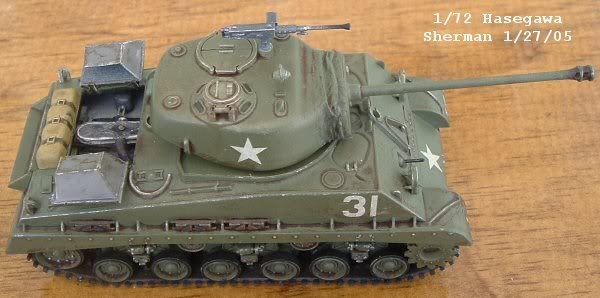
Here is a Sherman with artists oil paint wash. Burnt umber on faded olive drab. Brush applied overall and then applied again around the raised details. I allowed it to pool in some areas because thats what I wanted and it collected around all the edges nicely.
an airbrush will just blow the mix all over the place.
This thread seems to have these three things confused: 1.wash 2.drybrushing and 3.weathering. They are different methods with different purposes. So, you’ve got to know the end result of all of them before you decide which one(s) to do.
On armor, or really filthy aircraft, a wash over the whole model is fine to both accentuate recesses and to show the accumulation of dirt and grime on the surface. If you don’t want that overall grimy look, then you might want to avoid an overall wash.
Personally, I always brush-wash the whole thing (talking armor here) with a dark ‘n’ nasty “sludge wash.” Wiping it off is part of the technique, as you can recreate realistic rain streaks and other grunge effects. The one thing to be careful of is pooling, which can lead to unrealistic effects (or realistic effects, depending on how you manipulate the flow) as the wash dries.
Also, to get the grungy, dusty effect I like, I apply the wash over a flat finish, rather than glossy (which most people seem to prefer, particularly for aircraft). I also use acrylic enamels for my washes.
I would avoid using an airbrush, for the reasons eloquently stated above. But who knows, you might come up with a technique you like!