I’ve already seen where Kittyhawk went out of business and rebranded as Trumpeter or into the trumpeter family. If any or all of this is wrong, blame it on spot checking articles in a google search. Anyway, I saw a video on YouTube showing the KittyHawk UH-1D being built. In that video it showed a box of 3 crew members, two pilots and a Chief/Gunner. It also showed a mounted M-60. I have no idea if the 60 is part of the model kit, or part of the crew kit. I am trying to find out who sells that crew kit and while we are at it, has anyone out there put that UH-1 together? If so, is it as cool in real life as it is in the video. It’s the first kit I’ve seen that has the cabin and cockpit separate from the tail section when it comes to the fuselage pieces. It also has a set of photo etched? pieces. Probably got that wrong. Any information from my more experienced colleagues is greatly appreciated. Any review of the model is even more appreciated.
A lot of questions at once 
First of all, the KittyHawk moulds are bought by Zimi Models - yes, the company who also bought most molds from Dragon - and the kits are still sold under the KittyHawk label. I bought a few later examples and the only difference was a Zimi Model label on the PE fret and decal sheet instead of KittyHawk.
Regarding your other questions: Scalemates is the modellers friend! Here you get most informations you need - a copy of the instructions, a great selection of aftermarket for the kit, kit reviews and much more. Have a look here
https://www.scalemates.com/kits/kitty-hawk-kh80154-uh-1d-huey--1069135
I have built one of these and can only highly recommend to get it - if you want to build a 1/48 Huey - rather than the Italeri, which is crap to be honest! The instructions are of KittyHawk better ones, only a few errors. I should have done research beforehand, some equipment on the roof etc are from later versions - my fault! The numbers for the handles next to the windshield are mixed up, the one for the right is the left side and vis-versa. There is one more, but can not remember what it was 
Here is my finished model, I hope you like to see it!
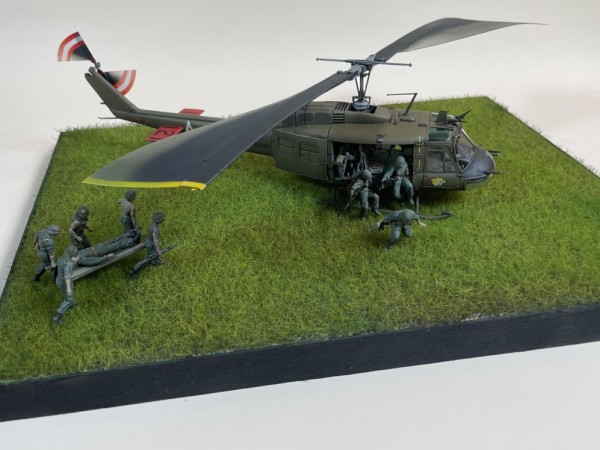
The figures I bought from Germania Figuren - or the stl-files I should say - and printed them in 1/48 scale. Very happy of how all came together. The pilots do not touch anything, but this is not really noticable, and the door gunner needed a little fettling to get him to fit nicely. For the main rotor I want to try a different solution next time!
I hope this answers most of your questions 
That’s a lot of really useful information. Thanks!
And yes, I definitely like seeing your finished Huey. That’s exactly the kind of result I’m hoping for. I really like having the crew in there—it adds a lot of life to the helicopter.
I’m especially interested in the Germania Figuren files now. As you know from my other thread, I’m currently trying to figure out the whole STL/3D-printing world for the crew on my 1/48 Little Bird, so apparently I’m going to have to go take a look at what else Germania has available. 
One other thing really caught my attention in your photos. What did you do with the rotors to get that spinning/blurring effect? That’s really convincing, and I’d love to know how you did it.
Good to know about the Kitty Hawk kit too. I’ve been picking up several of their 1/48 helicopters, so knowing that Zimi has the molds and they’re still being produced takes a little of the urgency out of grabbing them whenever I see one.
Thanks for taking the time to answer all those questions!
Absolutely. Great information, thanks for the link. I’ll check it out once I finish this reply.
You mentioned “research”. I have tried to research various models, ask questions, via an AI software I use from time to time, but in regards to models, all it could tell me was, “no, the figures you mention are not part of the model”. Good to know, but you’d have thought it would have mentioned scalemates, like you did. In my case, research is done through YouTube, and through, as I called you in the inaugural post, my colleagues on the forum. Thanks to you, I now know that those windows are swapped where the numbers are concerned, and will look for it. I also know that some parts are from older sets, or that’s what I gathered from your reply, and that there is one other issue you couldn’t remember.
This is exactly why I joined the forum. It’s important for me to know this kind of stuff, so I can have any chance of building my models with knowledge instead of winging it and having no idea how to “fix that factory issue.” I watched all 7 parts of a build for the UH-1D Huey Gunship, and even though I was in the Army, never knew that the UH-1D or H was never used as a “Gunship” in Vietnam. B. C and M were Gunships, while D was mostly Troop and Medevac with crew mounted 60’s. I also learned that there are all kinds of factory mold issues that had to be attended to in order to have any chance of a successful cosmetic build, as well as making parts fit. I learned the seats are way off accurate, and watching this guy scratch build the pilots seats back to accurate was amazing, and then he scratch built troop and gunner seats. Now I know what “scratch build” means.
I may be 61, but in model years, I’m 12.
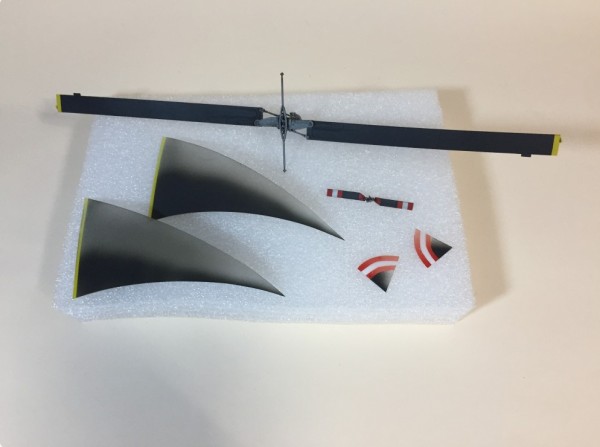
The rotor effect was done from clear acetat. I bought a roll of this stuff, but you can also use a suitable piece of packaging material.
All you have to do is to paint the blurring effect with your airbrush … I think this work-in-progress photo says more than thousand words
Like with every other kit, dry-fitting is essential. You notice very fast when something does not work the way the instructions are showing you. Like the handles I mentioned (green circle)
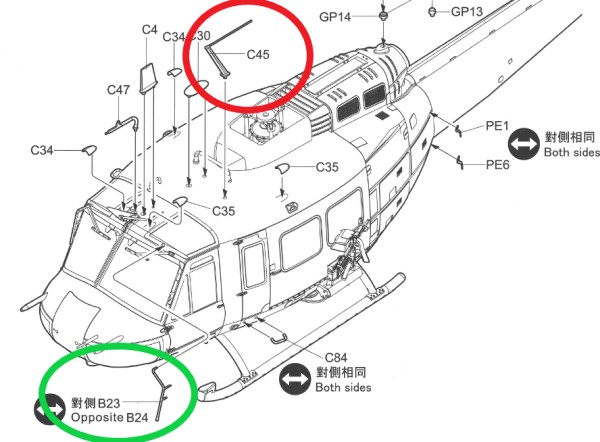
Another issue with the instructions is, it does not say “Do not do this when you build the D version”. It says drill a hole and put on part C45 - just one example. Afterwards I noticed the UH-1D never had this antenna, or whatever it is!
But the main thing is, I really enjoyed building this model! In the end its a hobby, a fantastic hobby in my opinion, it does not matter if you are a master-modeller, beginner or something in between - enjoy what you are doing.
I am building a second KittyHawk Huey in the near future, this time a German SAR. For sure I will have photos next to me when I am building it - that is what I have learned from this build!
That’s really interesting. I never would have guessed that’s how you did it.
You know, you should sell those! That’s a really convincing effect, and I have to think there are plenty of helicopter modelers who would love to have something like that without having to figure out how to make it themselves.
I’ve never really liked the solid discs that are sometimes used to represent spinning rotors or propellers. What I like about yours is that you still get the impression of movement without looking like there’s a solid piece of plastic sitting over the helicopter. That’s a pretty clever solution.
I’m definitely filing this idea away for one of my helicopter builds. Thanks for showing me how you did it!
And if you ever do decide to sell them, let me know. I’ve got several helicopter kits in the queue.
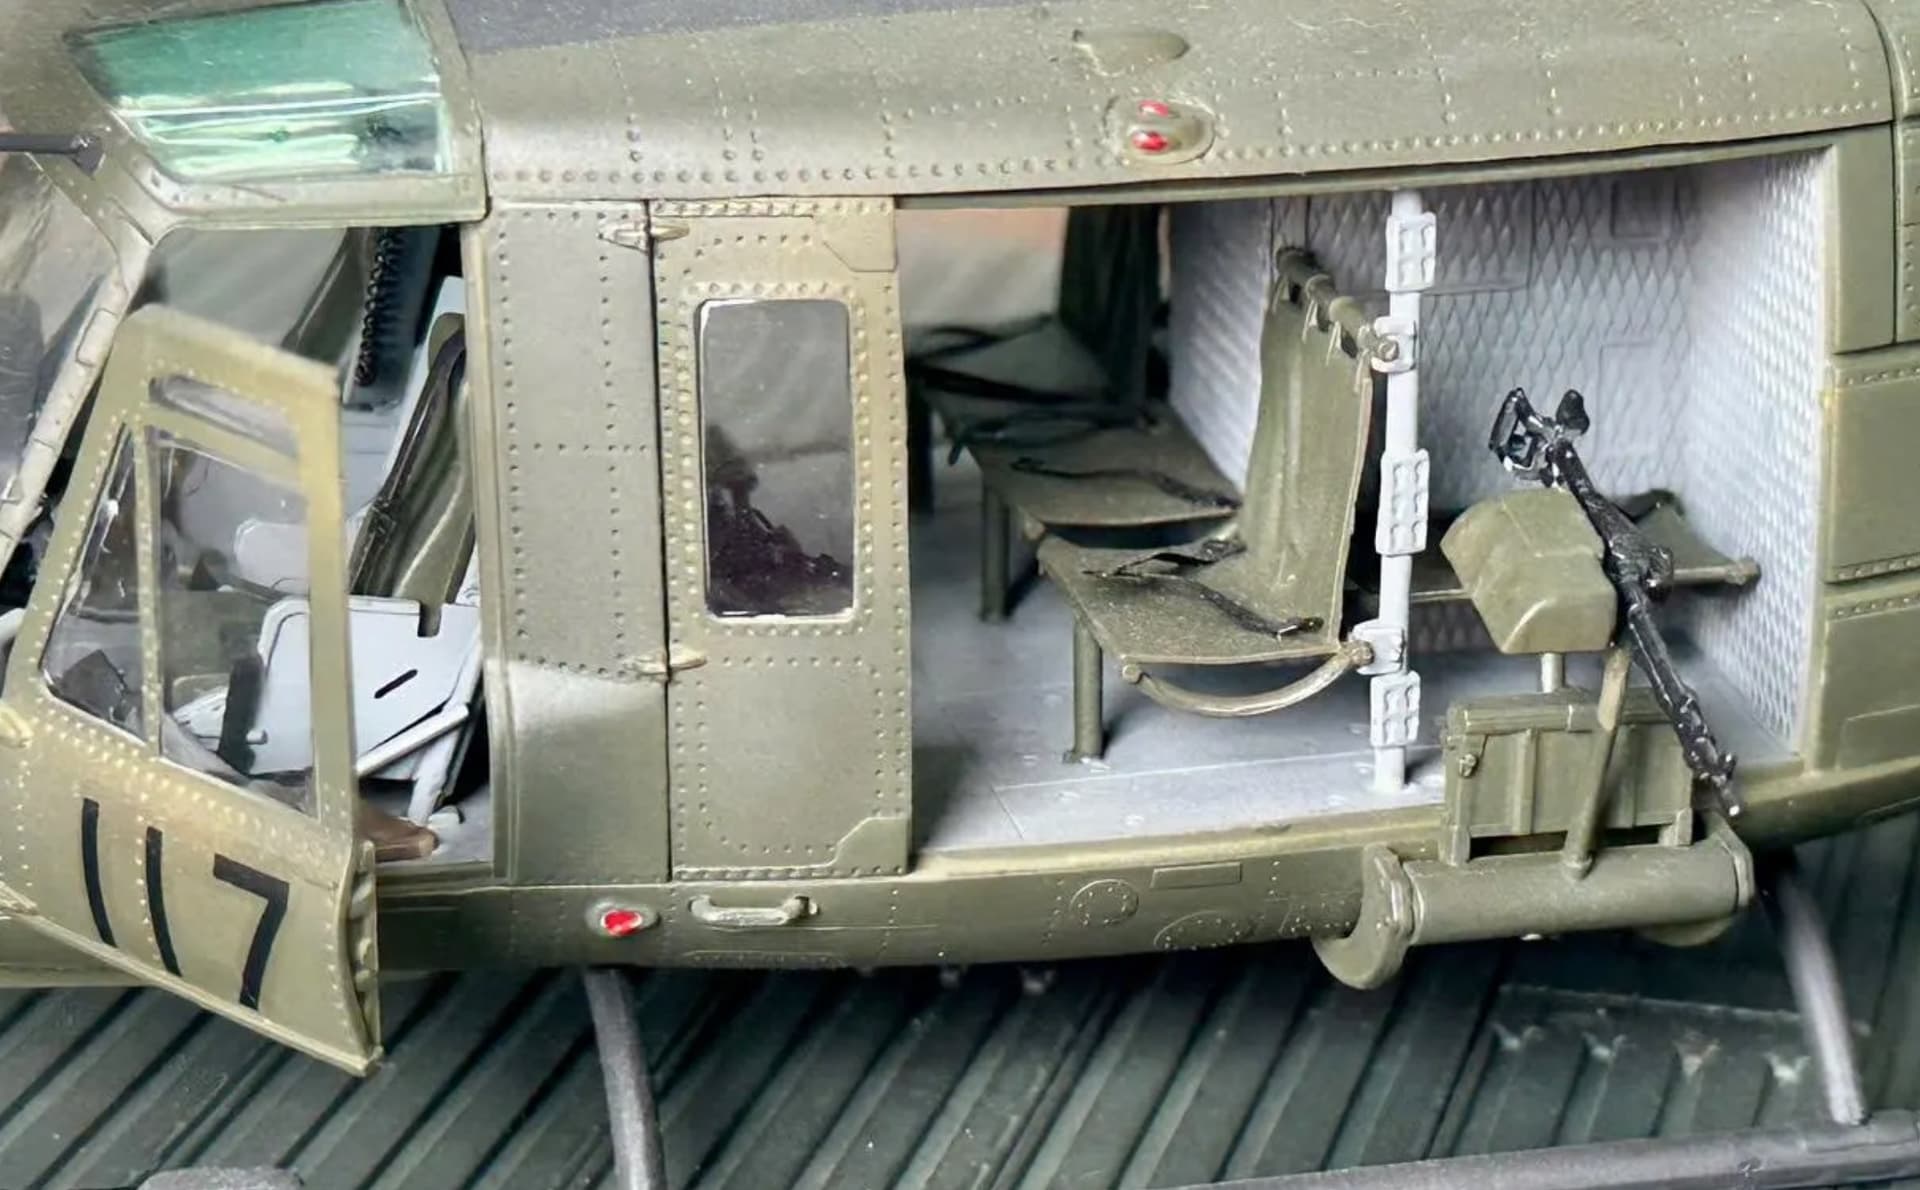
One thing I’m not a fan of with that particular kit it how they replicated the rivets. They look like divots on a golf ball instead of a rivet head protruding from the surface.
That’s a really good point about not blindly trusting the instructions and dry-fitting everything as you go.
I learned that lesson the hard way on the F-4 I’m finishing now. I used aftermarket engine exhaust cans, and nowhere in the instructions did it say that part of the wings inside the fuselage had to be modified to make room for them. I had the airplane completely assembled before I tried to install the exhausts and discovered they wouldn’t fit.
I ended up having to make the modification through the openings in an already assembled airplane, and in the process I managed to damage it. Fortunately I was able to repair everything, but it was a lot closer to disaster than I would have liked.
So I’m with you—test fitting as you go is essential, especially when you’re adding aftermarket parts. You can’t assume the instructions know everything you need to know.
You’re right. Those look more like somebody took a tiny scoop out of the surface than rivet heads protruding from the skin.
It’s funny because I’ve got almost the opposite problem coming up. I have a 1/48 CH-46 in the queue, and the kit basically has no rivet detail at all, while the real aircraft has rivets everywhere.
I suppose the manufacturer’s argument would be that at 1/48 scale or smaller, those rivets would be so small that they really shouldn’t be visible. But I don’t completely buy that. When I look at photographs of a CH-46, the riveted construction is a big part of the character of the aircraft. I don’t want the finished model to have perfectly smooth skin when the real thing clearly doesn’t.
So I ended up ordering raised rivet decals that I can apply to the surface. I’d actually rather start with no rivets and add them than have recessed divots like these that need to be dealt with.
I’d too would not buy the argument that at small scales the rivets would not be visible.
Look at this example, this thing is small and has rivets, although the thick paint covered them some.
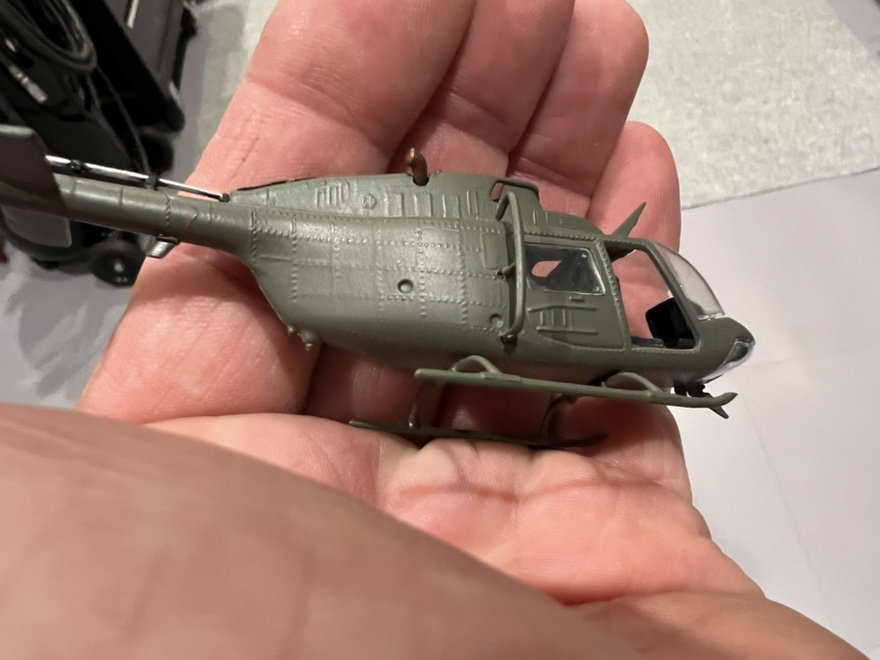
From what I have seen of this model, I’m still waiting for it to be shipped, with all of the assembly this model requires versus Revell’s full skid, full fuselage, full transmission cover parts, you’re lucky the didn’t put a sprue in that had millions of teeny tiny rivets for you to figure out how to install each one into those golf ball holes.
The issue Achilles heel common issue with all models is that even with modern technology and 3D printing and whatever else the world has come up with to manufacture a lot of stuff in a short period of time, scale model building is still and appears to for as long as it remains vogue and people buy them, handcuffed to the same idea of how to make the parts and sprue them. Injection port? Probably not but if you know what I mean just go with it. In some cases I have to speak very butchered foreign language and let my reader interpret. But every model due to this method has gaps, pieces disfigured to a minor degree, pieces that lined up on paper but missed the mark in the field. Even with knowledge being what it is, we still have companies like Kittyhawk who give us this amazing detailed model and force us to build parts we once just had and glued in, still missing the mark when it comes to true detail. Golf ball rivets rather than raised rivets. You took the time get all those pieces and parts just right, and scrimped on the fuselage. Then there’s the mistakes the molding process makes and we have to figure out how to fix it. But, that’s why it’s so much fun. I can’t wait to get this one.
Hopefully this is still par for the course in this thread, again I’ve been accused of “hijacking” a thread. Just call me DB Cooper. To any new scale model enthusiast who are now scale model rookies, like me times 100. Buy an inexpensive mid sized scale model of what you are enthused about, cars, trucks, jeeps, army, navy, planes, figures, scale model homes for that matter, and agree you will screw it up somehow. Not on purpose, but as a testing ground. Practice adding decals. All of the decals. Even the ones that don’t fit your profile. Buy a big enough model that you can add the U.S. decals, German decals, RAF decals, just add decals. Get good at it. Paint something bad, ask questions, learn how to make thick paint thinner without turning it into colored water, and solve your painting issues on a throw away model. Learn to mask. I paint prior, assemble later. Figure out how to hold something and paint without painting your nails. Practice on throw away models, then buy the one you plan to display.
“Par for the course”  appropriate considering we were talking about golf ball rivets.