Very nice ship model there.
I’m smiling- a ship only a Red Leg could love. Shore bombardment for Operation Torch, D-Day at Sword Beach.
Very nice ship model there.
I’m smiling- a ship only a Red Leg could love. Shore bombardment for Operation Torch, D-Day at Sword Beach.
No idea about the right colour for the casings but the interior looks great from here!
Ben: Great job there on the monitor too!
Excellent find Carlos… I’ll hold off painting the shells until I get that Tamiya old bronze paint. Thank you.
Harold
I completed as much of the interior detail painting as I can until I receive the bronze paint for the shell casings.
The next step while I wait for the paint is to assemble the exterior photo etched parts on the front and rear upper hull.
Harold


That looks sharp Harold, darn near the spitting image of the interior shots of the real thing!
[dto:]
Thank you Gamera and Carlos. I finished painting the fire control panel guard and it’s a little rough up close, but at least it looks more like the the real thing now.
I finished the upper hull assembly too and ready to start steps 9, 10 and 11 which is the turret, recoilless rifles, spotting rifles and machine gun. Below is a rear-view illustration from the ONTOS manual and a photograph of the actual rear fenders. I think Academy made the rear fenders on their model to long.
The Tamiya bronze paint I ordered for the 106 mm casings should be delivered tomorrow and once they’re painted, I can glue the upper and lower hulls together.
I have not glued the hatches down yet because I’m still thinking about how to display the ONTOS when it’s finished. I like the idea GMorrison and Gamera suggested of adding a couple Marines and creating a wood base with a little ground cover.
Harold


Gino, you were right about the Academy PE fret. In my opinion it’s better engineered than some of the parts in the Voyager kit. I had the Voyager headlight guards glued on before I realized they looked terrible. So, I replaced them and the rear fender brackets with Academy PE parts. Who would have guessed?
Harold
Carlos, thank you for suggesting Tamiya Bronze. I could not find an ‘old bronze’ in Tamiya’s acrylic paint line, but I did find Bronze X-33 which has metallic flakes in it, so I mixed it 3:1 with Tamiya Dark Copper XF-28. Please see the left spoon in the photograph below. I think the mix is near perfect match with the photograph of the shell casing above.
I also completed the turret assembly, so the next step is the assembly of 106 mm recoilless rifles and for that Voyager has supplied lightweight aluminum barrels to replace the plastic Academy barrels.
Harold


Sorry about the color misdirect Sarge. I kinda like the 1:1 mix better, but you’re the man on scene.
You know, I think 1:1 is better too. I have learned so much more from veteran scale modelers like you Carlos in three years than I would have in nine or ten years on my own. In this regard I think FineScale Modeling has created a valuable tool in these Forums. The forum can allows its members to increase learning exponentially and it’s fun.
I remember reading an article about the effects of light on surfaces. It suggested that model paint should be a touch lighter than the actual subject we are trying to represent with our model because the model surface is so much smaller. I know there are some very excellent modelers who disagree, but in this case we have a controlled experiment. I simply paint the shells 1:1 and when the paint is dry put the upper hull on and see if it looks right. If not, I add a second coat of 1:1, or change the mix to 2:1 or 3:1 what could be easier.
Harold
That looks really good! And I’d probably put a figure beside her to show how small the AFV is.
The bronze mix looks good, pretty darn close to the real thing.
That is one fantastic interior - it’s a shame to cover it over! Your post about how to display the finished model made me think about a photo of an APC I recently saw in a contest article. The upper hull appeared to be hinged on one side so the interior was totally visible. It’s inspiring me to look into how to hinge one side of an Academy M113 Fitter, maybe a small wire and tube hinge like the car modellers use when they open doors and trunks.
Just a thought; your Ontos is a real work of art.
Thank you Mrmike and Gamera; I like your suggestions. I started today thinking I would assemble the 106 mm recoilless rifles, but realized I needed the machine gun assembled first. Adding the Voyager PE parts to the machine gun was not as easy as I thought. I also gave the 106 mm casings a coat of 1:1 Tamiya mixed paint and they look right to me.
Harold


That MG looks really good! I’ve tried folding up those PE ammo boxes and not had much luck keeping them straight and square. And the teeny-tiny sights- WOW!
Gamera, there is an interesting back-story regarding the tiny little sight. It is about the size of the head of a straight pin. There were two in the kit and it takes about 30 seconds to form the sight an another 60 seconds to glue it on the gun. Most of that is just opening and closing the glue bottle. But it took me three hours to find them on my work space after I dropped them. I must have drop them 17 times and finely I decided they weren’t worth the effort. Then while I was taking a break I saw one and lost it again, then I found the other one. In the end I only recovered one of the two, but I got it done.
Now the question; why in the world would someone design something for scale modelers you need X5 magnification to form? But more important why would any sane person bother to use it, myself included? Some times I think the people who design PE layout forget what happens when it’s reduced to 1/35 scale. Example: if an actual gun sight is 1/2 inch high and you reduce it to 1/35 scale the sight become .0143 inches high, or <1/64".
Harold
the simple answer is… because you’re a madman…
You’re right!
I served in South Vietnam from January 28 to March 5, 1966. I was a Navy hospital corpsman assigned to the Marine Corps’ 3rd Battalion, 1st Marine Division. I hadn’t planned on such a short tour of duty — 37 days — but in Operation Utah, a sniper shattered my right femur, a wound which gave me a free ticket home and more than 10 months in the Navy’s Balboa Hospital in San Diego.
A few days after our amphibious landing in South Vietnam, I encountered an Ontos, which I had never heard of at that time. Here’s a photo, taken with my Nikonos I under water/all-weather camera, which I had bought specifically for Vietnam:
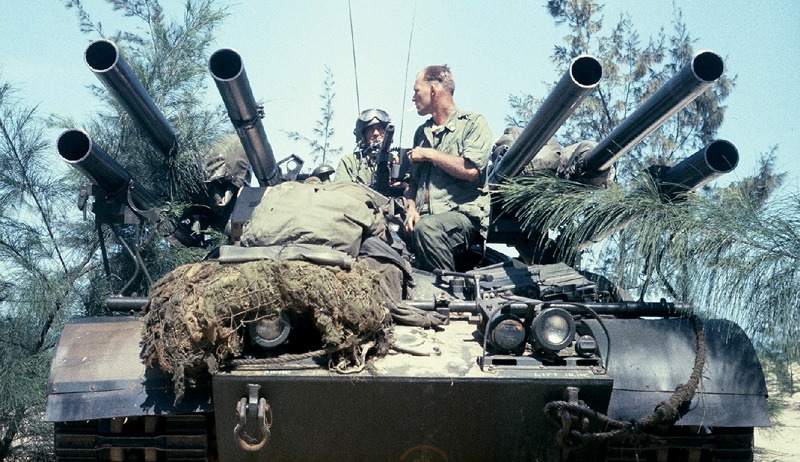
I talked briefly with one of the crew, probably the bare-headed guy. He told me that a day or so previously, they had fired all six of the 106mm recoilless rifles at the base of a pagoda, which promptly and not surprisingly collapsed. I guess we showed those Buddhists who was boss!
Bob Ingraham
Vancouver
Bob, thank you for sharing your ONTOS picture and story.
Harold