Hello, I’m taking a little break from the group builds at which time I had decided to start a subject I’ve always wanted in my collection. One of the Zeroes flown by Japanese ace Saburo Sakai, the “Sky Samurai” of the Tainan Air Group. Not only was he a skilled pilot, having once flew 640 miles to his base half blind with a bullet in his brain, but he seemed like a genuinely guy as well. I’m using the 1/48 Hasegawa A6M2 Model 21 kit. I even used the decal for the instrument panel which turned out fairly nice. I did utilize an Ultracast seat. I also decided to detail the Sakae engine a bit, by means of scratchbuilding the ignition harness with the assistance of some reference photos. Here is my process:
I started with some small .010 styrene rod and glue two pieces together side by side (like the appearance of a double barrel shotgun). I then sliced it salami style into small appropriate sized squares (tiny) and added these to the ignition ring to simulate wire attachment points with tweezers. To make this easy, use Tenax or similar type weld cement and glue these to the ring “pre” paint. The styrene should fuse right to the bare plastic with little fuss. I then ran thin solder to the cylinders attached with super glue. I sprayed the engine itself different shades of Alclad, specifically dark aluminum on the cylinders and regular on everything else. like the contrast it shows. I then hand painted the wires a brownish copper color I mixed up with Tamiya red brown and Khaki. This process requires patience but is not difficult. I think it looks better than PE too. Heres what I have so far.
Thanks! I’ve been using a pre-mixed wash called “The Detailer” and really haven’t looked back. I found it at my LHS for like 4 bones which comes in small white bottle. It also comes in different colors. I use black which seems to be more of a dark grey. Its water soluable too. I buy a bottle everytime I’m there just in case they stop making it. If you can’t find it, heres the website:
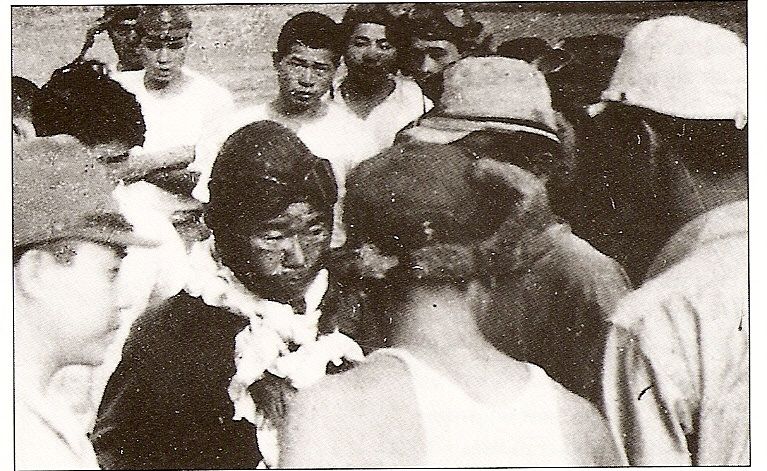
But it is not true about the bullet in the brain. He took a glancing slug to the head, which severely lacerated his scalp and cost the sight in one of his eyes due to the glass from his goggles being shattered and driven into his eyes…the flight back was indeed a great feat of airmanship, however…Early Japanese Zero pilots were almost superhuman in their ability to navigate over water for extremely long distances, which was required because of the incredible endurance of the Zero…
Thanks for the compliments all. Manstein, thanks for clarifying Sakai’s injuries, however, understand my intent was to provide some brief examples of why I was inspired to build Sakai’s bird. The following passage from Wikipedia is where I drew some of my inspiration, which I found extremely impressive or as stated “superhuman”. Of course Wiki has been known to be wrong from time to time and I’m by no means an expert in Japanese naval aviation. It appears that Wiki’s references were fairly good. Perhaps I should have stated the bullet passed through his brain.
Although in agony from his injuries (he had a serious head wound[14] from a bullet that had passed through his skull and the right side of his brain, leaving the entire left side of his body paralyzed, and was left blind in one eye,[15]) Sakai managed to fly his damaged Zero in a four-hour, 47-minute flight over 560 nmi (1,040 km; 640 mi) back to his base on Rabaul, using familiar volcanic peaks as guides. When he attempted to land at the airfield he nearly crashed into a line of parked Zeros but, after circling four times, and with the fuel gauge reading empty, he put his Zero down on the runway on his second attempt. After landing, he insisted on making his mission report to his superior officer before collapsing. His squadron mate Hiroyoshi Nishizawa drove him, as quickly but as gently as possible, to the surgeon. Sakai was evacuated to Japan on 12 August, where he endured a long surgery without anesthesia. The surgery repaired some of the damage to his head, but was unable to restore full vision to his right eye. Nishizawa visited Sakai while he was recuperating in the Yokosuka hospital in Japan.
Anyways, I still have to post shade the cockpit then its time to put her together. E-bay had decals for Sakai’s bird offered by a company named “Berna” . I’ve never heard of this company but I’m going to give them a try. Does anyone have any experience with these decals? They offer some enticing subjects and I’ve been eyeing a KI-43 sheet as well.
Wikepedia has it wrong. I actually have a pic of the flying helmet, goggles and scarf he wore that day and it is clear (just from the pics) that the bulllet never entered his skull…if it had, he’d most likely have died…Indeed, he doesn’t even claim in his own bio that the bullet entered his skull…
Cool pics Manstein!. The pic of Sakai dismounted is actually used on Wikipedia, but your example is higher quality. Dave, no I havent read the book. Unfortunately I have little time for reading right now (family, long hours at the job…yadda yadda). I havent even read “Munster-Before and After”, about the Munster Raid in Germany on 10-10-43. My grandfather, a ball turret gunner in the 390th BG, was shot down on this mission and apparently his B-17 is mentioned somewhere in the book. Hopefully someday. Anyways, back to the Zero. I postshaded the 'pit a bit more and added 5 minute epoxy to the gauges to simulate glass. I love this technique but you have to work fast say…5 minutes[^o)]. I glued in the cockpit starboard side in but when I attempted to glue the port sidewall and fuselage together around it, to my surprise, it was not fitting right. It turned out the starboard side was badly warped, which completely convoluted the fit of the cockpit. (theres probably a reason this kit was 10 bones at a model show vendor’s table[:^)]). Oh well, I was able to muscle it into position with some Tenax and finger pressure, but lets hope there arent adverse affects later. Heres some more pics…
Hello, I thought I would post a little update in my progress. I got the airframe put together and I did have fit issues due to warpage. It was enough to where I had to walk away from it for a few days. This thing has been fighting me the whole way thus far. Not only was the starboard fuselage warped, but so was the port upperwing. It was nicely bowed and I had a heck of a time getting enough Tenax on it to make it stay flat [bnghead]. Unfortunately the warpage affected the fit of the wings to the fuselage and the whole thing need quite a bit of fiddling, especially at the wingroots and where the lower wing meets the fuselage. In the latter area, I ended up sanding the [cnsod] out of it then rescribing the panel lines. For some unknown reason, a groove was left at the port wingroot which I had to sand out. I think I have it squared away now. I suppose every now and then a kit just fights you for whatever reason[*-)]. Oh well, I’m almost ready for paint…