Stik, I wanted to thank you and Ixion again for your time and great detective work that helped me decide to change the title of my diorama. There have been many dioramas regarding Bastogne, but ’The Road to Bastogne’ is about getting to the fight and the sacrifice our troops made who stood in the way of an advancing enemy.
You’re quite welcome sarge. When I was looking for the info this morning on which combat command of 9th Armored division was where whenthe Ardennes offensive began, I came across the tale of Combat Command Reserve. I had read of it before, but forgotten the details. It was broken up into task forces and placed into the path of 5th Panzer Army, to the easy of Bastogne. They were outnumbered and outequipped, had hold at all costs orders, and were eventually pretty much destroyed. Only a few lucky survivors were able to escape being killed or captured. Their sacrifices bought the time for the 101st to get to Bastogne and, along with the surviving elements of 28th Infantry Divison, 10th Armored Division, 705th Tank Destroyer Bn, and several other units, make their heroic stand.
Jeep #2 is in primer (Tamiya Liquid Surface Primer thinned 50/50 with Lacquer Thinner) and ready for custom O.D. paint (Tamiya Olive Drab XF-62 mixed with Buff XF-57 60/20 and thinned 80/20 with Tamiya X-20A). I did not like the results on Jeep #1 below of painting over Tamiya Nato Black XF-69, so I used a nutural gray primer on Jeep #2.
This is Jeep #1 with custom O.D. paint, Legend resin BC1306 radio set and Blackdog resin wheels with snow chains.
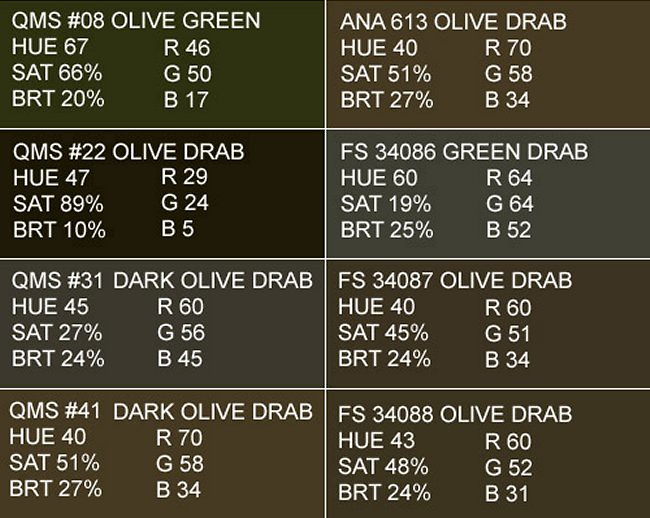
This picture is the olive drab color I’m using as my paint sample. My hope is the nuteral gray primer will make the olive drab lighter and match more closely the color in this photograph.
I also decided to add a realistic antenna and base (mast) on Jeep #2.
This new antenna not only looks more realistic but can be bent over like the photograph ‘The Road to Bastogne’ that I’m building the diorama to represent.
I also orderd a Legend stowage set that will repesent what we see in the photograph below.
Sherman tank of the 9th Armored Division’s CCA on the road to Bastogne.
Sgt., are you trying to replicate the Sherman in the photo? If you are, you have the wrong Sherman. The one in the photo is a later A3 with the T-23 turret and 76mm with threaded barrel and thread protector. You might have kitbash another Tamiya kit, but the Armor experts like Rob G. would know. I’m an armor newbie. On the Shaddock website is an actual verified 9 AD A3 knocked out sometime 17th December 1944.
You guys are amazing! Just amazing. Sarge, I can’t wait to see the finished diorama. It’s really going to be something. I remember seeing a program as a kid, The Twentieth Century maybe, narrated by Walter Cronkite, about the “Battered Bastards of Bastogne.” In the film, the ice on the road was so thick that a Sherman tank was sliding sideways through an intersection. This thread is a build log, right?
Thanks a lot for the info, now I know what you’re up to!
And isn’t the forum great? It seldom works as good as on this one, but when it does - then it’s a really good thing to be on! I like this thread a lot, it’s about accuracy now!
I would say the colour for the jeeps is too light. IMO it looks more like the modern forrest green than the correct old OD - but that’s the talk about colours, so subjective. I’d say don’t match the colour to what the restorers did - they might have slipped here… Maybe it would be better to find some old ammo can or something like this and match the colour to that? I have an OD ammo can from the sixties or seventies and the best match to it’s colour is Humbrol 66 with some future on top of that.
I believe you know that the antenna has to be tied down to not whip around and avoid hurting people on the way… Once I have made the tie-down out of a nylon thread taken from a stocking (that’s always a fascinating story :-). Maybe you have some use for that trick, too.
richs26; yes, I am trying to replicate the Sherman in the photo. Thank you for pointing out the mistake. Not only do I have the wrong turret and barrel, but I may also have a problem with the hull. I believe the fender on the right side facing the tank in the photograph indicates the hull was an early production M4, but the fender on the left side and the front of the hull indicate the M4 was a later production. So, I need to resolve that difference and possibly look for a Tamiya #35190 model. I can easliy add a resin T-23 turret with round hatch and metal 76mm barrel, see photograph below.
fotofrank, part of the fun in scale modeling is the research and effort to accurately replicate an event from history. I have watched the video ‘Battered Bastards of Bastogne’ and it was very well done.
Ixion, I believe I found the original house visible in the background of this 1944 photograph.
I used your link and went down N85 (Rosiere la Petite) in the direction of Neufchateau past the buildings along the road and turned the camera left and back across the field is the house above. It has a distinctive roof which we call ‘saltbox style’ in the U.S. where the front of the building is two story and the back is one story. The owner has added three roof dormer ‘eyebrows’ but that is easy to do when the roof is replaced.
Yeah, I didn’t mention it yesterday, but I did some “driving around” and spotted the house too, hence my “historic view” comment. Pretty cool! I “drove” up and down the highway, imagining all the relics that must be buried in the farmer’s fields or hiding in the woods, what sorts of hardships the men endured there. It’s like revisiting the past without actually being there. If you take the road towards Nives and turn at the first right, you can go up the alley a ways and see the house. It’s a great way to get a feel for the surroundings, the vegetation and buildings, before one starts building a diorama. I use Google Earth a lot, which is why I was able to find the location relatively easily. My other main hobby, apart from modeling, is rockhounding, and I use Google Earth, with geological map overlays, (plus a degree in geology) to recon my target areas before I venture out in the field. It greatly improves my likelyhood of finding what I’m looking for, while minimizing unnecessary bushwacking.
Oh, I’m knowing that the rsearch is part of the fun in modeling. My dad was assigned to Lowry Field in January 1945 for B-29 transition training. While there he got some stick-time in a P-40. I spent a week researching P-40 units at Lowry at that time and found a picture of a flight of P-40s taken from the back seat of an A-24. I based my P-40N build on one of those airplanes because my dad may have flown the airplane. Yes, the research is a major part of the fun of building. Thanks, Sergeant.
Ixion, I studied geology in junior college and did some excavating at a place in Oregon called Richardson’s Rock Ranch digging for thunder eggs. As you know we have very diverse geology in Oregon and Washington.
I’ve been to Richardson’s Ranch myself, many years ago. I sometimes look for fossils out on Highway 26 in Oregon, near the Nehalem river, when I get to take a trip down that way. Losta rocks out here. [Y]
fotofrank, I have always had a passion for World War II British and North American aircraft, my Uncle was an RAF pilot of an Avro Lancaster bomber during the war and my father was a Staff Sergeant in the 20th Army Air Corps on a B-29 crew in the China Burma India Theater. He also served in the Navy on a Consolidated PBY Catalina crew before the war. I am a member of the Royal Air Force 153 Squadron Association in Great Britain. Recently I found a man in Scotland who’s father served with my Uncle. The 153 Squadron of Group 1 Bomber Command were night fighters. They flew bombing missions over Germany at night without instruments, in close formation from 1944 through the end of the war. My Uncle and three of his crew died in a collision over Laon, France on 17 December 1944.
Pawel, I have read about Humbrol 66 Olive Drab enamel paint #AA0730. Several people have commented that it is very close to the original Pullman Green paint that was the standard for U.S. military olive drab. I would like to try the paint but wonder what kind of issues there might be painting enamel over a lacquer based primer?
That’s an easy one - as long as the lacquer based coat is dry, you can paint enamels over that without any issues - I do it all the time. You could get into trouble trying to paint something lacquer based OVER an enamel coat, but even in such case it sometimes can be done.
Ixion, I did not find Larry Cloe’s name in my Shumway Junior High year book; however, last night my wife and I talked with a lady who’s son was in one of Larry’s classes at Columbia River. She remembers Larry very well.
Ok Pawel, I am going to give it a try. My base coat is Tamiya Liquid Primer thinned 50/50 with lacquer. I will apply Humbrol 66 enamel as my top coat over the primer. Then Tamiya acrylic gloss clear coat over the enamel to facilitate applying decals and Tamiya acrylic flat clear coat to seal the decals and bring back the flat finish.
I noted that in your earlier reply you recommend ‘Future’ over the Humbrol 66. I have read about using Future as a seal coat, but I’m going to stay with what I know on this first experience with enamel paint. However, I would like to know how, or if you thin the Humbrol 66 for air brushing?