Bakster, The whit looks like it covered well and laid evenly. It will look real nice with the orange over it. That, along with your wonderful interior will make this look real.
ScottRC, Your Estes Apollo is growing up and looking good.
GAF, Nice idea for the command module control panels. I am looking forward to seeing it applied.
Keep up the fantastic work, I always come back here to this GB just to see how things are goning and visit friends.
Nothing to show here but my X1 is primed, sanded, touched up, and ready for some pumpkin orange. I’ll save this task for Saturday when I have more time to tackle it. Giddy up!
Ben> You’re always welcome here. Glad to see you got the monitor completed in the Ships of the British Flag GB (run by Modelcrazy here). Great work all around!
Bakster> Good luck with the paint work! Not sure what color orange the X-1 was painted. Must be a spec on it somewhere.
I got the idea for printing out control panels when I built a stuka for Bish’s Stuka GB. I was unhappy with the simple decal supplied, and adding some PE controls to what was essentially a toy (Monogram stuka) seemed like overkill. That was when I ran across an image of the control panel for a Stuka and decided “Hey! Why not?” I copied the image, scaled it in a paint program and printed it out. Worked great! If I don’t have a great control panel for a model, I will try to find some image to use.
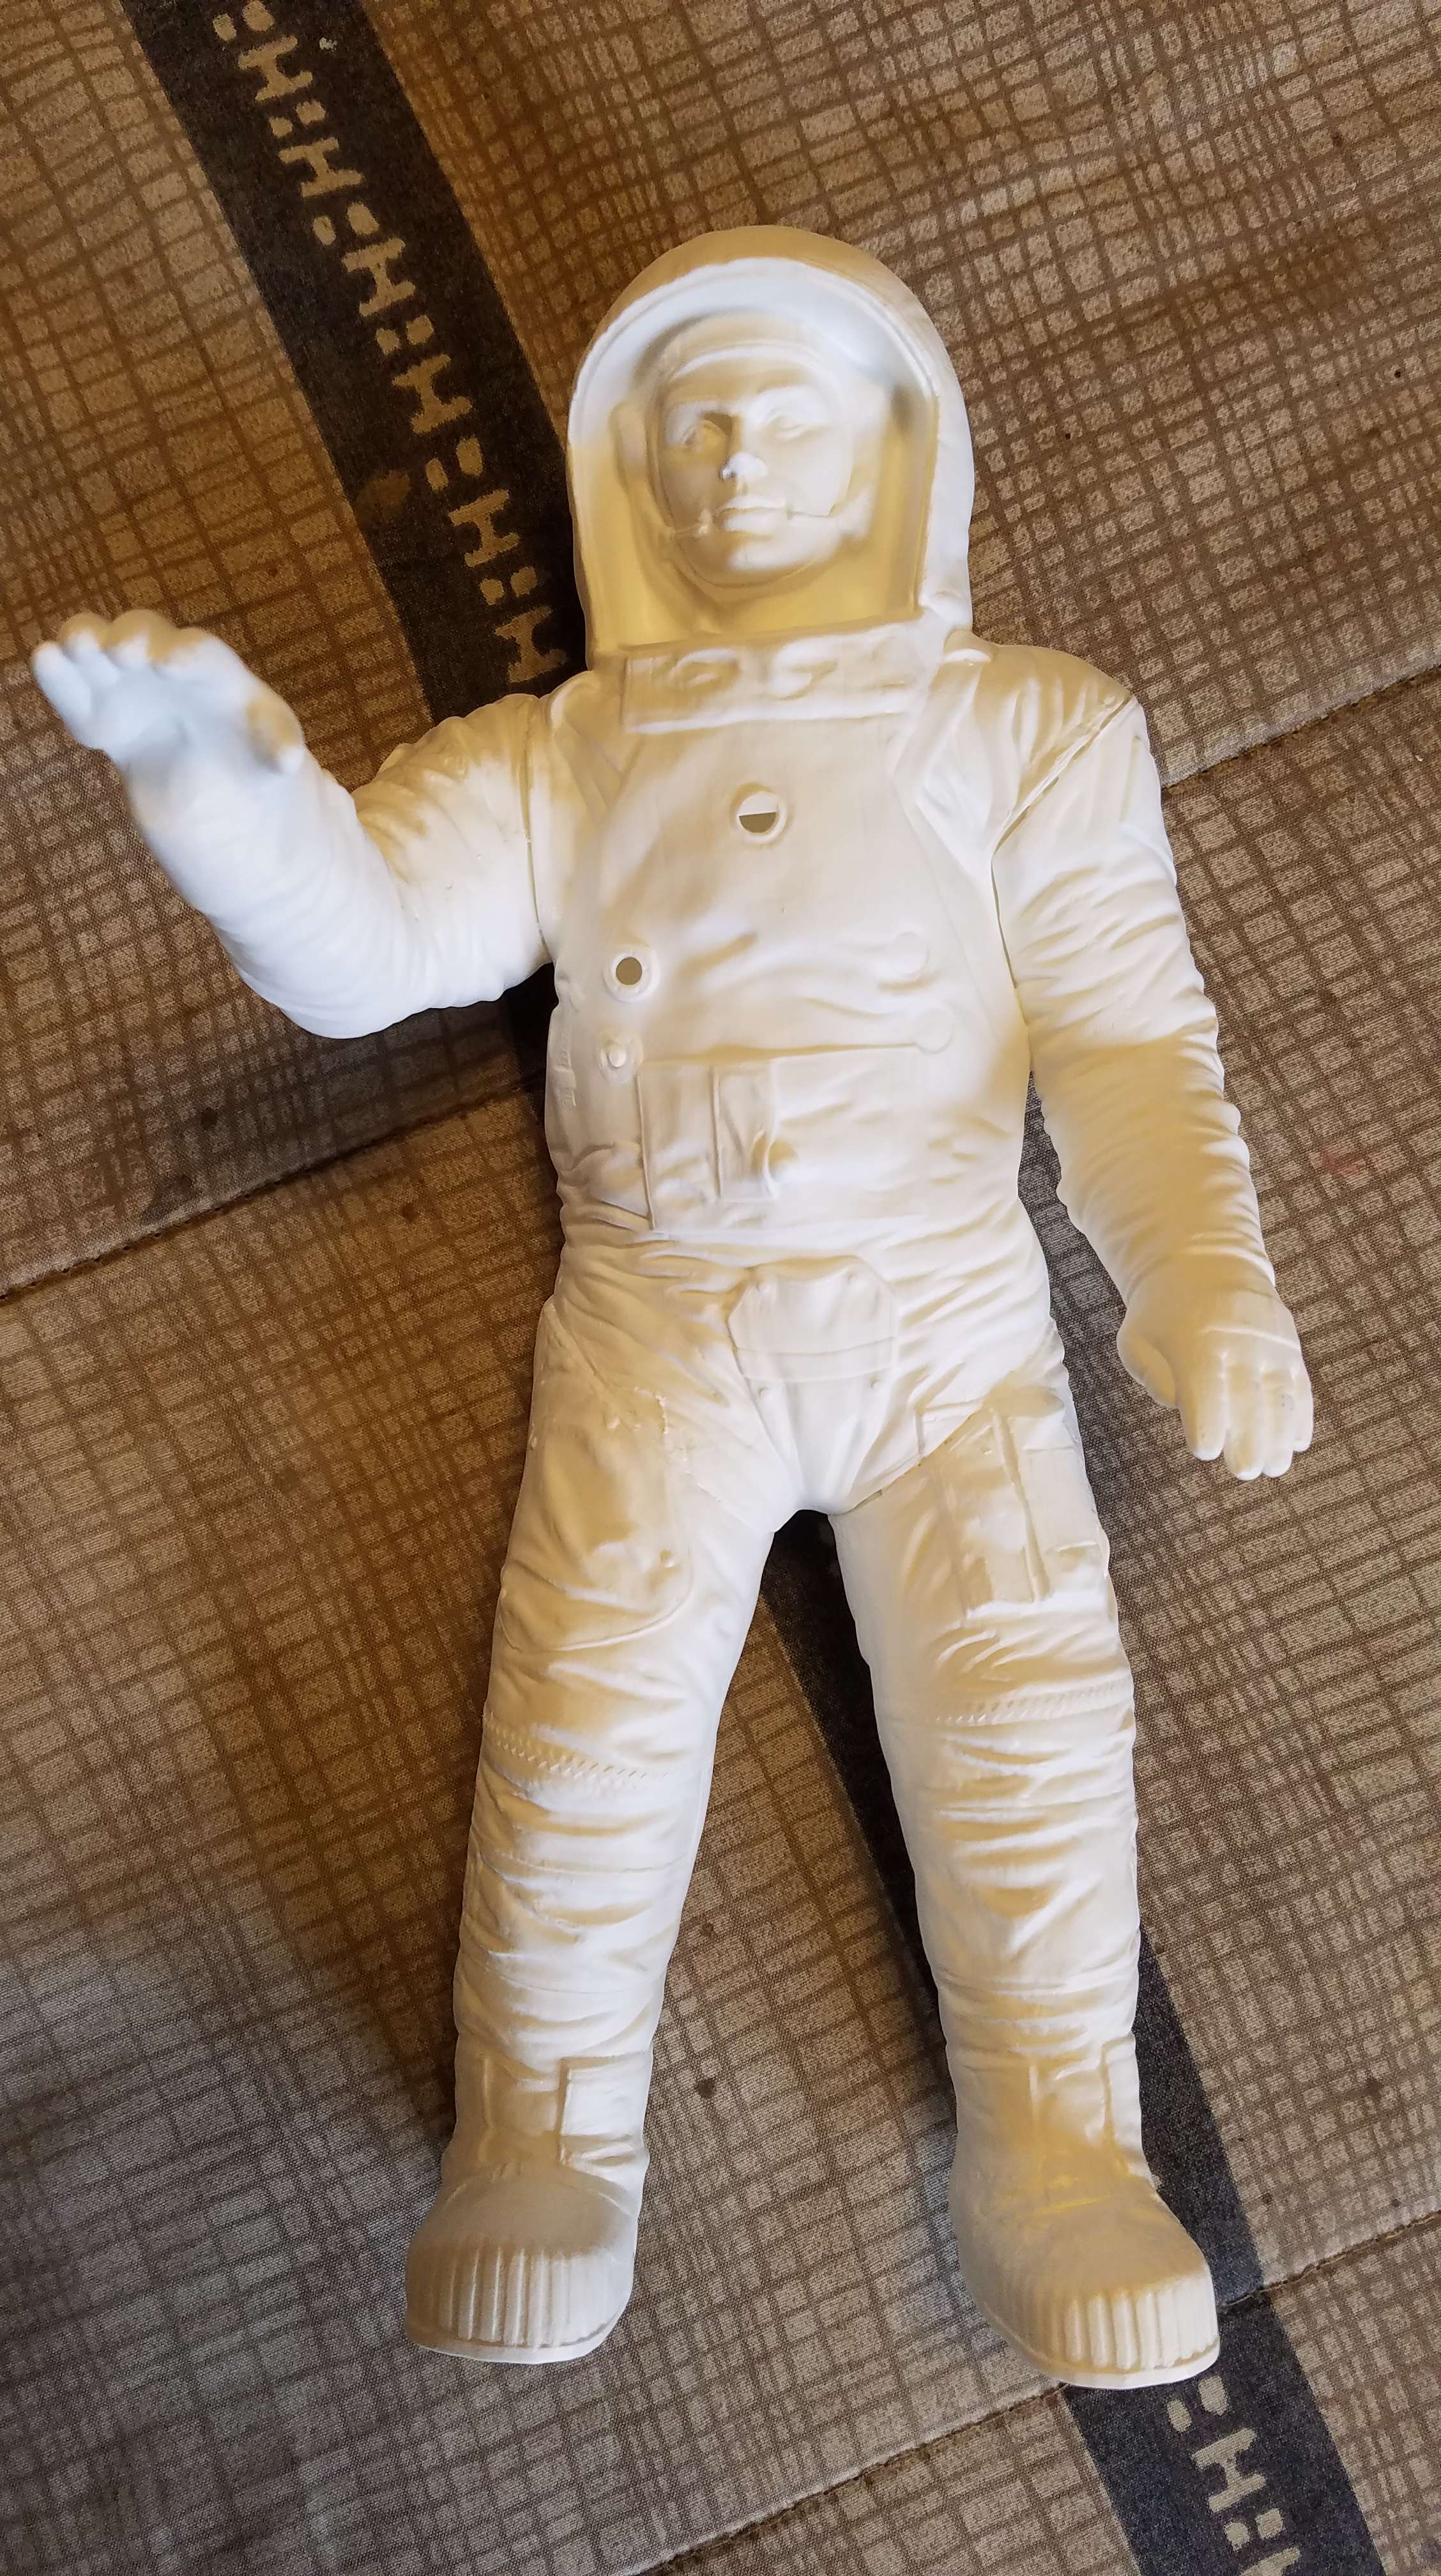
Well, I primed my astronaut last night. With two spray cans of white paint. The first one gummed up halfway though. And it’s almost full of paint. I’ve been turning cans upside down when done and spraying ‘clean’ propellent to clear out the nozzel but still I can’t seem to use a whole can without the blasted thing gumming up. Any advice anyone???
I might just go over to using the Tamiya white primer for everything. It’s way more expensive but as things are going with me getting two or three jobs out of a Kylon can and then it gums up it would be cheaper.
Gam-- that sucks, man. I don’t have enough experience with rattle cans to give you any good advice. And when I do use it, I decant it, and thus far only with Tamiya. You are probably already doing this but I soak the can in warm water before decanting to help with flow. Thus far, I have had zero issues using a can that was previously sprayed. And BTW–I don’t even do the upside-down thing. I wipe the nozzle with lacquer thinner after use and that’s it. Maybe you are losing too much propellent by doing that? Just spit balling here.
Gamera> As Bakster says, you might try soaking the can in hot water (at least the top), but once paint drys in that little tube I have to say it’s toast. I’ve not had much problem with rattle cans stopping up unless I let one sit for months after use. Glad to hear you’ve reached the primer stage with the astronaut!
Managed to get the printed images for the control panel glued on last night, and started adding a few details to the interior (such as joysticks on the couch arms). I should have the interior together tonight and I’ll post some pictures. Meanwhile, I need to get to Hobby Lobby for some things.
Thanks guys, I haven’t thought about warming the can. Will give that a try. I pulled the nozzel off both cans and gave both the tube from the can and the nozzel a good squirt of thinner and left them overnight- crossing my fingers.
Thankfully it’s not that big an issue with me, I don’t use rattle cans except in stuff like this without a lot of surface detailing.
Gamera> Good luck with the paint! I need to pick up another can of gray primer to finish up the base.
Project Report:
I’ve finished detailing the interior of the Command Module having applied the printed images to the control panel and interior panels. I used Aleene’s Clear Gel Tacky Glue and cut panels to fit (as the interior doesn’t match the actual shape of the real Command Module. But they look okay. I cut out some pieces of thick paper to use as a canvas covering for the couches, and some plastic for pillows. Not sure about painting the pillows tan to match the canvas color. A few pieces of plastic take the place of actual instruments, and some plastic rod and square pieces were fashioned into control arms, while the heads of a couple of pins were cut to make the joysticks (you can just make them out on either side of the astronaut figure on the couch arms).
The control panel is ready to be installed, but on hold until the astronaut figures are finished. I’m considering making the helmets look more like the block one spacesuits which had “blast shields”. A picture you don’t see much of.
Detailing still ongoing for various parts. If the weather is okay tomorrow, I’ll try getting some final paint spray done. Keeping our fingers crossed!
Decision to build Sputnik 1 due to delays in Sputnik 3 design. - . Nation: Russia. Spacecraft: Sputnik 1. Council of Soviet Ministers (SM) Decree 171-83ss ‘On Measures to Carry Out During the International Geophysical Year.–Launch of simple satellites in mid-1957’ was issued.
1961 February 15 -
James E. Webb sworn in as Administrator of NASA. - . Nation: USA. Related Persons: Glennan, Webb. After his nomination by the President as Administrator of NASA on January 30, 1961, James E. Webb was sworn into office, replacing T. Keith Glennan.
1974 February 15 - .
X-24 Flight 36 - . Crew: Love, Michael. Payload: X-24B flight 8. Nation: USA. Related Persons: Love, Michael. Class: Manned. Type: Manned spaceplane. Spacecraft Bus: X-24. Spacecraft: X-24B. Maximum Speed - 724 kph. Maximum Altitude - 13720 m. Flight Time - 307 sec…
Hey Gary, that console looks fantastic. Printing them worked well. Nice work on the internals too and I can’t wait to see the astronauts full painted… [Y]
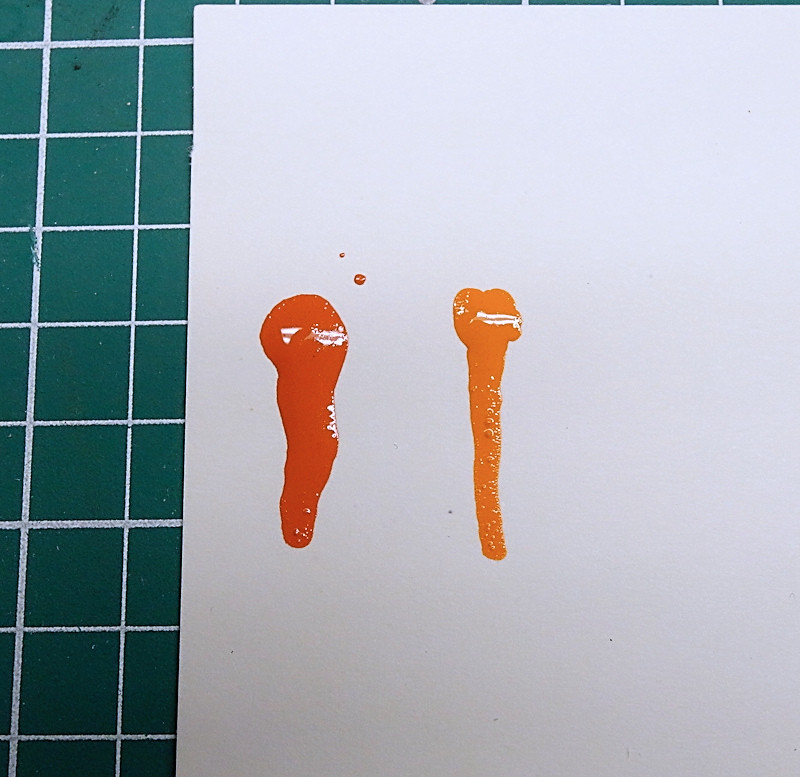
If I have my research right… the X1 used FS12246. I found some color swatches on the net and used it as a giude for matching.
I used Tamiya orange (X-6) as the base and drop by drop added red until I got the shade I wanted as shown on the left.
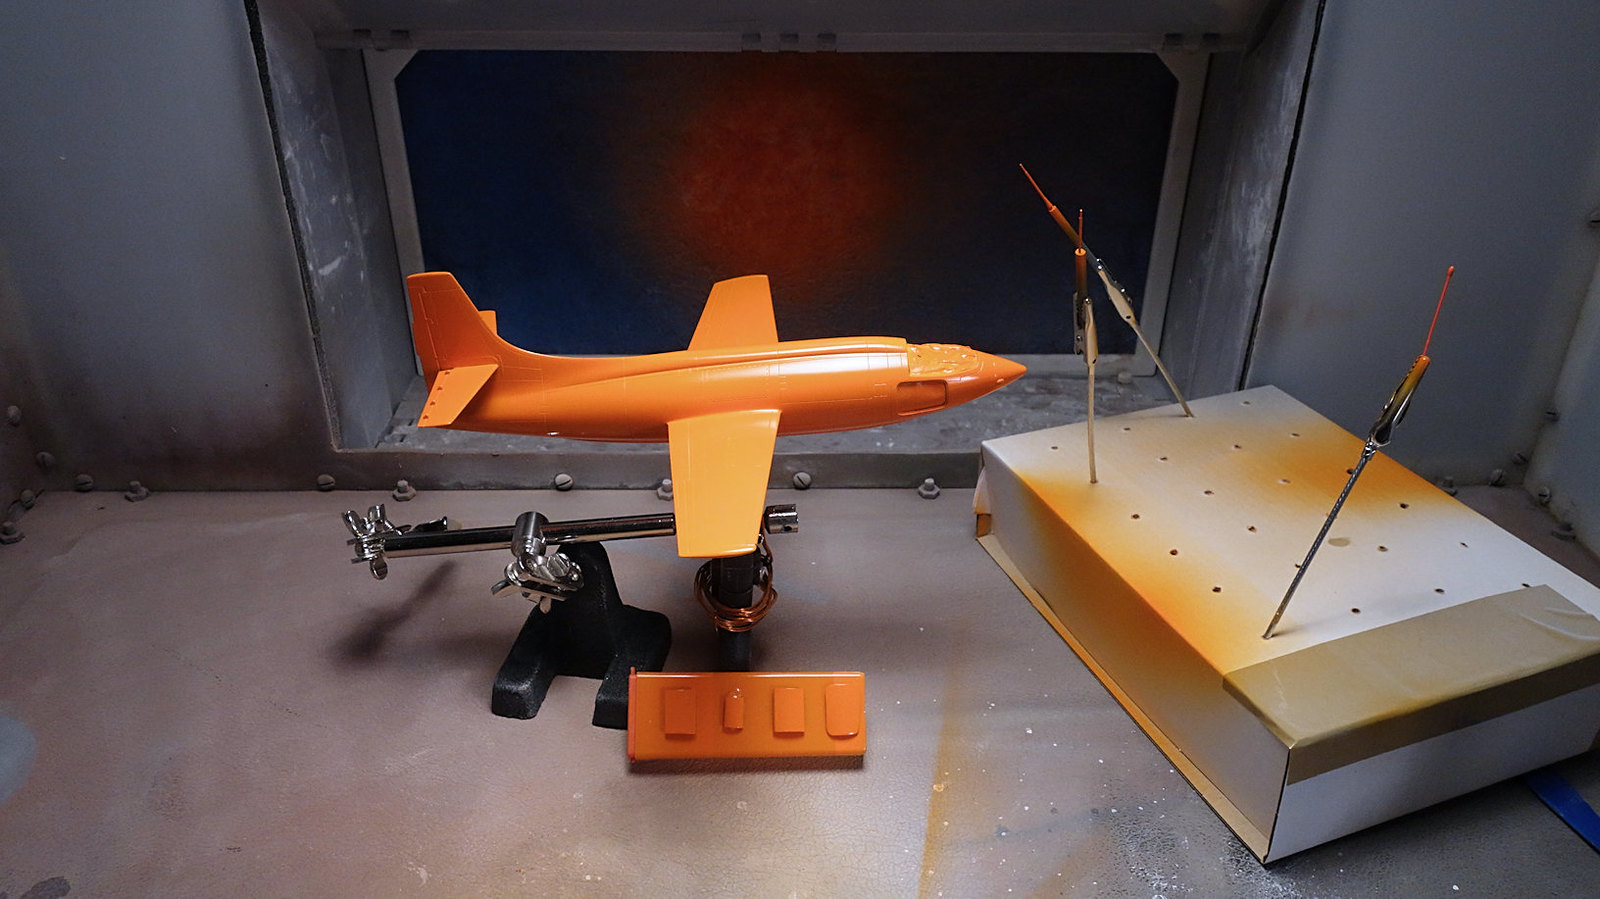
The paint covered the white primer well. I did have a mishap where the plane bumped my hand spoiling a near perfect spray job. I’ll wait until the paint fully dries, wet sand, then touch up the area. Not a big deal, just an irritation. Overall, I am very pleased with how it came out.
I will probably begin work on the landing gear whilst I wait for the paint to cure.
Bakster> Thanks! The panel turned out better than I had hoped, though it looks like one side is kinda misaligned. I’ll live with it.
That X-1 is looking great! I thought by looking at the color comparison the left one would be too dark, but sprayed over white primer it really gets close to the actual color. Good job!
As for me, the weather did not cooperate today. I was hoping for a brief period of dry, sunny weather but it never materialized. The rest of the week and next seems about the same, and they’re actually calling for flash flood conditions. Gee!
I guess I’ll have to just do some detailing work until then. Plenty to do, though a lot depends on getting the base coat down. [:(]
Gary
PS> I do note that it looks like e-mail notifications are down again.
I didn’t notice it being crooked and I still can’t see it. Looks great to me.
Yeah, cameras play weird tricks. My color comparison didn’t look that dark to my eyes. Even the second image does not look correct. Particulary, the top of the wings look a lighter shade, like there isn’t enough paint. That too is the camera playing tricks. Weird how they can alter the color of certain parts of an image while other parts are pretty accurate. To the human eye the colors are consistent.
But, your point is well taken because the white primer DID help bring the color together. It probably would have been too dark, otherwise.
Really nice work everyone! I like the orange on your X-1 Bakster, Gamera Your Moonwalker is looking great, I’m really likeing your Command Module Gary.
I havent gotten a lot done. I have started painting the Interior. The base grey ls down
and I’ve started on the Instrument panel. I’ve started cutting in the panel colors.
Gamera> The astronaut figure is looking good. I understand about white paint, let me tell you! It will show up every flaw there is.
Mach71> Okay, the panels are great. Love to see it coming together!
Don’t have anything to report. Work slowed after getting the Command Module interior, except for some minor detail painting. Nothing worth showing. The weather is the big hold-up at the moment. This week looks like rain and more rain. Still need to make a trip to Hobby Lobby to pick up a few things. I’ve been putting it off for one reason or another, but what with the rain I might as well make the trip come Wednesday.