Tony, I thank you for the compliments on the Vette and your update was correct. Photos do wonders for a built kit and I think it looks better in the pics than it does in person. At any rate, I appreciate your opinion and thank you again. I KNOW we are going to see some stunning builds from these guys in the future, there is some great looking stuff in progress. Later----
Eric the Vette looks great, did you undercoat the intake with anything or just shoot it with Alclade?
Rommel Looking good so far. I’m looking forward to watching this build.
Ken the engine is looking good - I plan on doing a little extra pluming on the next auto kit I do.
speaking of next kit, I’m going to give this one a shot when I get the "69 done.
Dale,
I used clear gloss enamel. The intake came out great but the oil pan came out splotchy. I don’t know if maybe the clear wasn’t dry completely or what. I read somewhere that the color doesn’t matter as long as you have an enamel gloss surface so I wanted to test it out. I’m going to redo the oil pan tomorrow night and hopefully get it looking like the intake. If I can figure out the key I won’t use black anymore as this is much brighter.
L8TR,
Eric.
Thanks all for the feedback on the engine. The 428 still rocks if you are lucky enough to have one!
Dale - I am both enjoying and pulling my hair out at times with the detail work.
Eric - I had mixed results on a couple different parts with the gloss black too. I even let the black set for 24 hours (at least). For instance, my hubs and grill look great, but the chrome license plates look like crap to me. Do you just sand them or strip them completely to redo? just curious.
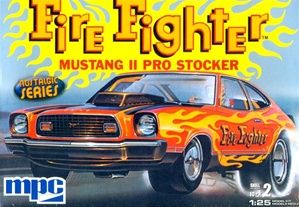
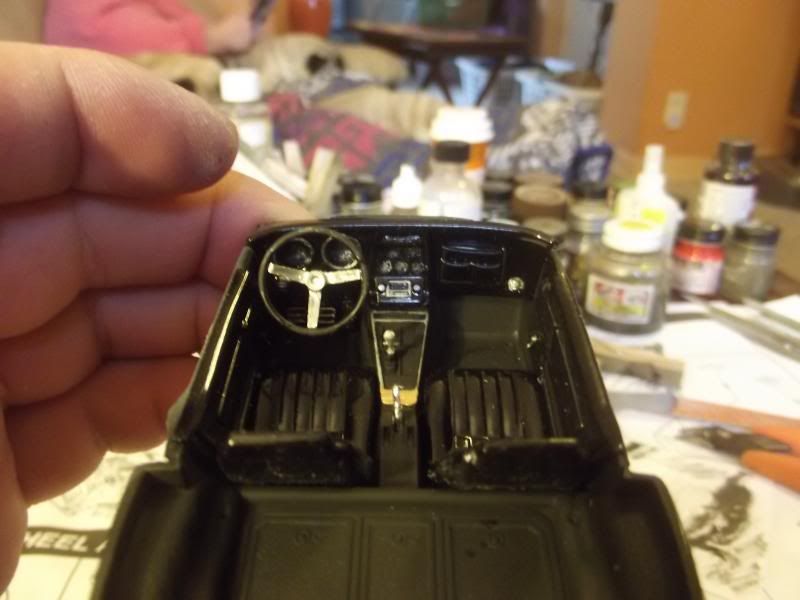
Tonight, I was having problems with the dials on the dash, so I put it aside and went to work on the rest of the interior. I have to say I am thrilled with the way it came out.
Here is the inside:

This weekend I plan to do the foil and spray the body, after I work out the dash. The dash is 95% there, just the dials and knobs remain. I still might send it to Rom if it gives me more fits!!! LOL
LOVE the woodgrain on that Ken.
65ss - Do you want me to update the build roster ? I’ve never seen that kit built before, which is ace. Go for it.
Cheers
Tony
Thanks Tony. I had fun doing it.
Oh yeah Dale, I totally forgot to comment on my last post. That looks like a really cool and fun kit. Can’t wait to see the parts busted out.
Wow. Nice work. How did you do the wood grain? Was the kit floor textured for the carpet look or did you do something to make it like that?
Tony If you could update the roster, my plan is to have both kits done for this GB. Thanks
Ken the interior looks great, really like the wood grain.
Thanks Alan for looking in and commenting.
jWood Grain
The wood grain was done with some base techniques that I have both read and googled on youtube.
Essentially, after I primed the entire interior in semi-gloss blk, I let it sit for a few days (not by choice, i was very busy).
Next, I hand painted on a base of MM enamel “Burnt Sienna” on just the panels I wanted to wood grain. I let that sit for a bit to set up.
Next was a layer of MM Acryl 4697 Tan. While still wet, drag a toothpick through it in whatever wood grain pattern you like. This established the texture and grain lines.
Lastly, it was drying a little light, so I thinned out some of the burnt sienna as a wash, and used a very fine tip brush to add some darker tint over the existing lines and tone down the tan a bit.
That’s it!!!
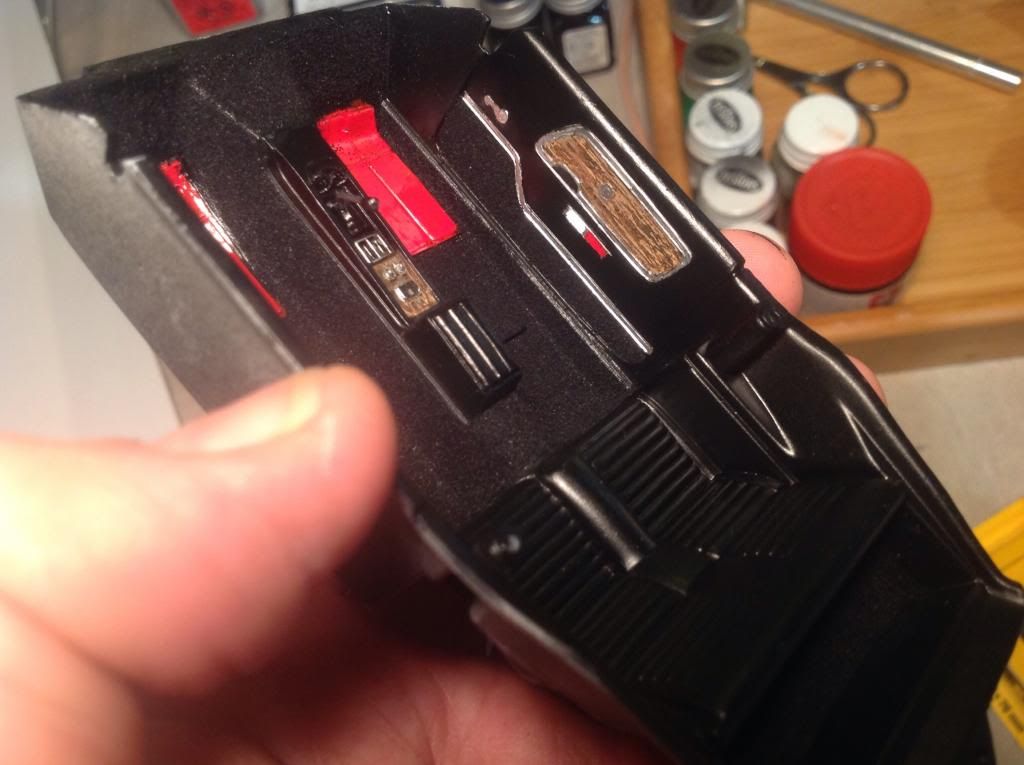
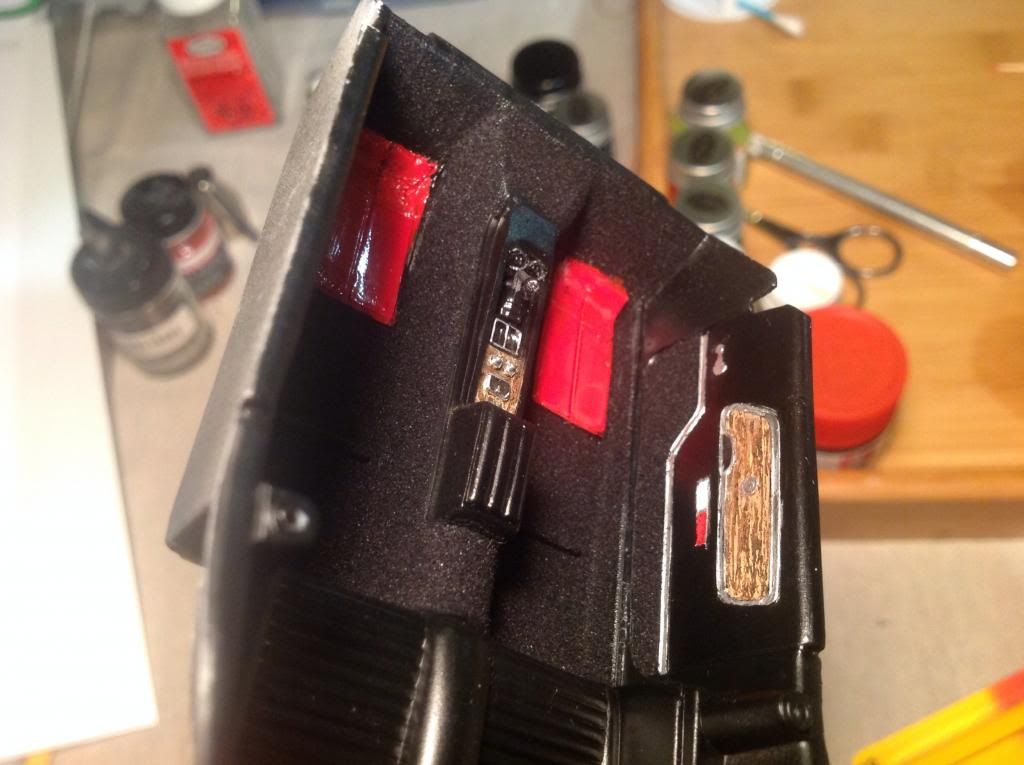
FUZZY CARPET FLOOR:
I can NOT take credit for this at all. About a year and a half (maybe 2), I started reading FSM and AutoScale on my visits to the local B&N way before my return to modeling. In the 2012 AutoScale - Build Better Muscle Cars edition, there was an article by Clay Kemp featuring his build of the 1968 Dodge Charger R/T. I would like to build that one some day. To say the least, it’s an inspiring build and I thank Clay for that.
Props to Mr. Kemp for such a beautiful build and a great article. He did a wood grain in his car too, but I didn’t exactly follow that to the letter, but it’s the same basic idea. Back to the carpet.
His technique is so simple it is pure genius.
A white glue (Elmer’s mixed with water) brushed on the area you want to carpet.
Pour black embossing powder (I used “ebony” found at any craft store) over the glued areas. Make sure it is evenly coated, and then I poured out the excess. I had already done all the detail painting including the floor mats, so be extra careful to not get the glue mixture anywhere you don’t want carpeting!!! I got a little on the door chrome trim, and it came right off with a toothpick.
I found this at my local Michaels for a few $s. It’s worth it as it will do a LOT of cars in the future.
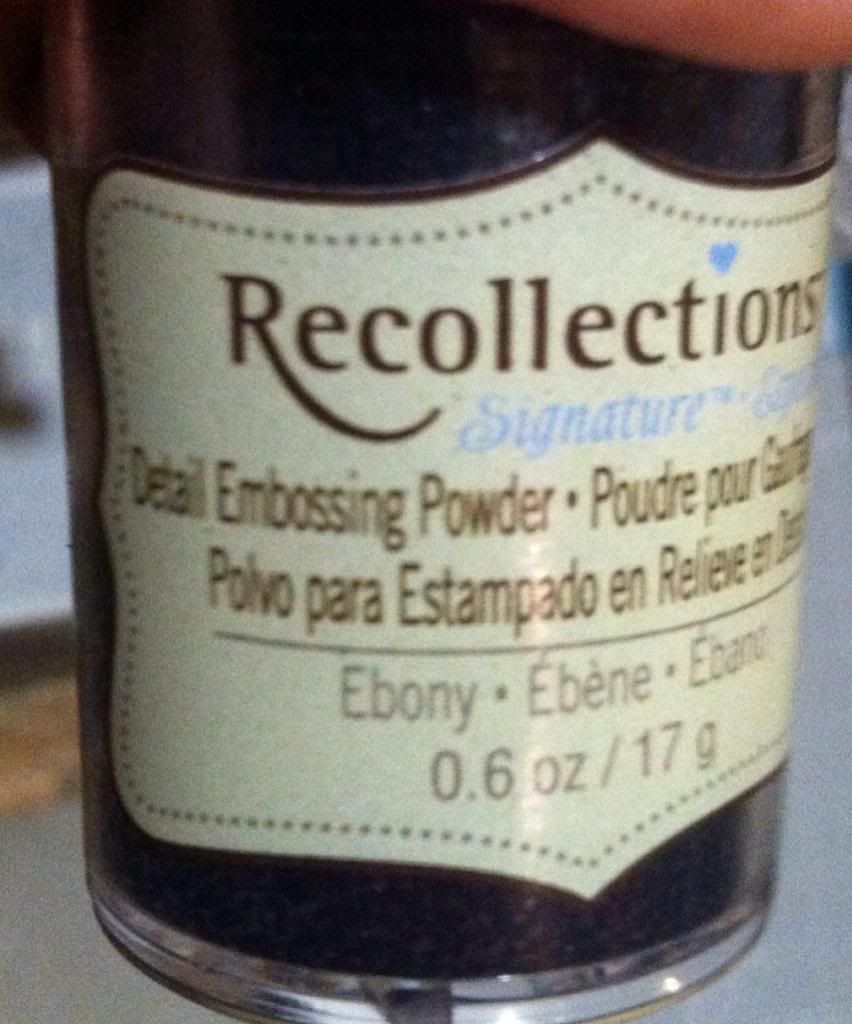
It is a very FINE powder. All the stuff that didn’t stick went right back into the bottle.
Any way, that is it. Thanks for asking Alan, I really enjoyed sharing this little gem to make the detail pop!
Thanks Dale. I saw your post after I posted my answer to Alan.
Well, its raining and coldernell here so it gave me some time to work on the Vette. After cutting and bending up a half package of evergreen .080 rod I managed to rough out the roll cage to the interior. I still have short braces and door bars to finish.
 I got the filled frame rails smoothed and added a square tube tail section to replace the stock unit I cut away and I added the fuel cell mount made from small evergreen square tube and rod.
 The only work I have done on the engine is gloo the halves together and cut away the stock oil pan. I swapped it out for a dry sump pan with pump from an old stock car kit. I have some nice detail items in my pile from Detail Master I plan to use on this one. When I get the basic suspension and chassis built and painted, I can start plumbing and wiring….but I think it will be a while. More later.
Rommel,
That’s some cool fabricating!
It’s all wet and nasty here too. I didn’t work on the vette today but did practice some more with the metal foil on the Bel Air for the other group build. It’s not perfect but I think I’m getting the hang of it.
L8TR,
Eric.
Some new updates. License Plate is actual aluminum.

fantacmet,
Looking sharp. Like the engine work.
Ken, I picked up some embossing powder. I’m gonna give it a try.
L8TR,
Eric.
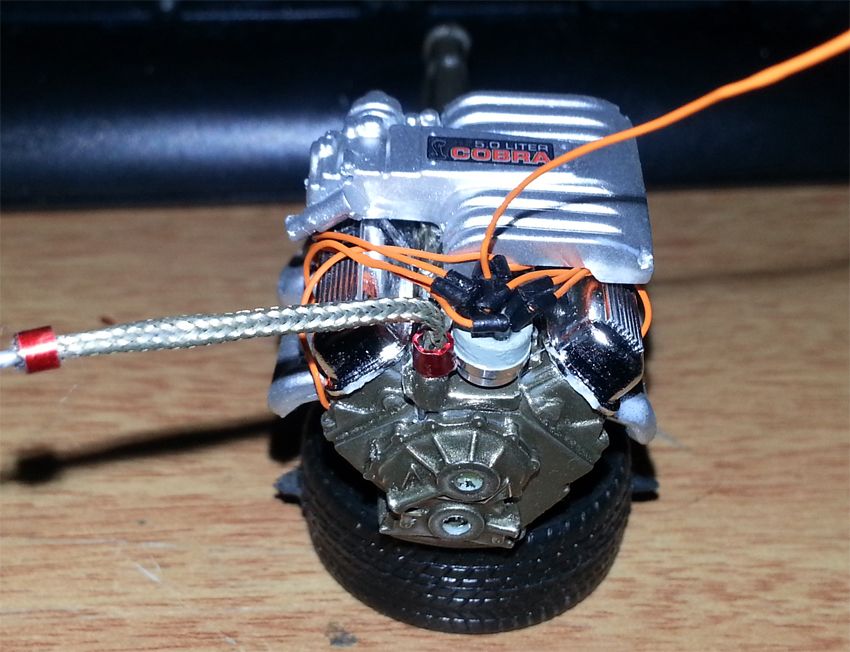
Fan, the engine looks great. What did you use for the boots on the plug wires? Lots of times I use small wire insulation but its a real pain and yours look good, I haven’t figured out how to do a 90 like you have on the distributor.
Eric - u r gonna love it. Good luck. I’d never done it before, and it worked out.
Fan - love the engine work too. Same question as Rom. At first glance I thought aftermarket, but how did you do all that engine work, especially the distributor and the mesh hose connector ends? Last question, is that a NH plate??? When I expand it I can’t tell. I live in NH.
I used the insulation that came with the distributor kit. I’ll see if I can do a video on how to make them 90 degree’s like that.
Ok well here’s a tutorial on how I made them. The video was far too long so I just posted this.
fantacmet, Thanks for that post. I have toyed with that very idea in my wee brain but never went to the bench with it. I just hope my antique eyes, along with the Tri-focals and opti-visor will last long enough to do 8! If thats your idea, Kudos to you sir! If its one you picked up somewhere, Kudos for posting it for us! I will give this a try. If I get it to work, they will be on the Vette build, if not, you will see straight ones!
Fantacmet, the Mustang is looking good. I really like the motor.[Y] Thanks for the link for the plug wires.
I got some work done on the Vette this weekend. I got the interior put together. I think it will look good in the car with dark windows.[:$]
I also got the motor, and suspension glued to the chassis. I didn’t get a picture of it, but the front suspension looks like it might be a little higher than the back.[:@] I might have to drop the front spindles a bit.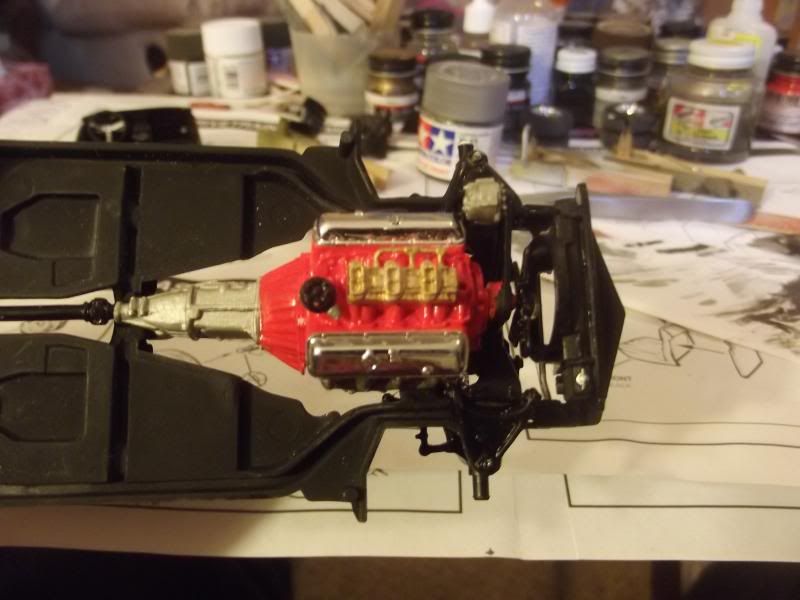
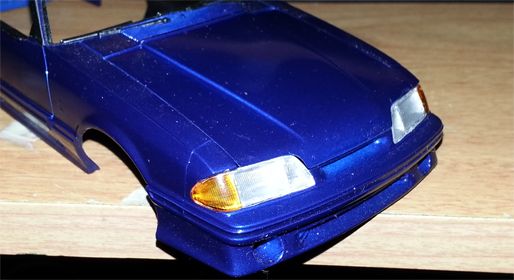
I also spryed the body with Testors The Wet Look, I think that turned out alright.
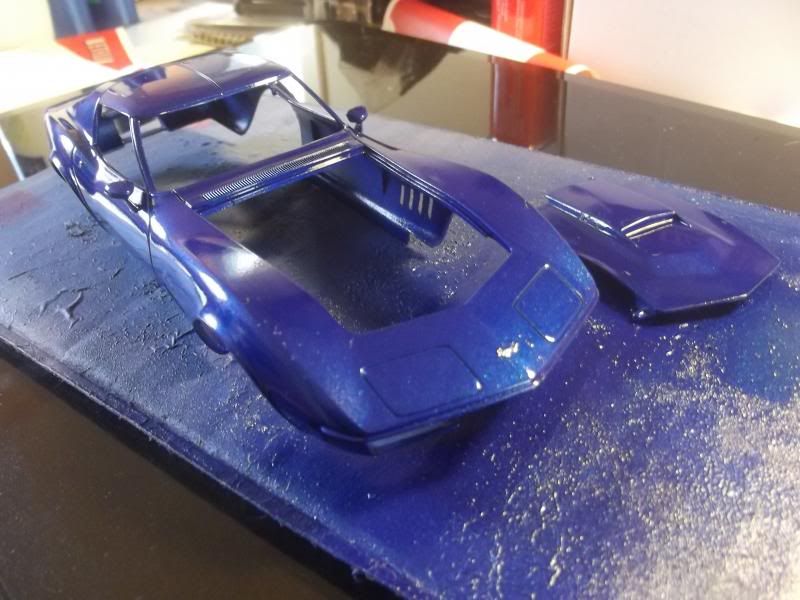
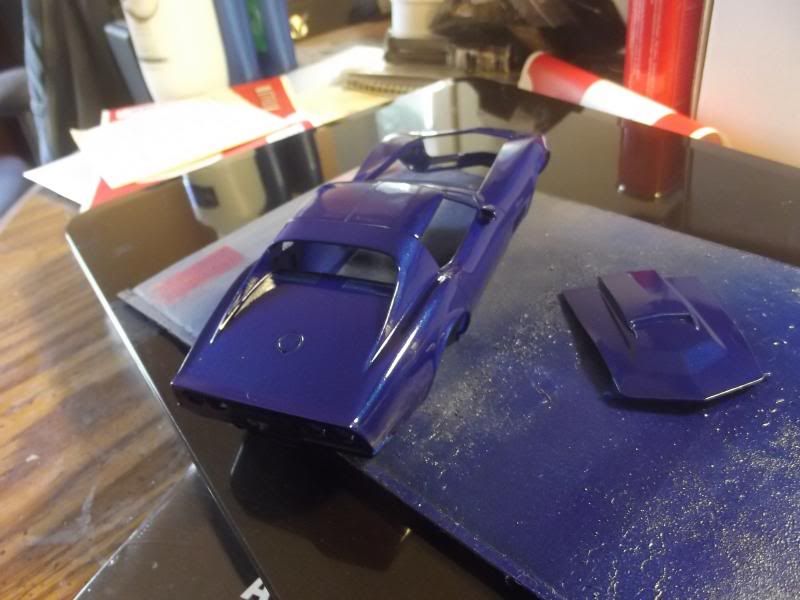
Also did some detail painting that I don’t have pictures of.
I’ll have to give the body a couple more clear coats as I have some decals to add and want to get them under some clear. Also no wet sanding on this one. I left the raised emblems on the body and I’m afraid I’ll sand through them… I’m learning.