Wow Dave, stories like yours and Plasticjunkie’s are just like Halloween all over again! Very scary! [:O]
Ken
Wow Dave, stories like yours and Plasticjunkie’s are just like Halloween all over again! Very scary! [:O]
Ken
Just an update on my progress so far. Finally starting to look respectable (to me anyway[:D]). I still plan on adding a little more detail, then get this glued in to the fuselage. 
Hi Mike,
That is looking really good! Excellent detail! [Y] [Y]
Ken
Hi Everyone,
I thought I would pass along that Trumpeter has announced that they will be releasing their 1/48 A-37B Dragonfly in March next year! Very cool!
Since the first time I saw the Dragonfly I have always thought of it as a sports car with wings.
Ken
Ken
ROG had a 1/48 Dragonfly (www.cybermodeler.com/…/kit_rg_4503.shtml) out but I think is OOP but available on ebay now and then for a lot less than the Trumpy kit. There is an A version from Trumpeter available now at Scale Hobbyist .
The ROG has raised lines while the Trumpy kit will probably have recessed ones which look better IMO.
Hi Plasticjunkie,
Yes I have the Revell kit along with the Trumpeter A version. I also have the Encore Models kit. And yes, both the Revell and Encore (which is a modernized re-boxing of the Revell kit) have raised panel lines and details. The Trumpeter kit is a new tooling with recessed panel lines and details.
Ken
Ken
Don’t fear the raised lines. I use a black Prismacolor pencil and very lightly run it on the raised lines. The pencil is held sideways so the sides and not the point is used to get subtle soft lines. Best to do it over flat paint so the pencil can bite into the finish. The trick is not to make the lines too dark.
Hi Plasticjunkie,
No fear of raised detail, it is just my personal opinion that recessed detail is more “realistic”. Heck, raised detail was all that was available when I was building as a kid. And I have made a point of purchasing some of the older kits out of nostalgia.
That is a good trick you gave for detailing with raised lines. Thank you for sharing that!
Ken
Here’s another update on my Invader. I added another missing detail on the right side of the fuselage which is a small hatch door, hinges and the door handle. The vertical lines were scribed and the hinges and handle are stretched sprue cut to size then glued with slow CA applied with a toothpick.
before…

and after…

The engines were painted metallic silver and given a black wash to pop details.

Engines and canopy are in place and secured

I recently read on one of the threads here in FSM about the wonders of “Perfect Plastic Putty” made by Deluxe Materials in the UK. This stuff is fantastic. It spreads very easily and sands extra smooth with super fine sticks producing an ultra fine surface.

I ran a Q Tip moistened with rubbing alcohol over the seams to check for defects. The alcohol lets you see while wet and glossy if any imperfections are visible. I then applied the Perfect Plastic Putty product over the suspected areas and let it dry over night. The directions said 20 minutes but bedtime was close.

The putty doesn’t shrink and sands very easily with little pressure on the sanding stick. It took care of a couple of dips at the joins. Any missing lines were restored with the UMM Scriber, another life saver.

I even discovered a small dip on one of the tanks but the plastic putty took care of it.

Just when I think I’m getting ready for paint, I discover another missing detail. More to come.
Wow! Great work once again Plasticjunkie! [Y] [Y] Very nice work on the hatch door. Definitely adds more detail. And the engines look great!
And thank you for the tip on the Perfect Plastic Putty. Where did you purchase that?
Ken
Hey, I found Perfect Plastic Putty on Amazon.com. I just ordered a tube. Thanks again Plasticjunkie for the tip.
Ken
Ken, I got mine at my LHS the other day. You are going to love it.
Hey. guys. everyones builds look great. Thanks for all the comments everyone has given and especially the tips and advice.
I have made a little more progress on the f-100D.

Dry fit of the tub and glued the 20mm ammo bay in place.

The shiny spot on the floor is where some super glue wicked out as I glued the stick in place. How do you guys avoid this? I suppose it won’t matter after clear coating and weathering and then a flat coat.
Hi Mike,
The Super Sabre is coming along nicely!! [Y] [Y] Great work!
As to the super glue, there are a couple of approaches to getting the glue exactly where you want it. One is to use a C/A Applicator by Flex-I-File. It has a double prong (very small) that you dip into a small puddle of C/A. Then you just touch the spot where you need it.
Another product is also made by Flex-I-File. It is called “Touch-N-Flow Applicator”. Here is a link to their webpage:
http://www.flex-i-file.com/adhesives.php
You can purchase these from their website or from several hobby shops.
Ken
Mailwaker
The pit looks good. Just shoot some clear flat and the shine will go away. Ken gave you good ideas but be aware that Touch N Flow makes two types of applicators, one for CA and the other for liquid glue like Tenax and Plast I Weld and both look identical.
If you want to go the cheap way for a CA applicator, take a sewing needle and remove the tip of the eye and slightly open it with a blade. Chuck it into a hand vise and you are ready to dispense a drop of either thin or thick CA precisely where you want it to go.

Happy Thanksgiving everyone!
Ken
Hi Everyone!
Whenever I hear of a new product that pertains to this group build, I do my best to post it. I just discovered a new decal sheet produced by Caracal Models for the new Roden 1/72 C-123B Provider. Here is a link to a short review by Cybermodeler:
http://www.cybermodeler.com/hobby/decals/caracal/decal_caracal_72027.shtml
Ken
Ken,
I occurs to me that my Trumpeter F-100F Super Saber would fit into this group build. I may join in once I get closer to finishing one of the other kits I have on deck now - not to mention the other big project in my personal life that you know about.
Jim
Very cool Jim! That would be great! Just let me know when you are ready and I will update the roster.
Ken
Hi Everyone,
After my Dad passed away nearly 5 years ago, I have looked at the following picture many times trying to figure out the story. This picture was taken at Tan Son Nhut Air Base in Vietnam around August of 1964. You can tell in the picture that something is going on because everyone in it is looking at the same spot. And several people are running toward the area that everyone is starring at.
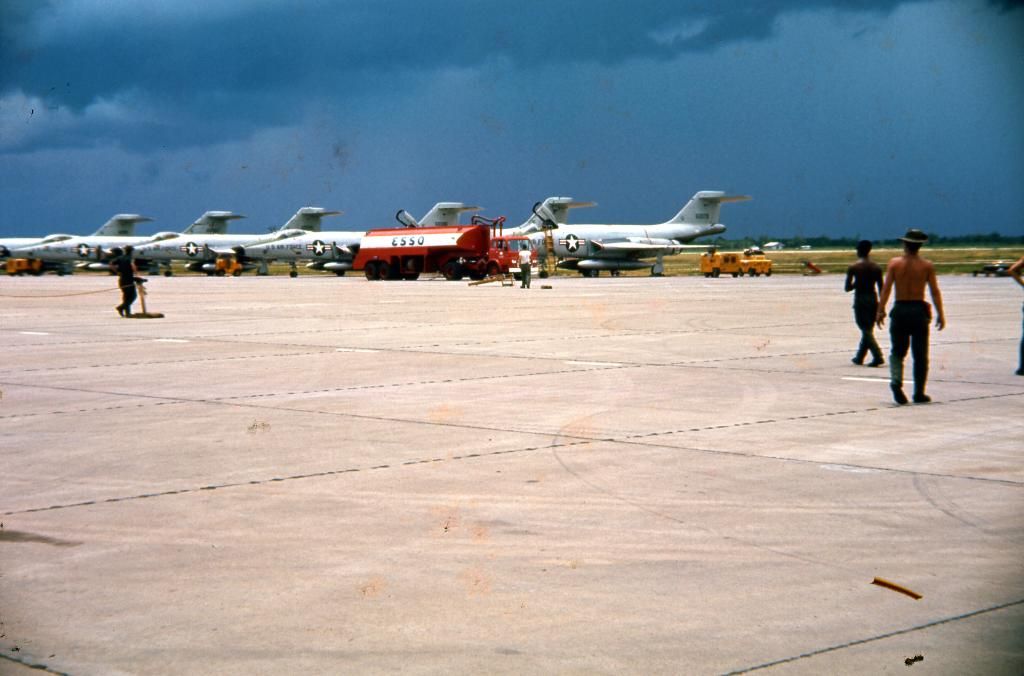
I have finally figured out why my Dad took this picture. I have blown up the area and circled the spot in the following picture:
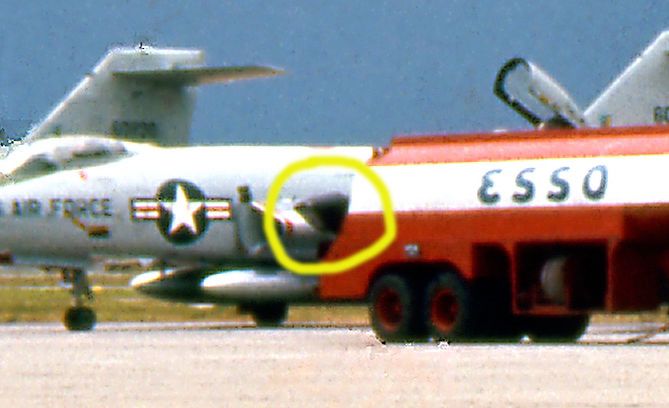
What I have circled is the nose of a RF-101C. The fuel truck has backed into it! Now go back to the first picture and you can understand now what is going on. Very cool that I finally figured it out!
Ken