Would You Please get that fishy smelling thing away from my fine Yacht ? You are doing very well there . I would have recomended taking the Winch and rope and re-doing them scratch .
There’s a lot on that boat you will find with flash . Remember it’s been around for over twenty years and Gosh knows how the molds have been cared for . I wouldn’t be surprised if you have problems with the deck-house and upper stuff .
Thanks! Any tips on how to go about doing that aspect of scratch building? I’ve never done it before, this is only my second build.
I‘d like to learn some scratch building because, as I mentioned in the diorama forum, I want to alter the set of the Russian nuclear icebreaker Arktika to make the other icebreaker Yamal (a very striking vessel).
The normal way that Waterlines and Boot stripes are done on any model , unless it’s molded in , is this . The model is supported in a position that’s level , side to side and fore and aft to where the lines should be .
Then here’s the rub , You get a good soft lead pencil Or a Sharpie marking pen Medium point . Take this and rig a block you can hold , That is the right heighth when the pencil or Sharpie is on the hull . Now take the block and slide it to the point where the writing tool touches the hull at the bow .
Gently slide it along the hull following the hull’s curve . This has worked for hundreds of years and still works now . When done you will have what you need .
I use the Sharpie because under a coat of Acrylic Semi-Gloss it is as black as paint . I picked this up from all the car guys I know , that use Sharpies to do the black stuff around today’s modern car glass .
It makes Boot striping easier And you can also ( if you are brave ) use a scribe or engraving tool . Mark the hull with a scribed line instead . Then tape off and spray or brush paint the lines freehand .
Sounds like a good project . There are lots of tutorials on scratch building here and in Kalmbach’s dvd of Model Ship Builders Collection . That DVD is specifically for model boat builders .
I could show you a way to make a winch for instance out of the right sized push pins and some .040 plastic . The drawings and explanation would take a day though . Doing it for my classes took about an hour .
If You want I will send drawings and text to you by snail mail if you want ! Just contact me on the message board . Tanker Builder
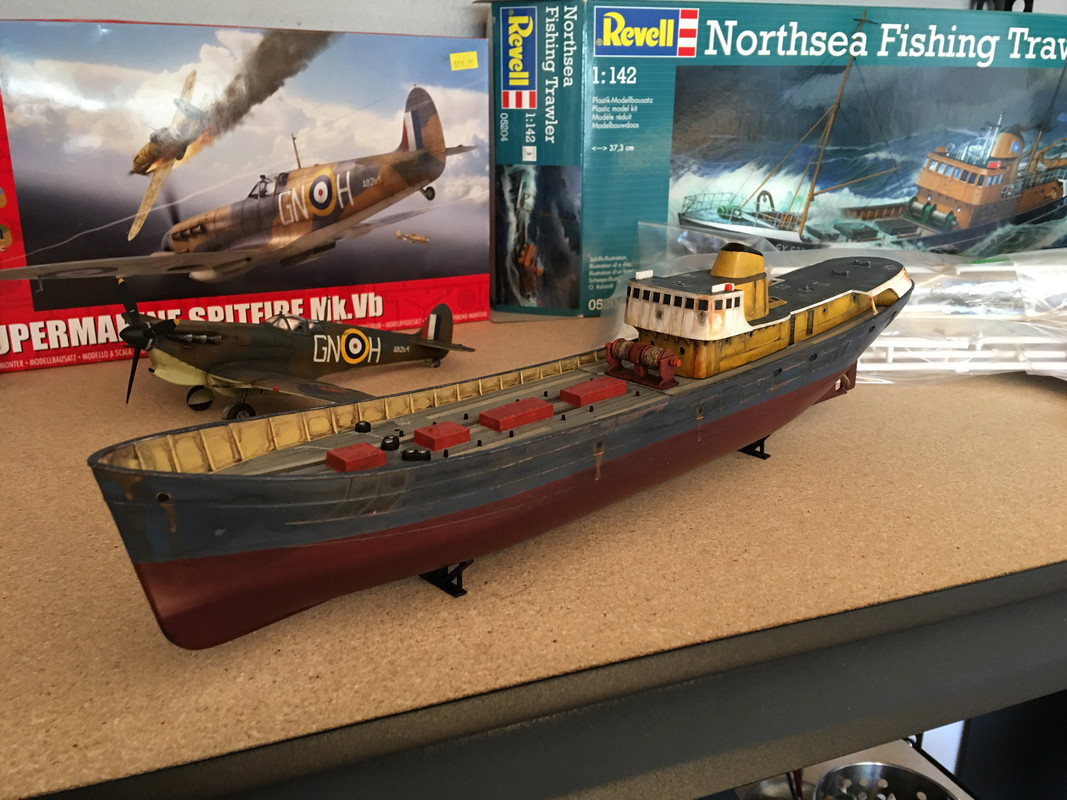
It’s been a week, and I’ve finished the bulk of the superstructure (still unglued to the hull). What a slog! I learned thing or two about planning big parts like this out. Thankfully the windows were actually quite easy to do, I was dreading that part but I took an unconventional route of just filling them in with my Faber Castell artist pens (the finest-topped one they make). On the while I’m finding using acrylics far more easier and fun to work with, the downside is that the paint seems quite fragile. I do prime, so the paint does have some teeth, but still it’s easy to wipe or wear or chip off paint at the high points.
I had no idea that was how it’s been done over the years, but that’s exactly how I did the fouling/water line on my Black Pearl build. Just seemed like the simplest way to do it at the time.
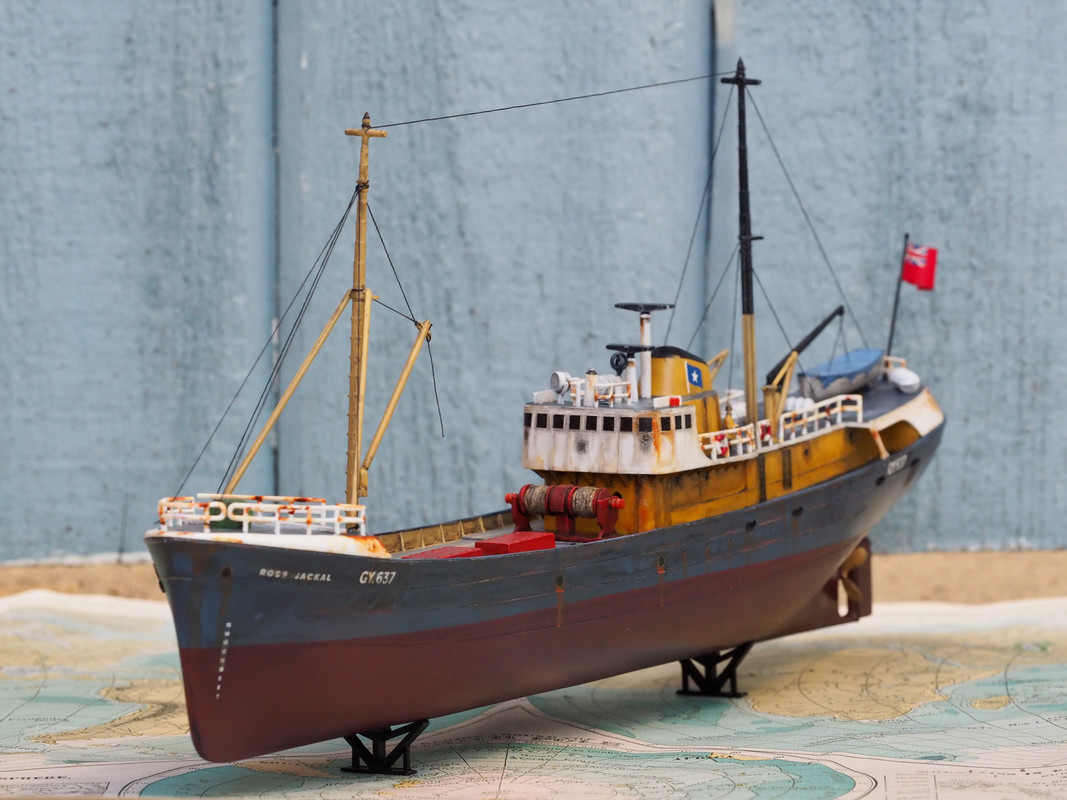
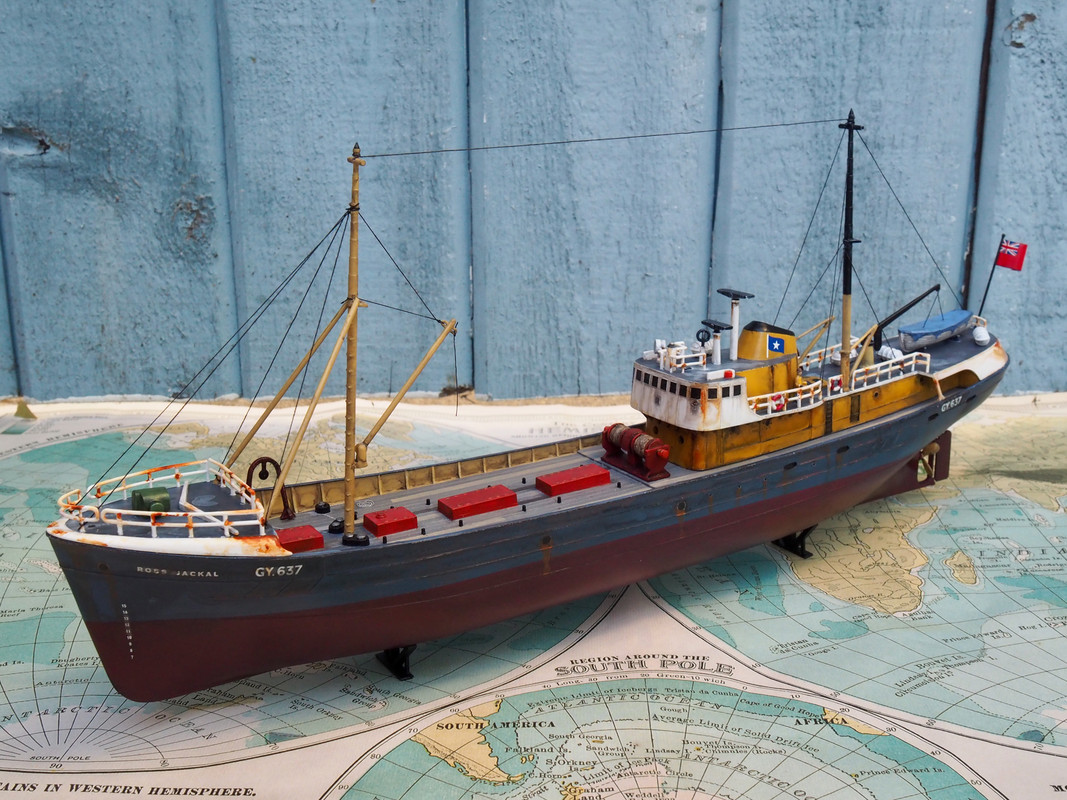
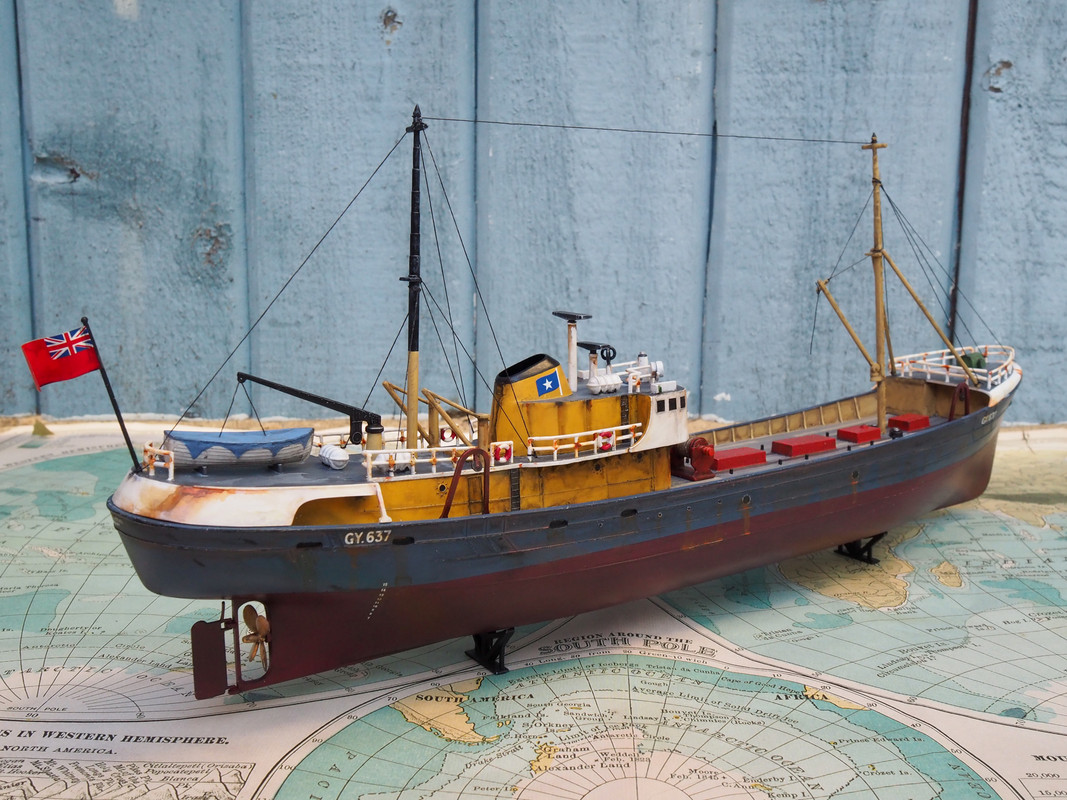
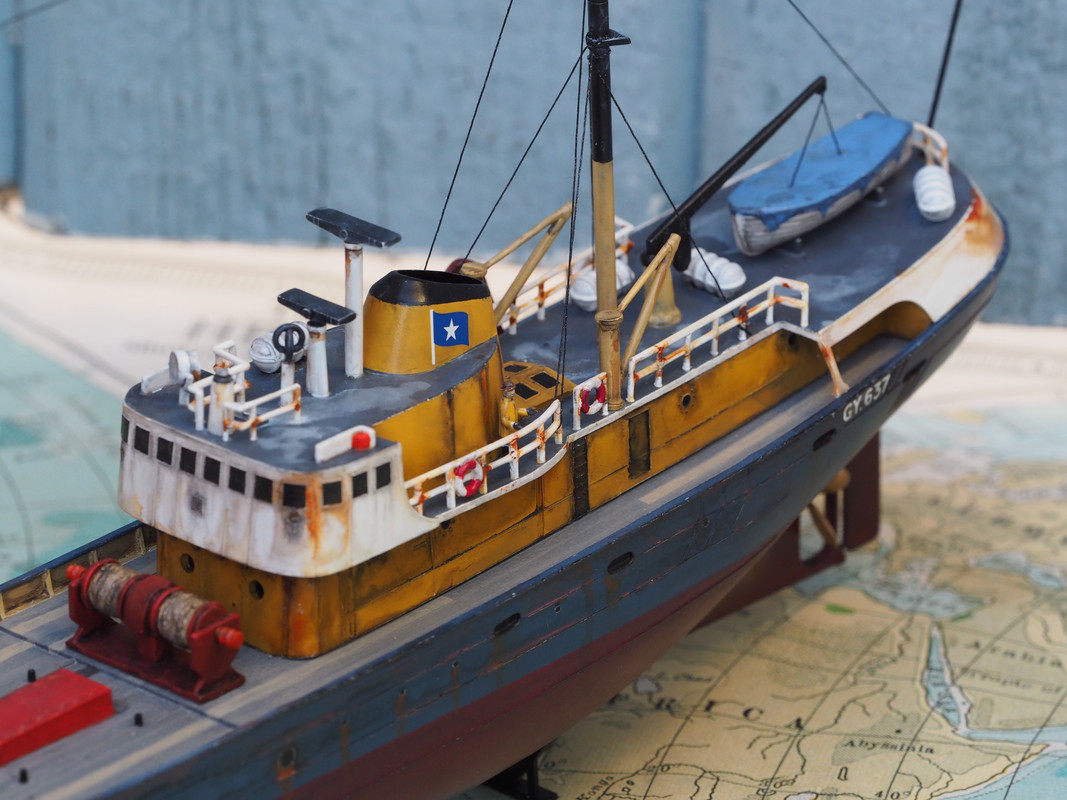
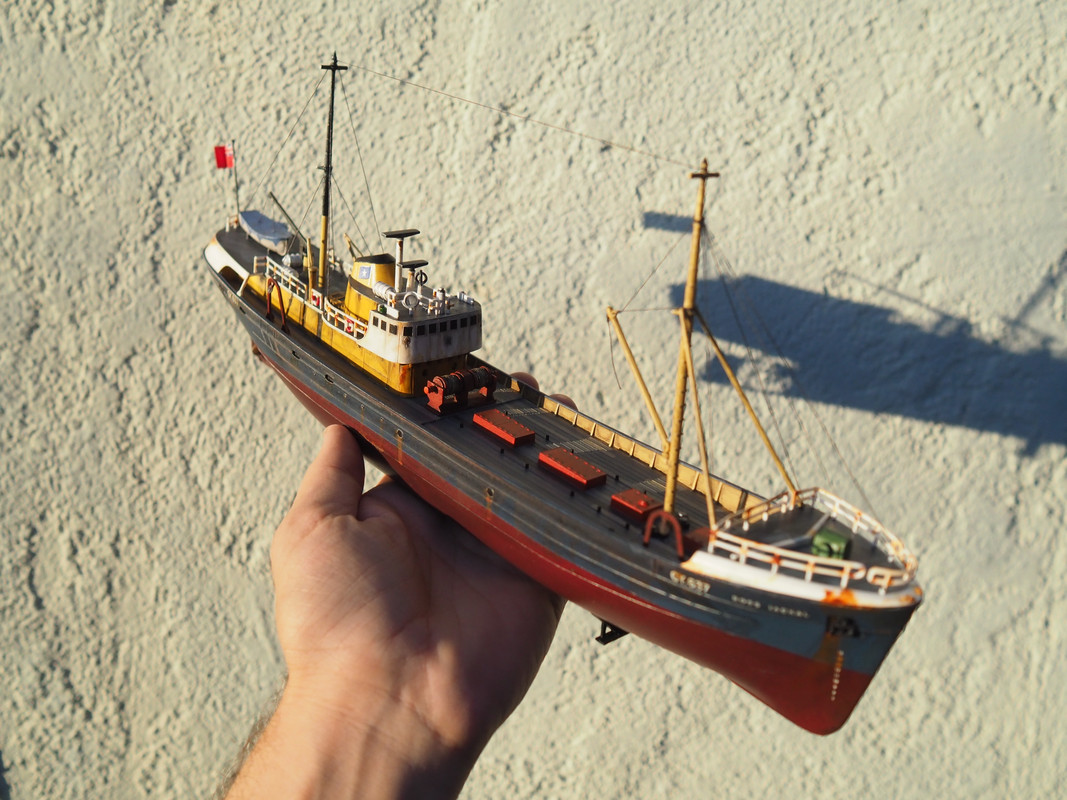
Well I completed the build. Biggest takeaway is that I need a bigger, better workbench. I may make one. I also need better lighting with a magnifying glass on it, I was really straining my eyes with this. Anyway, here’s my weathered, salty and rusty trawler. I like working with acrylic washes as it reminds me of watercolor painting. I was sort of rushing through this build as I’m not going to be able to spend time on kits for the next 3 weeks, nor do I want to think about them (vacation coming up), but I did spend a lot of hours on this in hindsight. Those life preservers were a pain to paint, and ended up using a finely sharpened toothpick a lot. On that note, my wife was impressed, saying she can barely paint her nails let alone something like those tiny life preservers. All in all I’m pretty happy with how it came out, and it looks better in person I feel.
That looks great. Its amazing what you have accomplished with this old kit. (I sometimes get a little defensive when I hear people criticise old kits. I know that they may not be as great as some newer stuff, but I always feel that given some effort you can still do something with them. And in the right hands there is the potential for a really nice build, like you have shown with your build)[:D]
Thanks for the comments. Yes, the age of the kit was a wee bit problematic; some of the details were almost worn away on one ladder on the top of the superstructure, and almost completely vanished on that forecastle part. The railings were very inconsistent. Having said that, there was still plenty of teen to be creative and improvise. I would like to get into dioramas, but I’m not sure where to begin. I’m sure FSM has a book I can pick up about it. But I think I’d like to start really small, like with a very small battleship in water (maybe with an island) to begin with.
As far as dioramas are concerned there is information about how to build them on the ‘net. You might look at some accomplished modelers’ completed builds for ideas. This guy was one of the best:
Shipspotting.com recently posted this photo of the British fishing trawler WYRE VANGUARD, built in 1955 and seen in this picture in September 1969 returning back to port at Fleetwood, England. Went to the breakers yard in 1981. This trawler looks like the finished model.
Making things filthy is pretty forgiving. Tonthat end I’m thinking my first diorama may be along the lines of a WWI tank with some infantry figures. Then I’ll move onto something more precise and clean with ships, like the Russian Nuclear Icebreaker I was talking about, and also the Hasegawa Soya Antarctic Observation ship (I don’t think I’m ready for that yet though).