Here are pics of my ship’s boats built early on. I’m sorry I did not take more pictures while constructing them. Basically, I sanded and primed all pieces white. I taped off hull and painted keels rust enamel. It gives a warmer look to me. I also used the rust on seats for the boats but tried to give a ‘worn’ look to where the men would have been seated by brushing off some of the paint. Floor of hull was painted dark brown. I then glued seats to boat hulls. My oars were painted with light brown and paddles a dark brown. I used a fine brush on my first two oars rowlocks, but switched over to using a fine point black marker for the rest. One learns along the way! Some one must have thrown me a peanut LOL * I realize I need to add more oars to my boats - things to do.[00ps]
I came across a post on Making Rope Coils on NRG’s site by Modeler12 and borrowed his aproach by putting a nail through a block of wood and attaching two pieces of plastic to ‘sandwich’ the line and keep coil flat. After dipping my line in 50/50 mix water & white glue, I attached string to nail and then turned my wood block while I kept line tight in my other hand until I had my coil. Then removed off of nail with xacto before coil completely dried. * I plan to use Hornet’s idea for future coils by using kids plastic ‘counters’ from that same post for making mulitiple coils. After making my coils, I then glued them down on floor of each boat (some where used after a line was tied and glued from eyelet to hull floor, then coil placed on top on line).
These pics were taken around August of 2016 and I put together my wooden base, drilled holes in hull for mounting and LED lighting with dimmer switch, and glued the Scaledecks wood deck onto the spar deck. I glued on the stove funnel and capston to deck. Rework time: After looking at the diagram of funnel in AOS and a build by Force9, I decided to redo the funnel. 1st step was to use a 1/4" punch on a thin piece of styrene to create baffle. I then used a stem of one of my eye pins to bend into a U-shape. I glued that to each side of funnel opening and then glued my styrene punch to the wire. I drilled holes at the base of the funnel and glued eyelets into them to create the turning of funnel. Finished by painting all with flat black.
I bought my base of wood at Michael’s and cut 1/4" square length of wood into 4.5" lengths to use as cross beams. I used 1/2" square length of wood to make ‘rails’ to run the length of keel and hide my mounting bolts and wiring into the ship’s hull. Base and rails stained with Cabot Autumn Glow and cross beams stained with Testors Flat Black Acrylic Wash.
Toshi - HaPpY HoLiDaYS to you! Thanks for taking a look and following along. I see you are retired also. It’s good to stay busy and creative. This is my fourth model build and my first attempt with a true sailng ship. So far, things have been going fairly smooth with this kit and I will be extremly happy when I get my decks in place. Cheers and enjoy yoursel![Y]
Robert, I hope I am not too late to remind you to put a piece of shaped 1x2 or a piece of large dowel in the bottom of the hull to take screws that hold the ship to the base. I even did that on my big wood models. You can super glue or epoxy them in & about 6" or 7" long
Maybe I didn’t understand what you have already done to take care of this.
Thanks Gene for that advice. As of now, I have to two metal bolts that will run up from bottom of wood base into the hull of the ship. Tightened down with washers and nuts. It seems tight enough but maybe I will add glue to them to keep them from loosening. [:)]
Bill Morrison - you’re absoluetly right about the wonderful modelers in these pages. The gallery is filled with model after model of finely worked kits. These sites are an inmense help for someone like myself in working on one’s skills while, at the same time, seeing how many amazing models from modelers are out there. Hats off to all of them![:D[
O.K. So my goals for December is to 1) finish installing my lights in the hull, 2) get my gun deck mounted in place and 3) try to start getting my 24 pounders in. I also purchased from Megahobby - Bragdon Enterprises set of weathering powders (FF-162) for my copper painted hull. Set includes Old Yeller,Green Grunge,The Blues,& Used Brick. Somewhere, in one of the posts I had read, a gentleman mentioned that he had used these products (sparingly) on his painted hull to achieve his weathering and had included a picture that looked really nice. I’ll see how it goes when they arrive.
My micro drill bits took a slight detour thanks to UPS but they finally arrived! While waiting, I started in on dulling down my copper painted hull using Green Grunge and Used Brick powders from Bragdon Enterprises. I used a stiff bristle brush to apply powders, then hit with Dullcoat. Repeated process a second time. Maybe one or two more layers and I’ll stop. I do not want to weather it too far.[*-)]
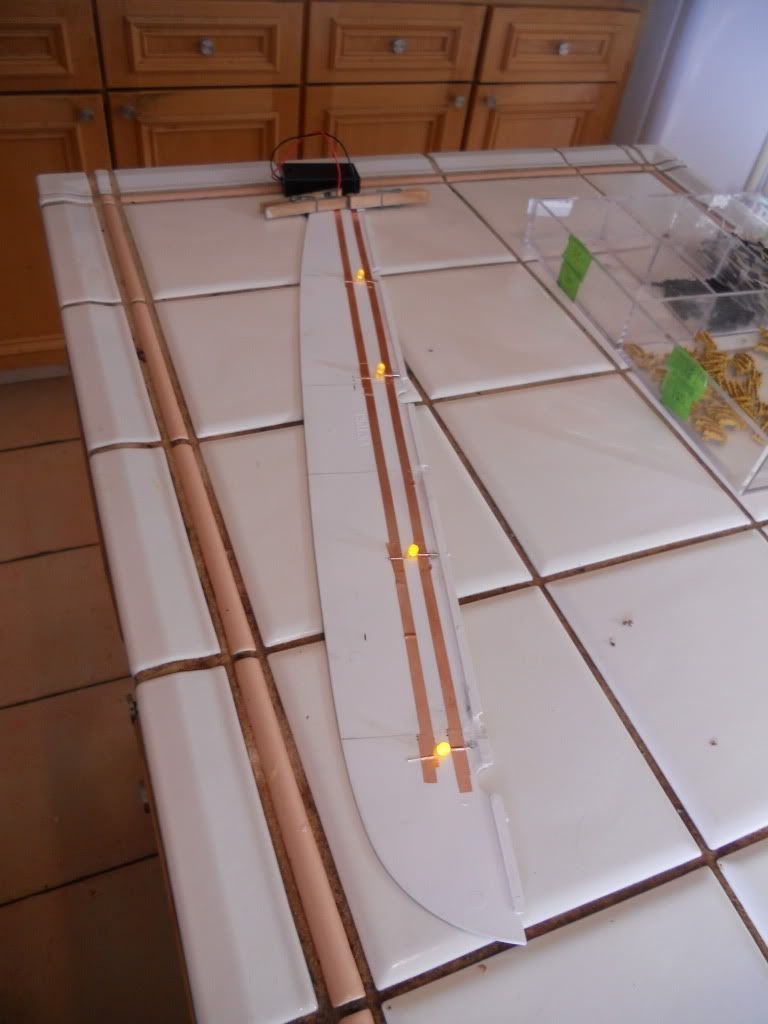
If you are interested, this is how I installed lights in my Victory.
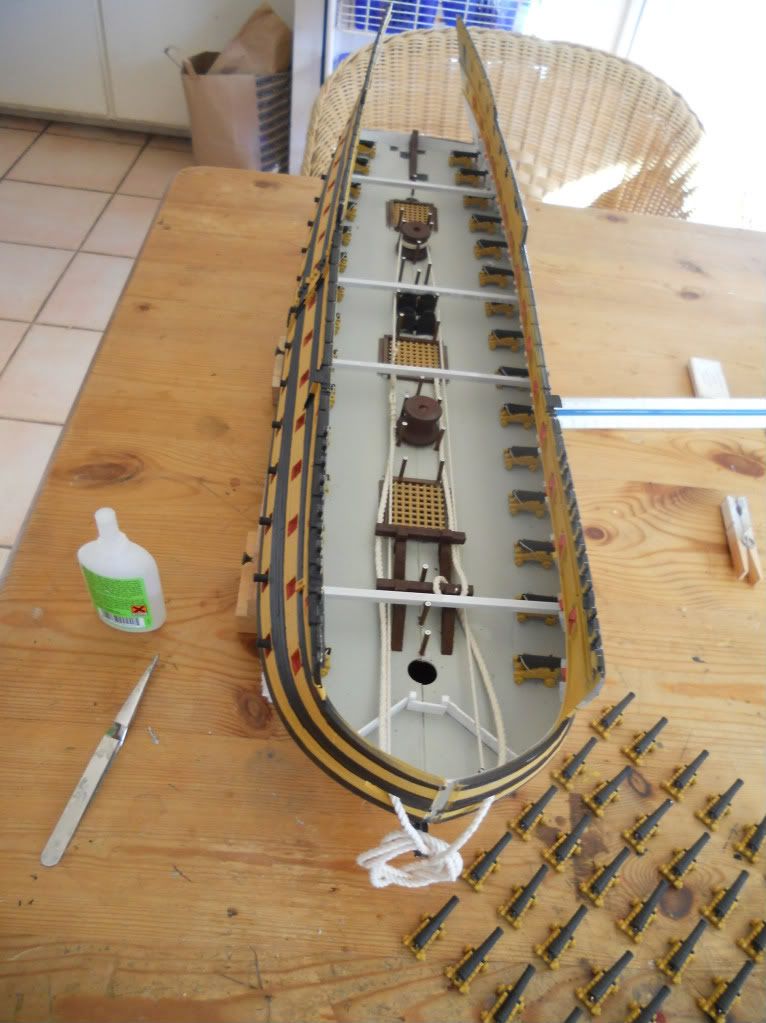
Lower gun deck exposed.
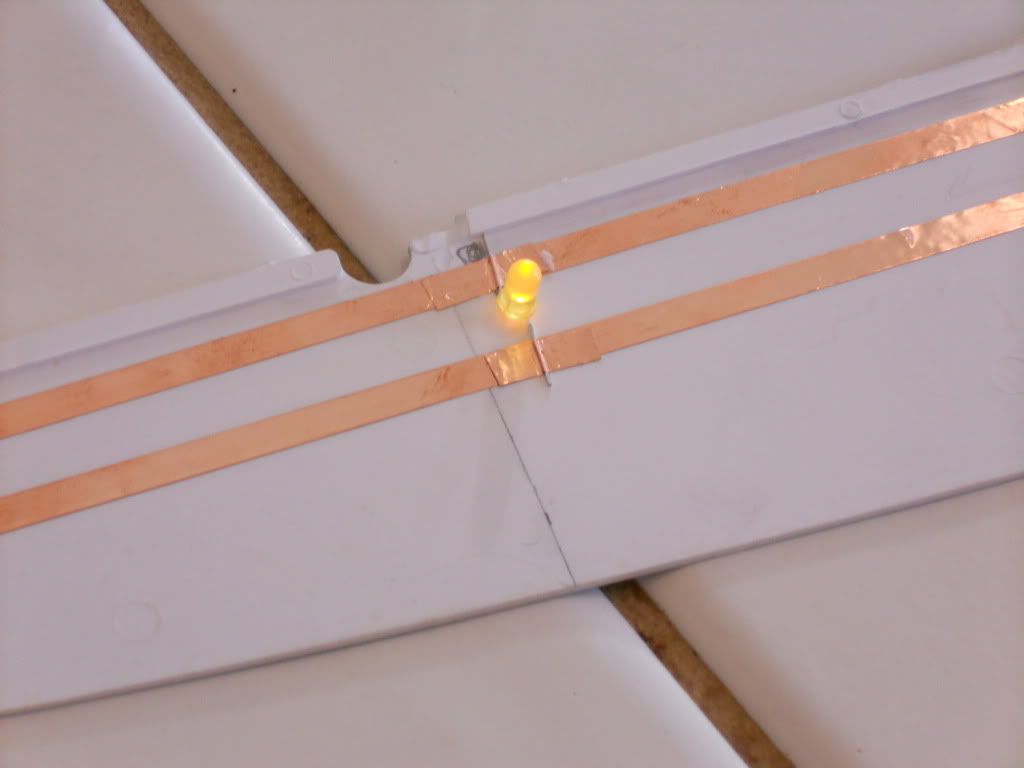
Underside of the middle gun deck.
I have a supply of copper tape in various widths from a stained glass supplier. I use it to copper some of my hulls. It is self adhesive and burnished down nicely over the leads to a series of amber LEDs. I’ve attached the leads from the battery pack to the ends, a real minimum of wiring.
GMorrisson - the way you did your lights looks pretty easy. Is your battery pack simply wired to the copper tape? With no diodes? I did not want to use a battery system on mine and, an article I looked at was telling me I would need to add diodes to change voltage depending on the number of lights, volts, amps etc. Over my head! So I went with a LED ribbon kit from HiLights that included a power outlet and dimmer switch. blackened out most of the lights so they wouldn’t saturate the hull with light by covering most of lights with black acrylic paint. I now have to decide if I will bring the ribbon up through the bow or stern of gun deck to attach to underside of the spar deck.
Thank you for letting me know about the locator lugs on hull. I couldn’t figure out what they were for. [:(DD] I’ll get rid of them. As for the weathering powders, I’ll go along with your advice to stop where I am. I just wanted to dull down the brilliance of the copper paint. I have no plans for doing any weathering on the rest of ship. Thanks for following this post and taking the time to give me your opinion [t$t] I’m very grateful to these forums for the assistance and help they provide to other modelers. Cheers!
Bill - your method of running lights looks clean and simple. Is that a simple battery pack holder that is soldered to the copper strips? Up to how many lights will that battery pack run? I looked at 4mm drop led drop lights but, not having any experience in wiring, it started mentioning diodes were needed to in between lights and power source etc. and it went right over my head. LOL Bottom line is, that sure looks pretty simple setup on your kit. Thanks for showing me these photos! Good Holidays to you and loved ones!
Sending a warm HaPpY HoLiDaYs to all of the FSM members. I thank everyone who has followed my progress in modeling; for all of your contributions in this group; sharing your knowledge and talents with others; and hopefully finding peace and comfort in the New Year that lies ahead. Cheers to everyone!!!
Alrighty then - finally got back to working on my ship. Finished installing electrical wiring in the hull. Not pretty but it will be hidden and it WORKS! Attached LED light strip to the underneath side of spar deck. Lights came from HiLights and included roll of LED strip lights, dimmer switch and power transformer for wall outlet. Blacked out some of the lights along the strip. Did a sample run to see what it will look like. Last photo is close up showing my added ‘3rd deck’ through hatch. I can live with the results and can adjust lower or raise the light output with the dimmer! Next step is to get the gun deck mounted into the hull so I can move on with installing the long guns. [<:o)]
Thanks GM - I have zilch electrical skills, but you gave me the motivation to get this finished. Your lighting system looks far neater than mine! ** CORRECTION: this lighting kit is from HitLights, not HiLights.
Thanks to my wife Chris, we got the gun deck mounted into ship’s hull.It needs to be glued and clamped, but she’s in and I can start working on getting the long guns installed!