Some beautiful work here Karl. Awesome job on the scratched interior and top notch weathering the interior. You’re chugging right along on these builds lately. You better get as much building done as possible because this weekend looks awesome, can I hear Brrrrappp braaappp in the woods of western NY.LOL
For a scratchbuilt “quickie” job that thing looks amazing! I am grabbing the popcorn and getting ready for this one…
Brian
Thanks again, guys!
Huxy—ha ha, sure bud…NOT! lol! [(-D] I appreciate the thought though…I think?!
Terry, thanks sincerely for the nice comments yet again!
Andy—ha ha, you crack me up! It’s funny; that’s the same thing I think about you when I see your 1/72 diorama over there in Dio’s! Excellent work!!
David–YES!!! BRRRAAAAP!!! I really do want to get out there! I’ll be looking for somewhere to rise for sure! Thanks for the kind words!
Brian, thanks for looking in and taking the time to comment! [:D]
So is this one a display model or are ya gonna “put it to work” in a dio?
Awe scratchbuilding and painting Doog. I can imagine how the rest will turn out. Looking forward to seeing this model progress into another masterpiece.
Rob
Display only, Hans–got no more room for Dio’s unless they’re 1/72, until I get a new display bookcase and figure out what the heck to get rid of in order to fit it in my already-cramped apartment!
Very nice work, Karl. Your modest “I threw this together” belies the talent you posess. Really, the building, and amazing painting of an area that a careful veiwer MIGHT get a decent look at, is a testament to your dedication and amazing ability. Thank you for constantly being in sharing mode.
Really intersting subject, too.
Bill
!http://i10.photobucket.com/albums/a144/parisienne-moonlight/emoticon/asdcattivo.gifGood!
Rather see 'ya building a nasty 'ol tank than a “Stooka”.
!http://img480.imageshack.us/img480/1662/doh4jw.gif(Oh what the heck, it’s good to see you build anything!) Such astuteness. Looks like another great workout here doog.
Thanks Bill and Steve! Glad you guys are enjoying this build!
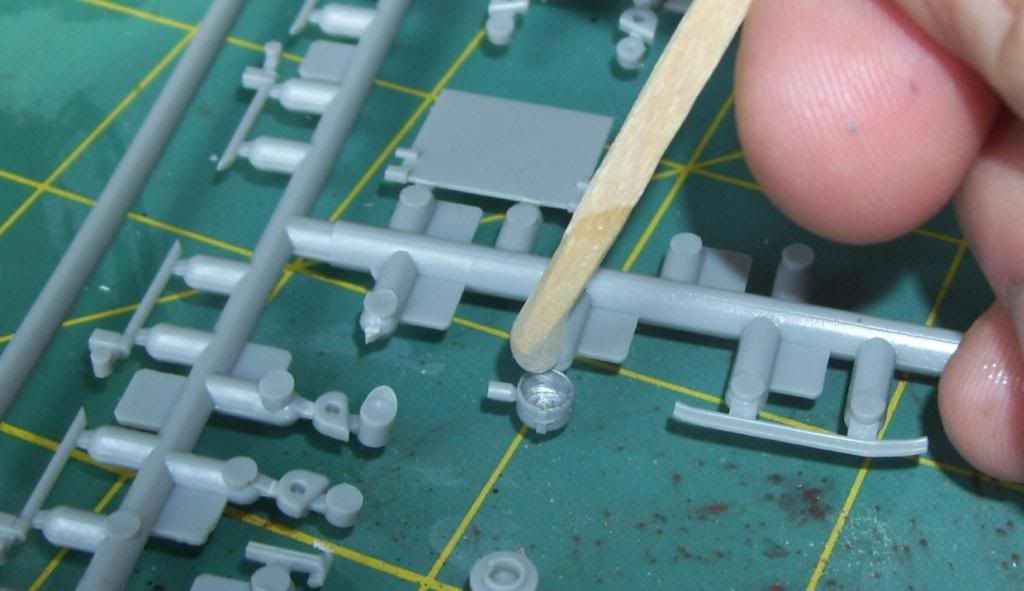
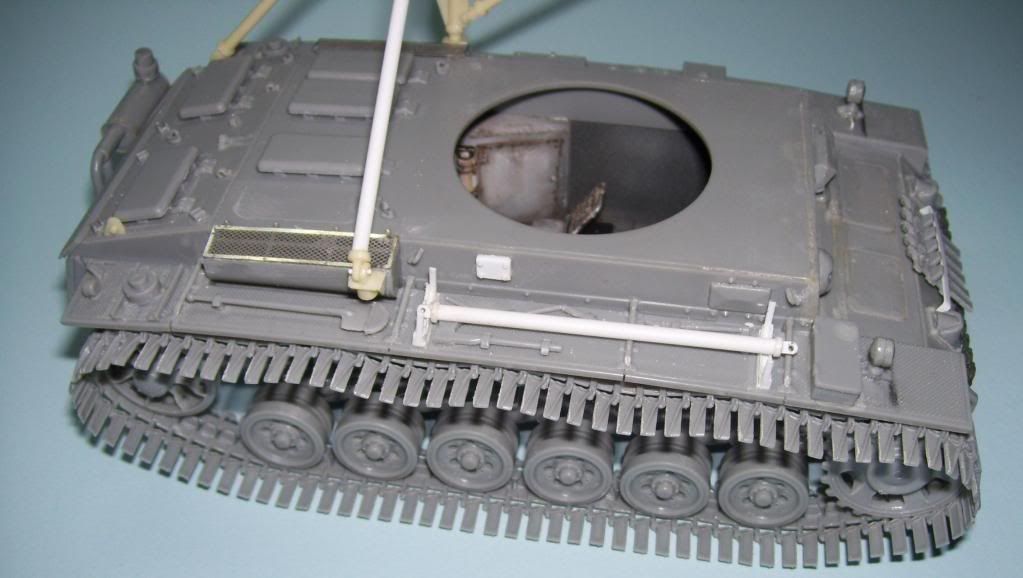
Well, I had a busy week, but I’m plugging away here. I have assembled much of the hull–there’s no turret to speak of, of course. Did some mods here and corrections…I had a weird problem with the molding on the muffler, but fixed the flange here with some sprue. Sharp-eyed readers will also notice that I deliberately put the towing pintle on at an incorrect 90’ angle, just to sharpen my corrective skills and provide a little more "interest"to the build…[:-^] (Yup, had topry this off and correct it later! [:(!])
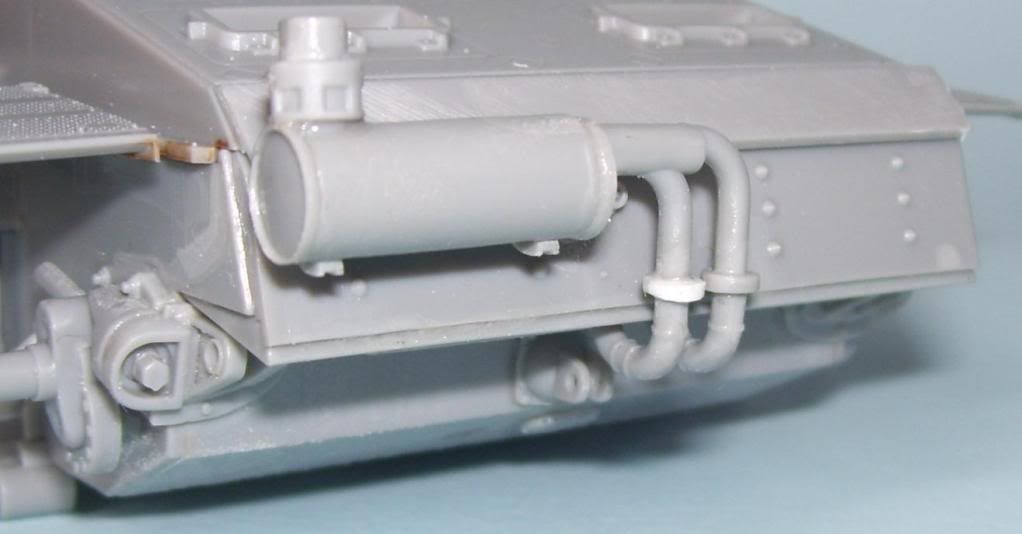
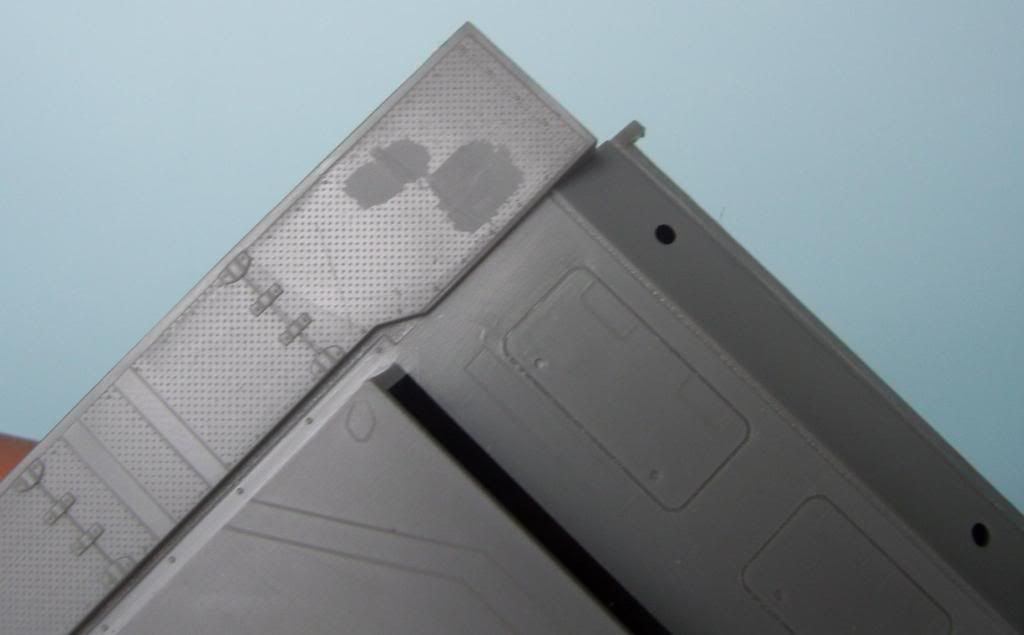
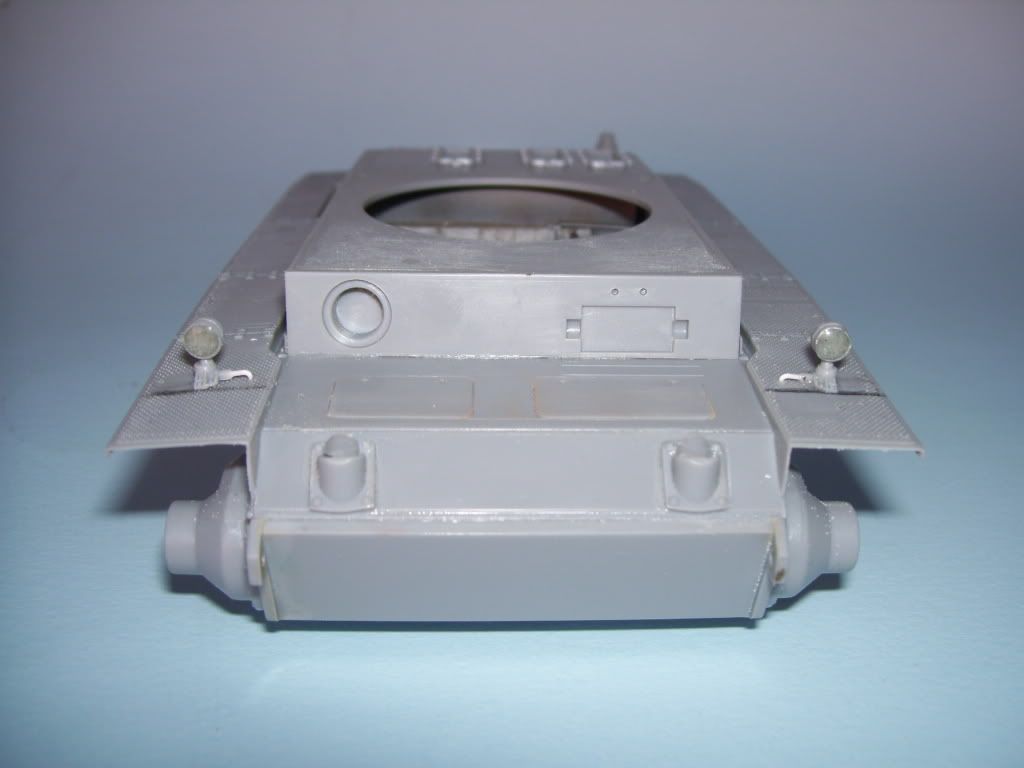
Unfortunately, (as a cost-cutting measure I’m sure) the instructions have you cut off the light bases, which leaves a horendous mar on the fenders. Ah, hell–I probably could have gotten PE fenders for it, but for now, I’ll just put ye ol’ venerable “Oily Rag” over the scar; this IS an engineer’s vehicle, after all…
I deceided to try something different here with the lights. Figuring that maybe a tow at night would have needed more light, and the lights maybe having been uncorked, I decided to try to fill in thelights to make them look a litttle more realsitic. I bored them out with a Dremel tool…

…painted the interior Chrome Silver…
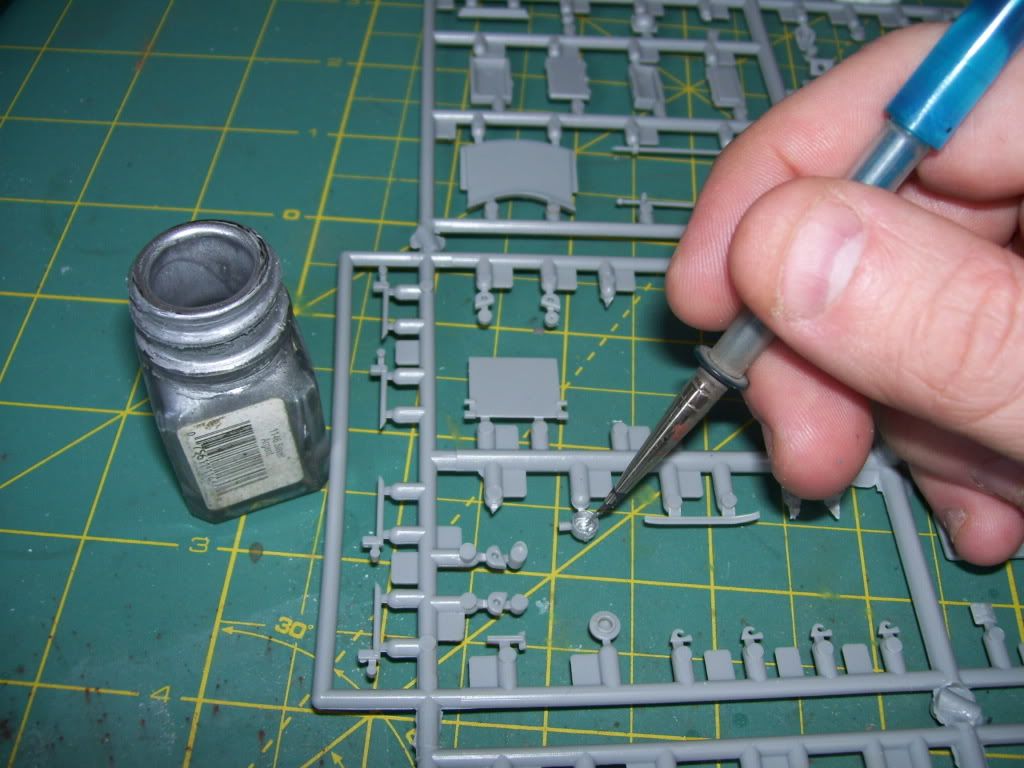
…and hit each one with a drop of epoxy.
Not a bad effort? You have to make sure that you sand away all the molded-on details if you do this–the real light “cans” were featureless, smooth, round-ish half-cups.
I had to reinforce the bottom of the box, becasue the resin molding was so thin between the boards that the boards actually started to sag from being “loose” on one end.
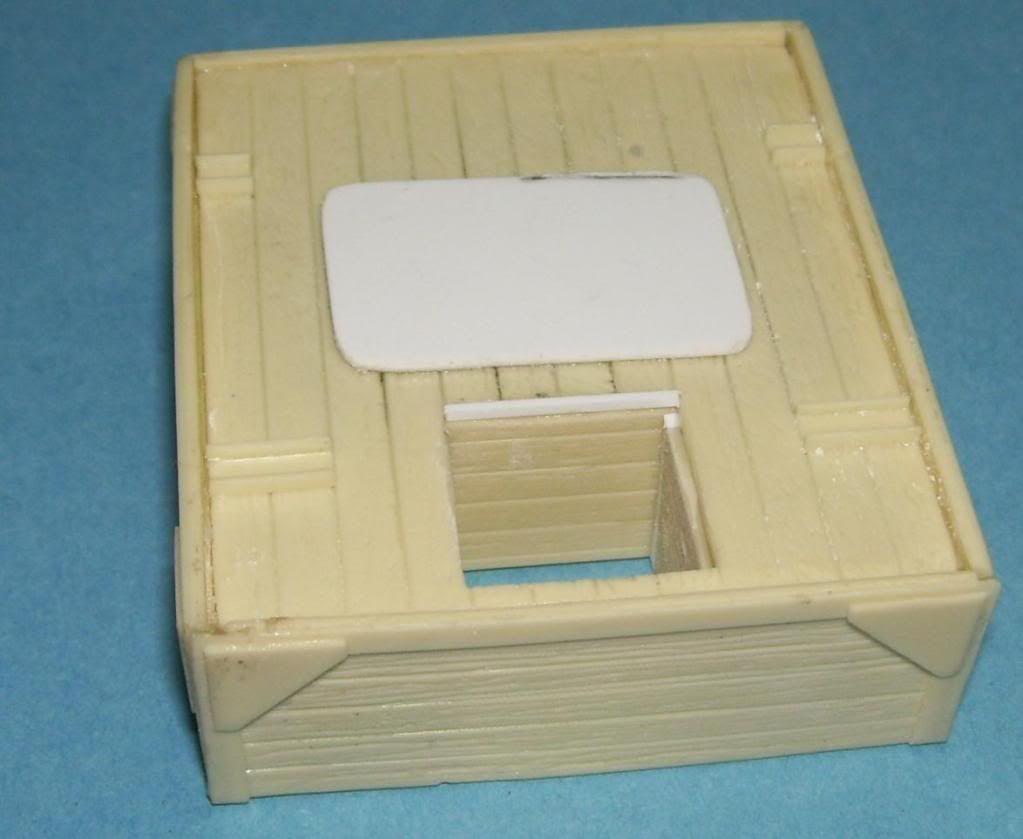
A bummer–one of the inner box’s walls were too short–it wouldn’t match up flush with the outer wall. You would be able to see the perimeter of the “toilet hole” going to the hull there under the box once assembled, so I had to lengthen it with strip. I also took the liberty of engraving “woodgrain” into the strip as well, to match it. I also had to add verious ittle spacers and whatnot to get it all to look sano.
Once assmebled, you can see that it’s passable…I can always occlude this area with addeed junk inside anyway.
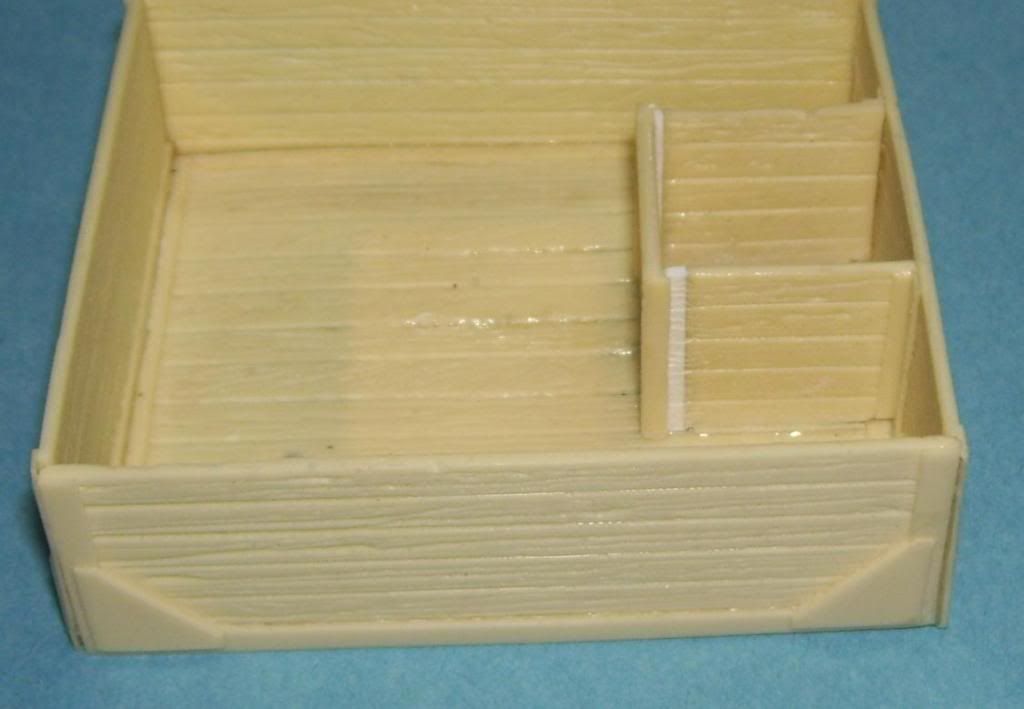
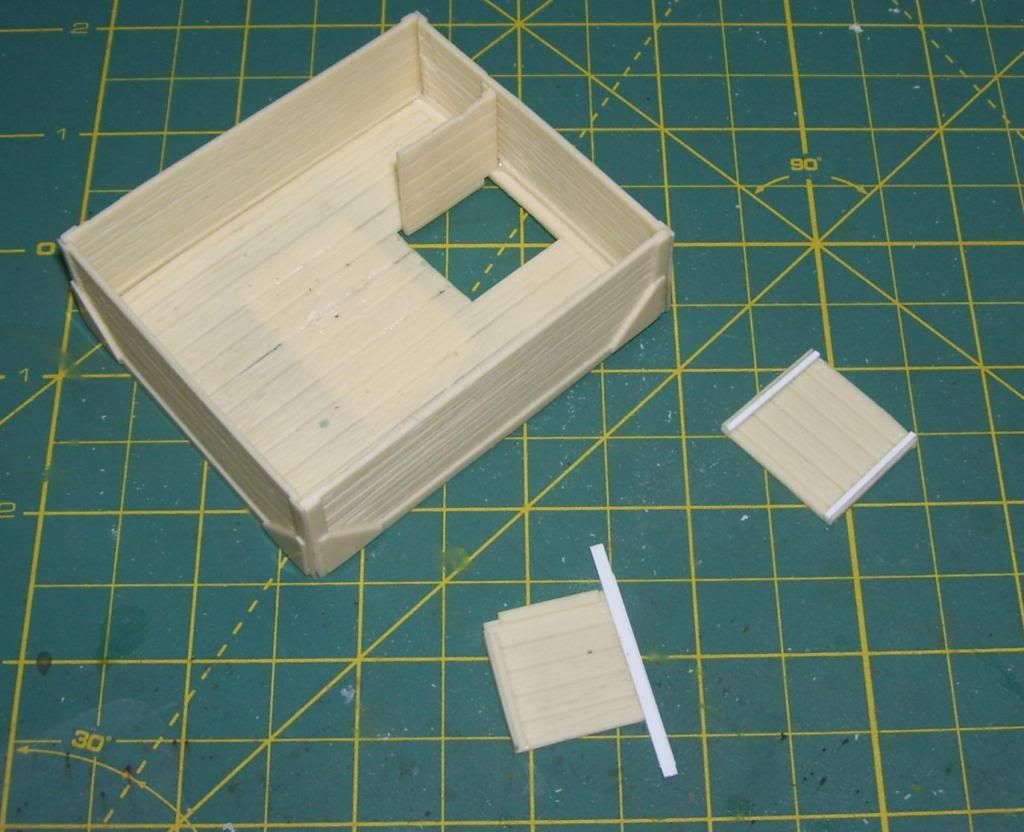
The box so far. I’m thinking that I might leave the box unglued, and paint it separately from the hull? Have to see how that will figure when the crane is assembled?

Sadly, you can’t see [censored] inside the hole, really! [sigh]
That’s it so far! I don’t know if I’ll get much done today-it’s the first day that it’s above 80 degrees here and I’m going BRAPPING!!!
bbrrrrRRAAAAAAAAPPPPP!!! [:D][:D][:D][:D][:D]
Hey Karl, looking good.
I am curious what epoxy you used for the headlight. My next armor build will probably be the 1/35 Abrams I bought, and it comes with 2 figures that I was thinking of trying to make lenses for the goggles for. I think boring the goggles out a little and adding some epoxy might be just the ticket…
Brian
Looking good so far Karl. Really like the lenses. Pitty about the interior visiblity, but then again theres the bonus of getting practice at a bit of scratchbuilding.
Terry.
Karl, this is the same as ChuckW’s builds. You wont see most of the stuff he did to that helldiver, but he knows its there, same goes for you, you know that detail is there, thats all that matters
Coming along nicely Karl, shame about the scarring on the fenders. DML’s older Pz III kits have that tendency unfortunately. I’m looking into doing the Pz III M in the near future and just added one more item to my list of needed things based on what you’ve encountered. [;)]
WOW! Came in late, but let me say, it’s really a shame that your interior got covered up, it looks amazing!!! Nice fix on the wood, you sure can scribe! Now are you sure you didn’t just paint strips of the wood white to make it look like you lengthened it with styrene? haha good work on practicing your corrective skills on the tow hitch [;)] I can totally picture you messing things up on purpose just to see if you could fix them later on. The best has got to keep sharp some how…
Hey Guys—well, it’s been a long road to this point. Thanks for the comments, and I’m sorry for not acknowledging them sooner; I’ve really been just lax from being stressed out and under pressure with all that’s been happening here.
Brian, I just used regular 5-minute epoxy from a hardware store; nothing fancy! [:)]
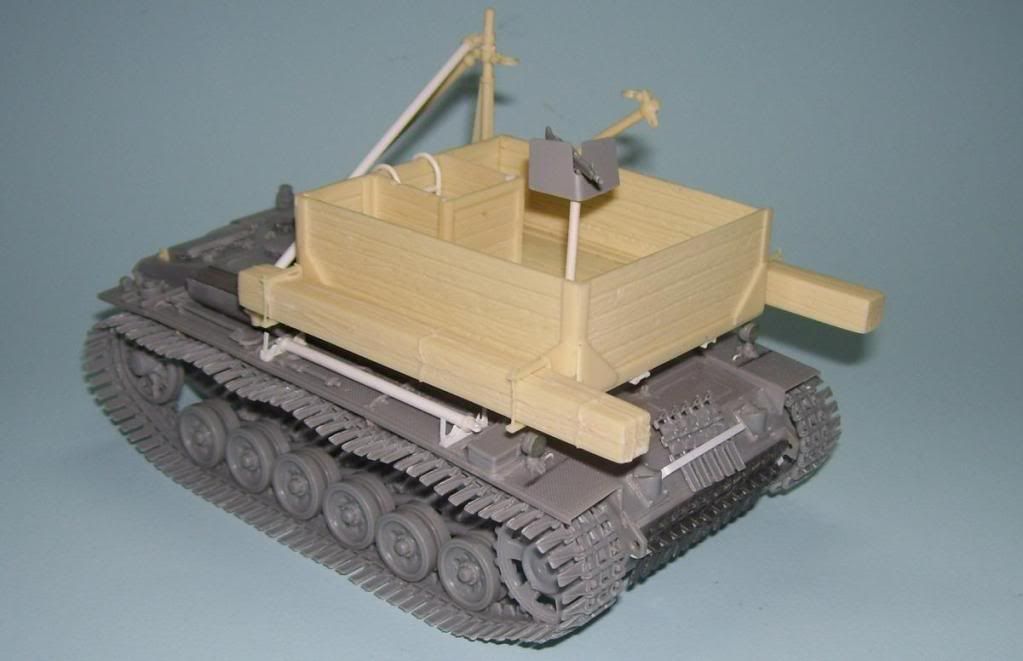
Well, here’s an update. I’m about ready for paint.
First, for those really considering this kit–there are a couple stupid mistakes that I made which you shouldn’t–first, DO NOT install the spaced armor on the front hull–the box will not fit properly with it on.
- DO NOT install the armored guards (?) over the engine screens–the crane will not fit with them installed.
I had a hell of a time figuring out the parts placement–more how to space and align the crane parts–the darned side brackets are so tight that they really almost make the placement of the crane jib impossible–anyway, I finally got it figured out. Here’s a progress report so far…
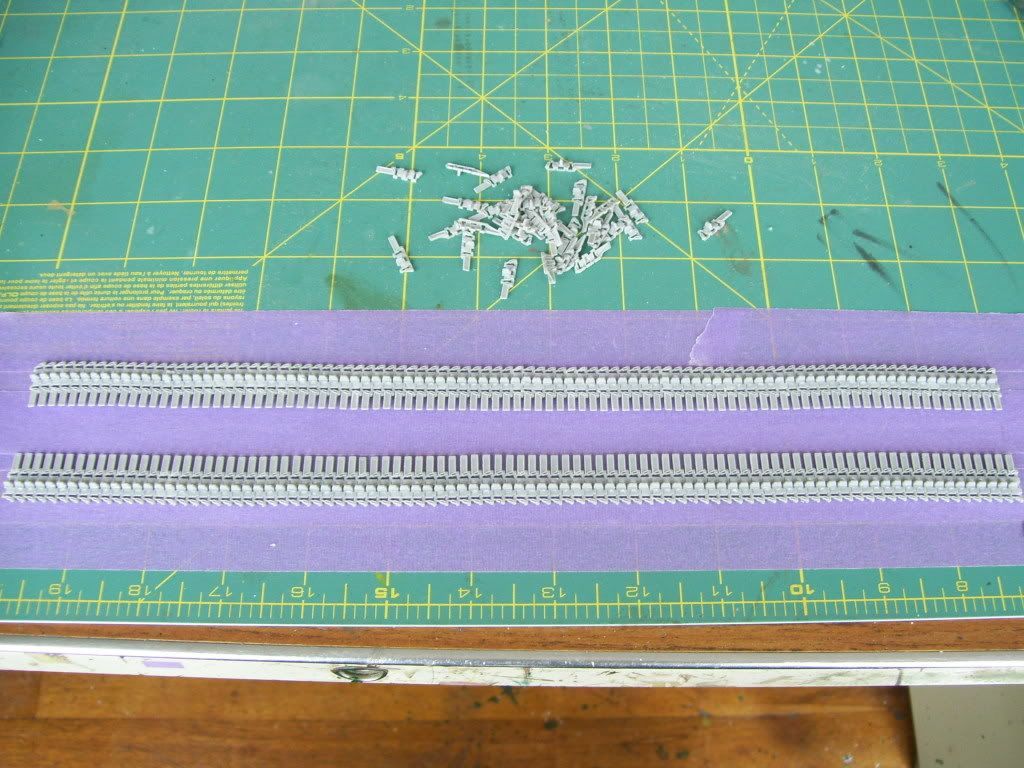
Most of these vehicles are seen either with regular tracks, or “Ostketten”–which are shorter than “Winteretten”. However, since theonly kit of Ostketten tracks I could find were in the $40.00 range, and resin (you know how I hate resin tracks!) I decided to use the last set of winterketten tracks that I had. There is photographic evidence–TA DA!!! [:P] What’s more, is that this photo also shows that some vehicle were modified beyond “normal”–there looks to be some sort of shield or special armor–even perhaps a top and a hatch?–fitted to this vehicle?

This “customization freedom” will play into my build-philosophy for this kit! [:P]
First of all–the winterketten tracks, I was disappointed to find that this set–I believe that I 'lifted" this set from the StuG IIIF kit–are completely unusable in their present state! I mean–look at the height of the dual knockout marks on this link!
I do have to say that the separate, actual “kit” of later-released Winterketten tracks, which I used on my late Brummbar and which come in a darker gray plastic color–were not as egregiously scarred.
After painstakingly using a flat Exacto blade to shear off each little stub, and then filing smooth the remainder, (two night’s work!) I started out by assembling the tracks, as per my “doog method”–leaving off the outer return rollers, and assembling the tracks on masking tape. The winterketten are “handed” so I did two rows. Here’s the link to my tracks tutorial, for anyone curious: http://www.armorama.com/modules.php?op=modload&name=Sections&file=index&req=viewarticle&artid=1737
I also added some reinforcing strips to the bottom of the box–the box should not sit flush on the hull, and this is one omission of the NeoGrade kit.
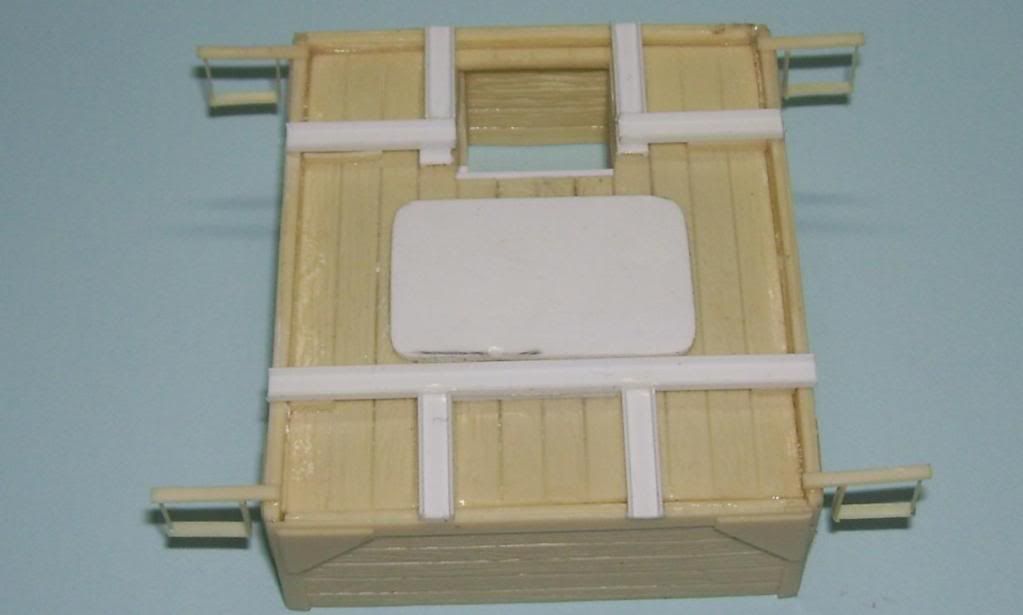
I also built a storage rack for the crane jigs, and built an extra crane jig. You also have to eliminate the radio antennae mount and channel–that little square of plastic is to replace where the mount would have been.
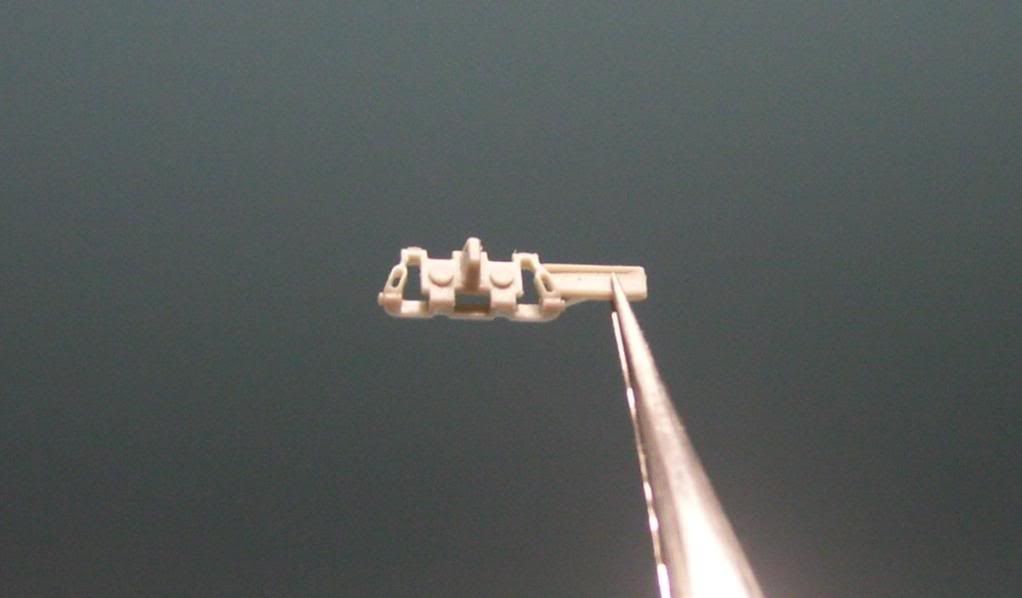
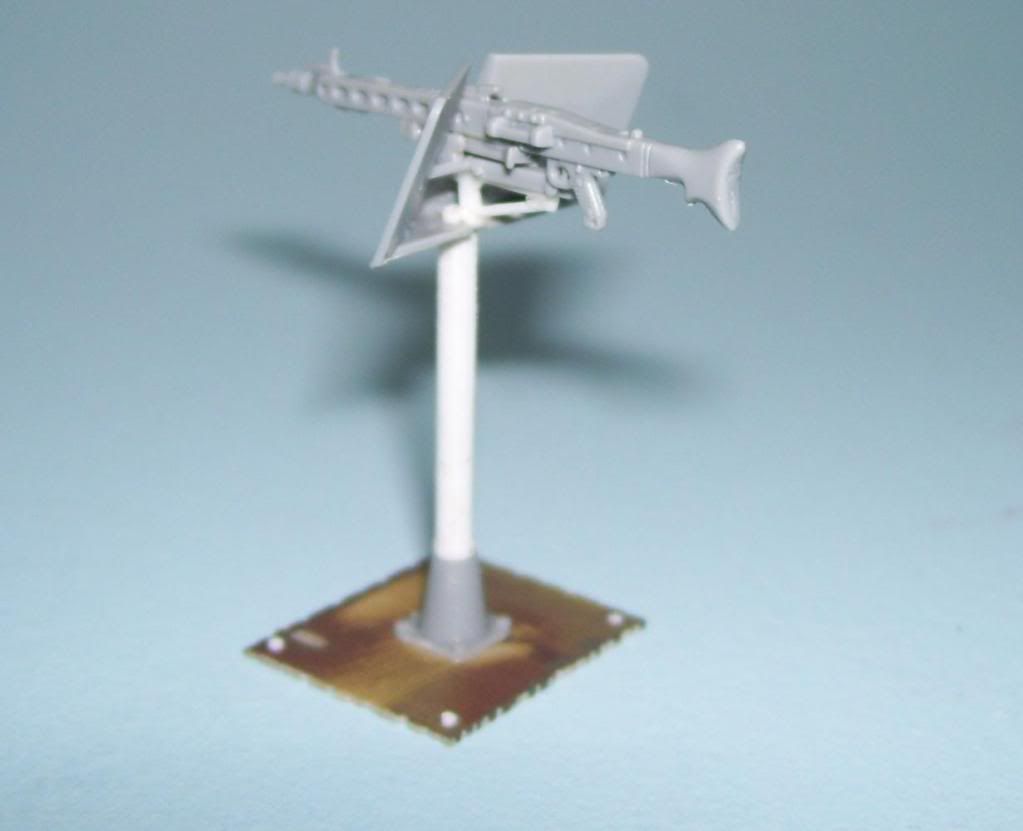
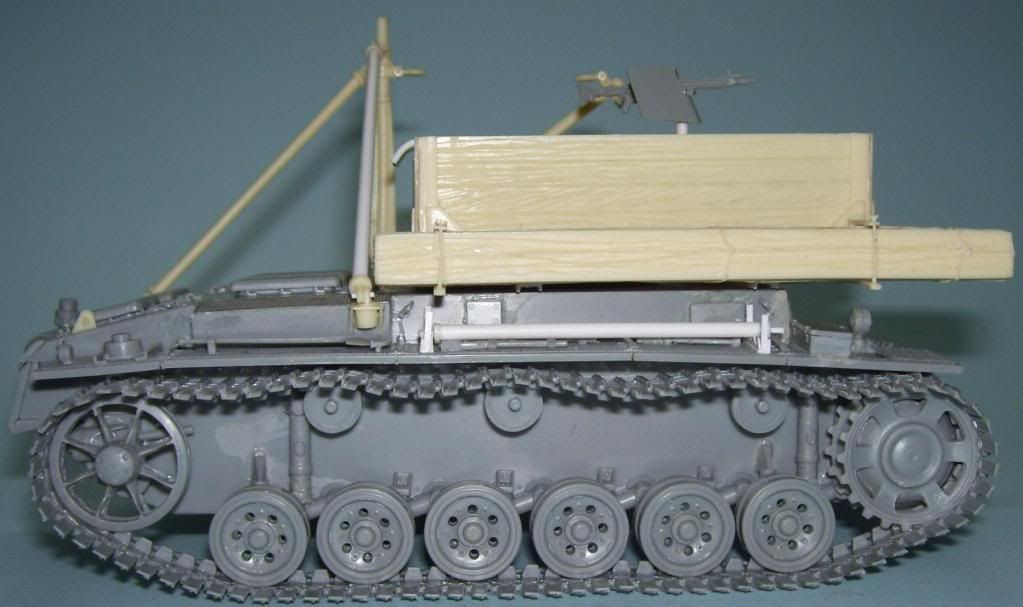
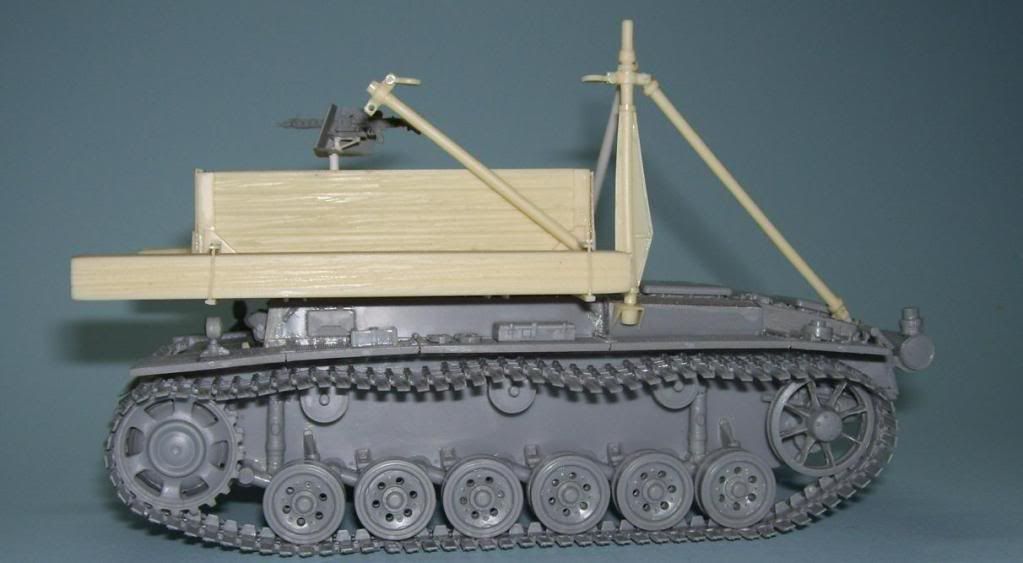
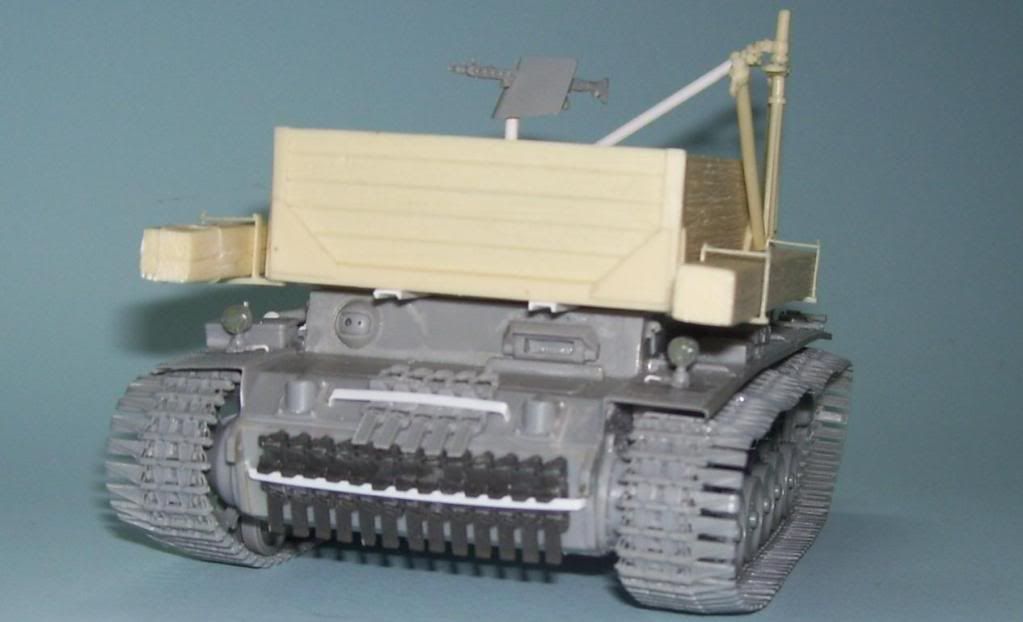
And as part of my “customization”, I decided that a late-war Bergepanzer might need a bit of extra firepower (at least I would have wanted some in mine!?) so I built up this pedestal-mounted MG to put in the bed. The parts came from spare parts from the “Shwebelafette” halftrack that I finished recently.
So here’s what it looks like so far. The box, MG, and all the rest of the chains and tackles are not fitted yet. I’m going to paint them all separately, and put them together…
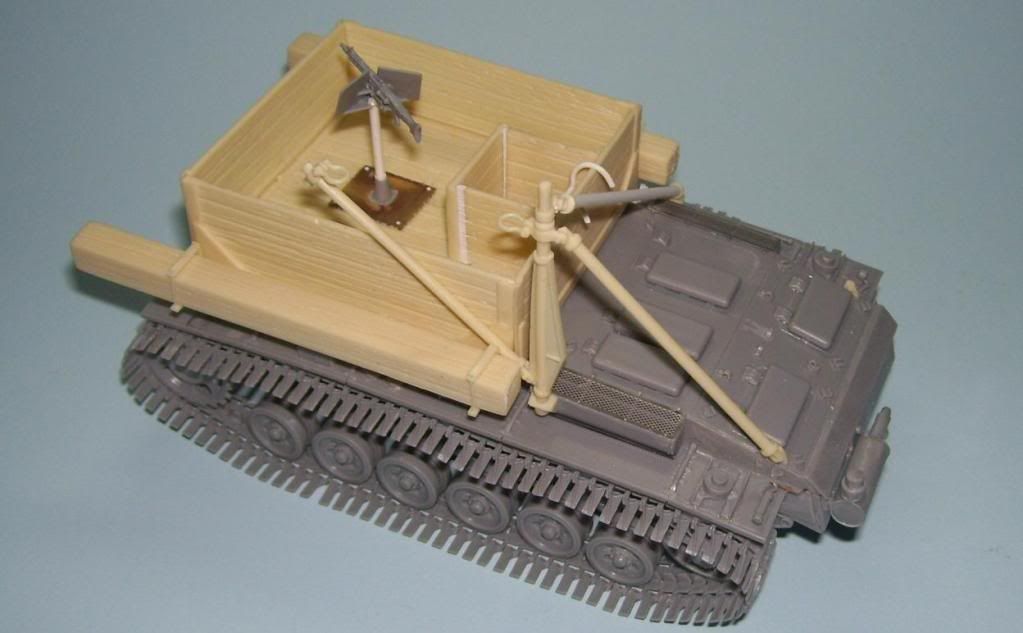
I also made a ladder for the entry hatch, and also had to lengthen the longer crane brace because it didn’t reach the other mount.
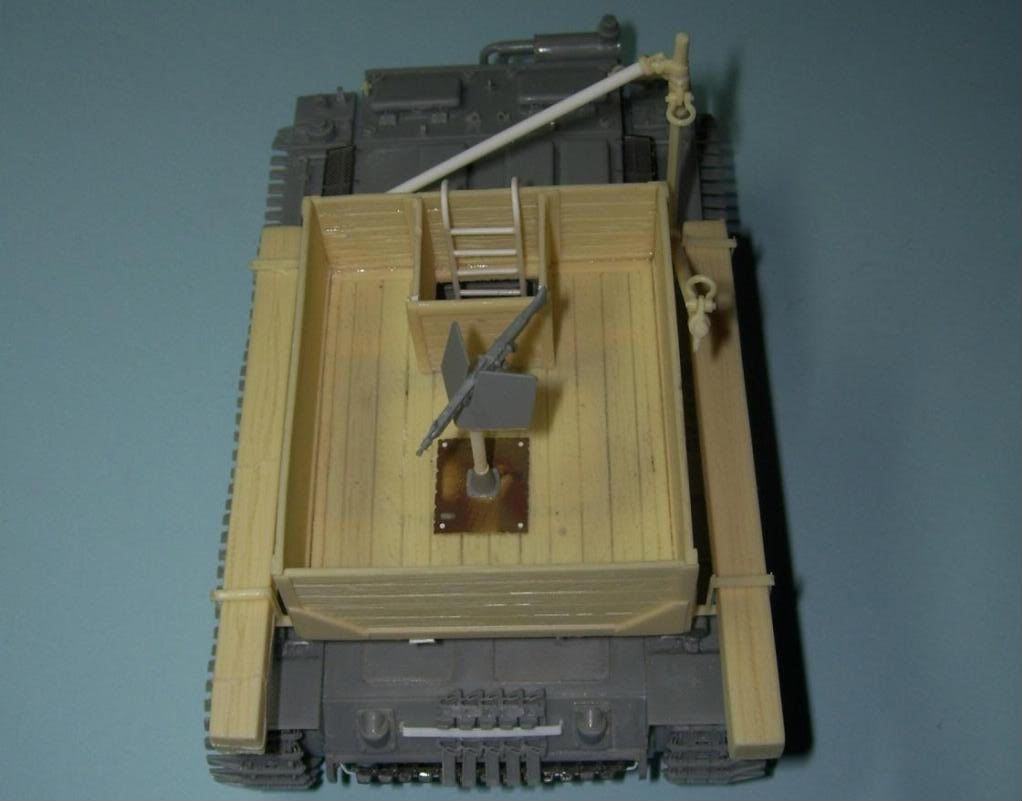
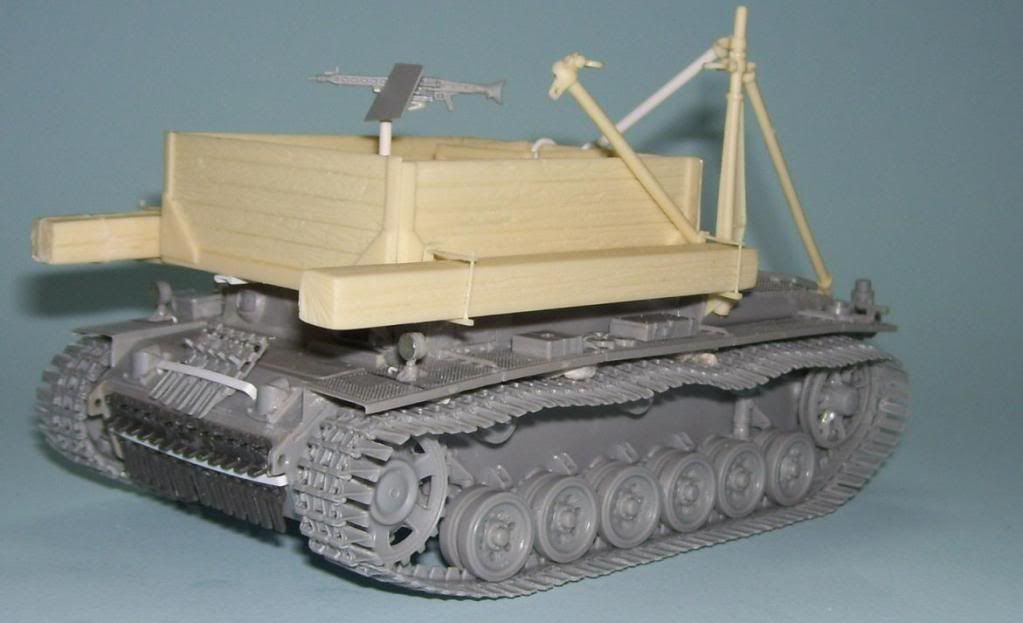
I went kinda easy on the sag–I figured that the engineers would keep it pretty tight?
I added a pair of spare track racks and you can see the other dark-plastic winterketten links there.
So that’s where I am so far. I’m going to be trying a new painting approach on this one. I’m not sure how it will work out, but it will be interesting at least. That resin “wood” will also demand a bit of innovation. I just hope that, given the crazy schedule I’m under here with teh band, that I’l be able to get it going soon?
Comments, suggestions, critiques and anything else much appreciated and welcomed! [:D]
Definitely something different Karl. Some really great stuff going on here.
WOW! You have been busy- two nights on track clean up?! [:O] I don’t know if I coulda done it…
I really like the custom work- that pedestal MG makes perfect sense to me. That thing needs SOME kinda firepower [tup]
Looking SWEET Karl!!
But that MG seems to be pretty much in the way in the box? I would have placed it closer to the walls…
And I love Ostkettens!! [:D]
Good…good…my apprentice, it is coming along well!!
Looking nice, Karl. I can’t wait to see some paint on it. I may propose to marry it if I am quick enough on the draw.
Bill