Cool work so far Joe. I’ve always been afraid of splicing kits together like that, just not enough confidence in my abilities yet. I’m looking forward to seeing this come together.
Joe,
Are you planning on doing another for 2015? I have some stuff I could do but it’s too late for this year and I have too many irons in the fire already.
Joe beautiful work so far. Looks fantastic.
ModelCrazy provided I am allowed to stay on this site and provided others will want to join in, yes I will host this again next year.
Joe
Thanks Bob and Joe. I need a project once in a while to keep me honest. With all this talk about Dremel tools, fate would have me in the tool isle at Wal-Mart this weekend. Knowing I would be doing much more sanding in this project. I broke down and bought one.

It was $40.00 well spent. Since I would be adding a True Details pit, the kit side wall detail needed to be removed. On the “Low” setting, with a sanding drum bit, this took maybe minute. I experienced no melting of the plastic. The trick is to use light pressure and keep the tool moving. I also cut out the closed radiator flaps with the cutting bit. It was a piece of cake. I can’t believe I waiting this long to buy one.
I turned my attention to the TD pit. It’s and ex- KMC mold that was supposed to be designed for this kit. Its beautifully detailed and relatively cheap, but the instructions are horrible. The hardest part was removing the resin block from the floor. I started with a razor saw (to keep the unhealthy resin dust down) but this was taking forever and the piece kept slipping out of my hand. I eventually whipped out the Dremel and sliced it off.

I then started working on the pit. I concocted my own Curtiss Bronze Green with one part XF-81 RAF Green, one part XF-5 Flat Green, and two parts XF-8 Flat Blue. If you would like to see how do my cockpits, see the tutorial in my Dauntless build here:
http://cs.finescale.com/fsm/modeling_subjects/f/2/t/160714.aspx
I’m not crazy about the TD instrument panel. The dials are too deep and impossible to drybrush. I decided to add 5 minute clear epoxy to simulate glass dials. I may paint up the kit part and compare the two. I just didn’t feel like buying a PE set along with a resin pit, nor should one have to.


Hope to get this installed soon…
Joe
Great work Joe! I agree, those dials do look a bit deep to me too. And Dremels are the way to go!
Thanks folks. I spent last night putting it all together, to include installing the Eduard flaps. All I can say is the Academcraft P-40B is an absolute pig and I now yearn for the Trumpeter version. Now I know why I only paid 11 bones for it. For starters, The panel lines are soft and I dont even know if they will hold a wash later. Perhaps the mold is too old. Also, the Monogram kit has more surface detail and its 50 years old. I even had to scribe panel lines into the horzontal stabilizers which they forgot . Correct me if I’m wrong, but shouldn’t there be some ammo doors and such on the top of wings?
I started my session by carving up the flap area thinning things out with the Dremel. This made the PE wing detail sit better. This was a nice set and should improve the area considerably, like putting lipstick on a pig.

I installed the pit, sealed up the fuselage then added the wings. At least the fit of everything was fairly painless, even with the flap detail. I needed a smidge of putty on the port wing root. I think the seat brace looks overscale and inaccurate. I may paint it green so it doesn’t stick out so much.


I made new radiator flaps out of styrene. Of course I had issues with the fit of the chin (intake), which was sightly to narrow for the fuselage. I used styrene to spread it out to reduce the sanding.

I’m not sure I’m going to waste my good Pearl Harbor Defender decals on this turkey. We’ll see how it looks when painted up.
On a side note, I got the Trumpeter kit cheap off ebay last week. Depending how this goes, I may be trading out.
Is it over yet???
Joe
I need some help guys. I’m doing Lt. Harry Brown’s P-36A. All P-36s had the two .50 cals in the nose. Some -A models only had one .30 cal in each wing, but later production -A models had two .30s in each wings, plus under wing pods to hold ammo. Now alot of people think since Rasmussen’s ship only had the two .30s, it was the same with Brown’s. But i recently read that the particular plane Brown flew was actually on loan from another squadron. So, two .30 cals, or four? Thanks!
Evern more so, It seems even earlier Hawks had only the two .50 cals in the nose, and then original Hawks only had a .30 and a .50 in the nose… I am so lost now…
Joe you are doing great buddy. It looks great to me.
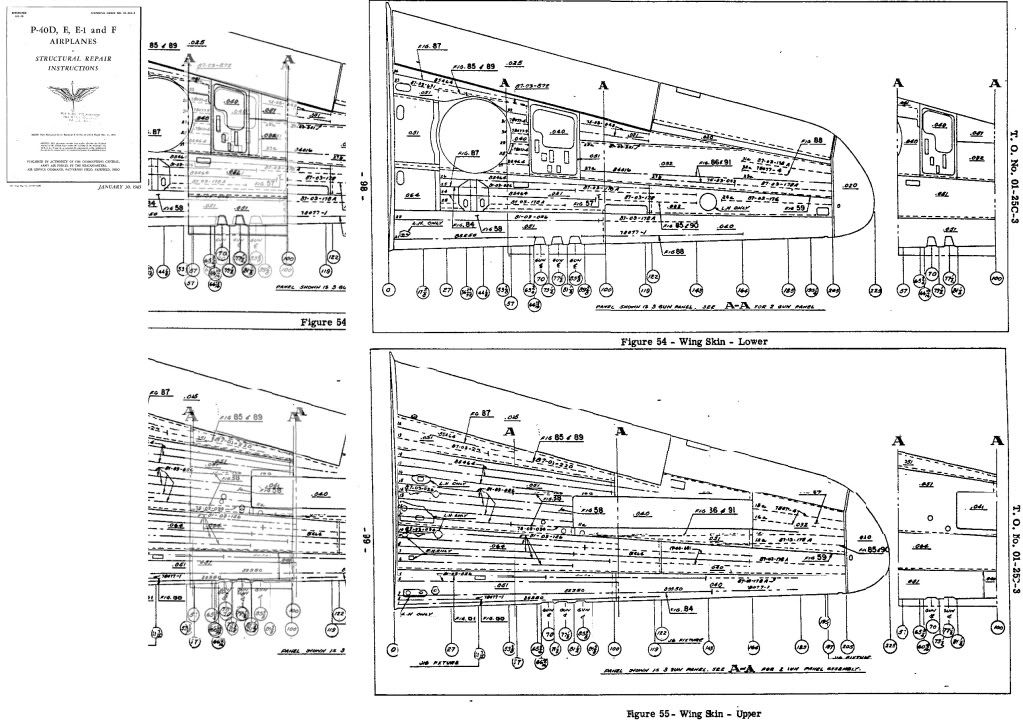
Now for the questions. And please understand I have just finished up recently a rather indepth build of the “B”. Yes there are ammunition bay openings on the top of the wings. They extend out from the gun mounts in a narrow rectangle across two frame sections. The guns mount from below so that access door is below and swings forward. The seat framing, honestly, is wrong yes. It should be round tubing with a brace just over the top of the seat. The framing is approximately two thirds of the width of the seat and centered.
Now with that being said, what you have works for the purpose. To be honest there are a number of things I found when doing my research that would make you pull your hair out. To take the time to try to fix the majority of the issues with the injection molded kits would take you several months and in that scale would be tedious at best. There are few of us that would notice the ammo bay doors or the seat frame. Your work to this point has been fantastic and I, as a huge fan of anything P-40 like, love what you have done so far.
Joe
Thanks Joe. Do you happen to have a picture or a drawing of the top of the wing? Specifically where the ammo doors are?. I’m going to try to scribe them in.
Thanks,
Joe
The best I can do at the moment is this.
i225.photobucket.com/…/P40DEguns.jpg
http://static.panoramio.com/photos/large/15790319.jpg
These are all on the net. All rights are the originators.
Joe
 Well, work has been slow between work and other things. I had some issues with the cowl flaps fitting right and staying put! Here som WIP. I had to add some sprue to the trailing edge of the flap area as the pics I have show “ribs” to the edge and the PE only went so far. getting ready to do some preshading next. Then on to the paint.
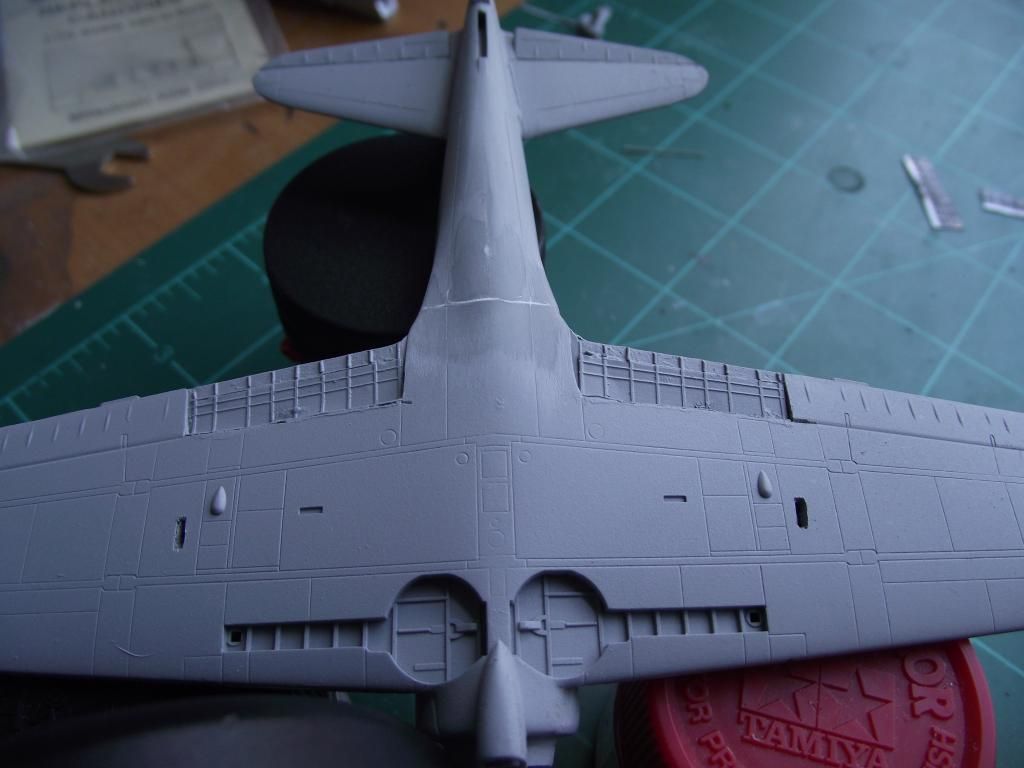
Thanks Joe. I decided to just leave well enough alone on the wings. I’m in for an update. I sat down and got some quailty bench time in last night. I fixed a few things here and there, to include cleaning up the leading edge wing roots which were a mess. I added some semi-circular-shaped styrene stock and poked rivets in them with a sewing needle to leave the illusion they’re supposed to be there. Probably not “correct” but it worked and looks passible to me. Here’s the area primered and ready for paint. It’s starting to look like a Hawk 81…


I preshaded all panel lines XF-1 Flat Black. I then sprayed the inner flaps, wheel wells and gear bays XF-4 Yellow Green, the perfect zinc chromate. After these were taped off, the bottom got XF-53 Neutral Grey. This was then cut with XF-2 Flat White and condensation streaks were added. I then added more XF-2 and lightened the control sufaces. After a post shade of diluted XF-69 and XF-64, here’s where I’m at. Perhaps it could use more…


She was flipped over and Blue Tac was used to mask off the demarcation lines thusly…

Since the Academy P-40 is so lacking in the detail department, I needed to be creative with the paint. started off with straight Gunze Aqueous Olive Drab 1. This is the perfect USAAC drab to my eye. Nice and brown. Too bad its so hard to get nowdays.

Xf-57 Buff was added and condensation streaks were added. More XF-57 was added for the control surfaces. I then added the postshade to highlight the areas that were detailed, such as the engine area and control surfaces. I also added some minor exhaust streaks with diluted XF-1 then XF-53 over it to simulate heat.


I will add some minor chipping here and there, especially at the wing root, then a gloss coat.
Joe
Beautiful work both of you. Just Beautiful.
Joe
Joe, great looking P-40!! I have one in the stash that I was toying with throwing into this build. we will see if I can get some more progress done on the zero and start the Val! My hope is the Val will be an easier build than the Zero with all the PE! I will keep you posted.
Thanks guys. Last night I got it decaled. I went wiith Welch’s “160” machine. These were some of the best decals I’ve ever worked with. No issues whatsoever. I was worried about the “160” but they snuggles right down under Micro Sol.


The prop blades with this kit are comical. They are flat and mishaped, so I raided my spare parts box for replacements. I found some left over P-38 props which looked close. Not too bad eh? Probably not correct, but acceptable for this turkey. I also drilled out the exhaust stubs.

I’m getting close with this one.
Joe
It looks great from here. Really like the coloring.
Joe
I’m gonna go with done here. To recap, it’s in the markings of 15th Pursuit Group 47th Fighter Squadron 2nd Lt. George Welch at Wheeler Field on December 7, 1941. Welch and another pilot, 2nd Lt. Kenneth Taylor, both still clad in tuxedos from an event the previous evening, got airborne and scores kills on the invading Japanese. Welch initially took off with only 30 cal ammo in the wing guns and claimed two Val dive bombers. After reloading, he got another Val and a Zero fighter. Both men would be awarded the Distinguished flying Cross for their heroism.
Now onto the kit. How much time do you got?.. To sum it up, if your looking for something simplistic that resembles a P-40, its fine. The best way to describe this kit is “generic”, from the cockpit to the landing gear. If you want a bit more, like a replica of the real Hawk 81, get ready for surgery or perhaps look elsewhere. On this one, I grafted the Monogram belly onto the kit and made new radiator flaps out of styrene stock. I replaced the cockpit, wheels, wing guns and the flaps to spruce it up. I also replaced the prop blades with those from the Hasegawa P-38. Other additions were a bulletproof windscreen out of clear stock and I used a spare Eduard Sptifire tail wheel which is much better than the kit example. I used Starfighter Decals which were some of the best I’ve ever used.
On the finished model, I added smoke colored invisible thread radio wires to finish it off. As I sat there looking at the finished model, something just didn’t seem right. It seems to me that either the landing gear is too compresed (short stance?) or the prop is too big in diameter. I suppose thats the story of this build…
On conclusion, any future Hawk 81 builds will be done with the Trumpeter kit, until the elusive state of the art kit is offered. I’m sure we’ll see another 109 first though…


Great work as usual Joe! I always enjoy watching your builds come together
Joe,
Outstanding work on your Warhawk! Love the plane and the story behind it. Reminds me of the movie “Tora, Tora, Tora!!” What a gutsy pair of guys taking on the entire Japanese Navy air arm!!!