Opinions on These Cameras

Unfortunately the Nikon Coolpix 520 is out of production, but there are plenty of other good superzooms available - including its successor, the Coolpix 600 ( http://www.nikonusa.com/en/Nikon-Products/Product/Compact-Digital-Cameras/COOLPIX-P600.html ). Do you have a decent camera store, with a knowledgeable staff, in your neighborhood? If so, that’s the place to go. But you can also pick up such a camera at Best Buy, probably a bit cheaper.

I spent about $150 (an excellent price) on a box full of lighting equipment: two sockets, two stands, two white umbrellas, and two blue photo bulbs. Again the camera store is a good source. But you can make do mighty well with blue photo bulbs screwed into simple, cheap “clip light” reflectors, which you can get at a place like Lowe’s. While you’re there, pick up a roll of cheesecloth. You can stretch it over the reflector to serve as a diffuser.

First, though, I’d suggest that you see what you can accomplish with natural light (or room light, for that matter) and the flash that’s built into the camera. Those little flash units are pretty amazing things.

Another small suggestion: whenever I buy a new camera from our excellent local camera store, when the staff member tells me his best price I say, “Give me a good price on a spare battery and you’ve got a deal.” Such batteries aren’t cheap, and you definitely want a spare. (Nikon says the battery in the P-600 will deliver 330 shots per charge - but you’ll be amazed at how quickly you can shoot 330 pictures.) The guys are always willing to sell me such a battery at their price.

Good luck. Have fun.

jtilley,

any concerns with heat production using a cheesecloth diffuser over a blue photo bulb in a Lowe’s reflector? I use a similar system to light my workbench, and it can get quite cozy at times.

Don

Terry,

jtilley’s advice is great if you have a reputable camera store nearby. In addition, most cameras have reviews posted online - either by users or by professional outfits - that can be helpful. Nikon and Canon are the big two but there are others including Fuji, Panasonic, Sony, Pentax, Ricoh and others that make quite capable cameras. As pilotjohn said, it can be quite confusing! You might want to look at some of the camera fora/reviews on: http://www.dpreview.com/. Too, buying factory refurbished can often save a few bucks as can buying a slightly older model. B&HPhotovideo ( http://www.bhphotovideo.com/ ) and Adorama ( http://www.adorama.com/ ) are two online photo stores that are very reputable. If you want the Nikon P520 you can find it though it’s discontiniued or the P530 is available now (http://www.amazon.com/Nikon-COOLPIX-Digital-Camera-NIKKOR/dp/B00IA9LUP2/ref=sr_1_1?ie=UTF8&qid=1425133011&sr=8-1&keywords=nikon+cool+pix+p530 )

As far as lighting is concerned - that is a whole new subject. It’s easy to spend more on lighting equipment than on the camera. Do you want photoflood, strobes, quartz etc. As has been mentioned above, the on camera flash or natural light can work well without any investment. With modern cameras, color correction/white balance will allow even indoor lighting to be used and corrected in-camera or post processing. For model photography even a couple of inexpensive halogen desk lamps can be used successfully. My advice, get the camera first, experiment and decide if you even want/need lighting equipment.

edit corrected link

Oh yeah. I’ve had a little scorching now and then, but never an actual fire. This is one reason I switched over to the stands and umbrellas.

Those photo bulbs have two weaknesses: they get really hot and they have a life expectancy of something like three hours. Once I get set up, I turn the lights on for just a few seconds at a time.

A couple of things.

One reason super zoom cameras appear to have such a wide depth of field is the size of the sensor along with the focal length of the lens. While lenses are often listed by their 35mm equivalents, unless you are using a full frame DSLR you aren’t shooting with the lens you think you are. Since the physical size of the imager is much smaller than a 35mm film frame, the actual lens focal length you are shooting is “wider” than you think. Since a 50mm lens renders the same DOF at a given aperture, it doesn’t know or care what size the imager is. Since a small imager is only capturing a fraction of the lens’ field of view, the DOF will be greater the smaller the imager size. This is one reason why pros who use 35mm full frame imagers were so happy when the full size imagers came along. Their 35mm lenses were finally acting like they had when shooting 35mm film. Wide angle lenses were wide, and the full size imager allowed a narrow DOF again for portraits, etc.

All this is complicated, and more technical than many people, including pro shooters, care to think about. Bottom line is: The smaller the camera imager, the greater the apparent depth of field will be produced for a given lens focal length. This is a great advantage to model photography for super zoom/bridge style cameras, and the small imager DSLRs.

As far as eye level viewfinders go, I won’t use a camera without one, nor use a camera without a good one. That’s why I’ve stuck with the super zoom/bridge type small imager cameras. They have EVFs while many sophisticated smaller cameras have abandoned them.

Regarding a simple studio lighting set-up, don’t bother with trying to find daylight blue photoflood bulbs in a camera store. That’s important only if you are still shooting film. Since digital cameras offer white balance choices, any type of bulb will work just fine. Even the lights on your work bench. You just have to tell the camera if you are using incandescent or florescent lights as your source. Of course, you have to remember to reset you camera to daylight before you shoot outdoors or with flash again.

Very good model photos can be taken with just about any camera and lights as long as the background is kept plain and preferably not white. A plain light blue, pale gray or similar background helps avoid exposure problems that crop up when using a glaring white backdrop.

Using two lights at 45 degree angles to the camera/subject line, render acceptable model photos most of the time. With experience, slight adjustments of one light’s angle and distance from the model can help with different subjects. Try to use two lights using the same type of bulb for a consistent light balance and color capture.

If you want to be an advanced photo hobbyist as well as a model builder, have at it! But photo gear ain’t cheap and for many folks, it is better spending the cash to improve the quality of model build you’d want to photograph anyway.

A good photo of a good model will beat a lousy photo of a great model every time!

Hi Mike,

Because pilotjohn already has his Nikon I guess we’re not really hijacking his thread so- ! I hope that Terry is reading this. I agree about eye level viewfinders - whether optical or EVF, Cameras without one are almost impossible in direct sunlight (personal experience with a Lumix LX3). Don’t know why manufacturers abandoned them for P&S And, yeah, a couple of lights at 45 degrees works well.

Bick & guys thanks. I started looking at Nikons at a local BB. The Coolpix P600 might just be what I need with a couple lights and diffusers. I’m thinking under $600 (I hope) for a setup I can get much better pics than what I’m doing now. Great thoughts especially the cheese cloth, never would have thought of that but sometimes in what we do, whatever works works.

Thanks its much appreciated, Terry

All;

I am learning from this thread that I don’t know much more than point one end at the model and click on the button on the top:) I am very pleased with this camera overall as it is easy to use and a good size. The controls are well organized and the screen is large enough to see what is going on.

For the curious, I go this bundle from Amazon:

www.amazon.com/.../ref=oh_aui_detailpage_o02_s00

I really like the extra batteries, the tripod, and the IR shutter release. the other lenses and filters I don’t know but what the heck. Tax return meant I can get the new toy. I might have been able to buy pieces and get it cheaper, but one stop was easiest for me.

Here are three sample pictures with everything on automatic. I need to start to work towards some manual settings I think, but these are OK for a raw beginner.

Mike’s right about old-fashioned hot lights, of course. The blue bulbs were designed to simulate daylight, and that’s not necessary with adjustable white balance.

The old-fashioned blue lights do have one other advantage: they’re just plain bright. But the new halogen floodlights available at places like Lowe’s are coming closer all the time - and they’re at least a little cheaper.

Usually the auto white balance function on the camera will take care of it. Usually. But adjusting the white balance is one of the first things you ought to look up in the camera manual.

Speaking of which - a tip that I wish somebody have given me. (I’m assuming the P-600 is set up like the P-520. If not, ignore the following.) The only printed instructions in the box are a “quick-start guide,” which only explains the most basic operations. Then there’s a CD-ROM that contains the full manual. Being an Olde Phogey who’s most comfortable reading printed pages, as soon as I opened up the disk on my Mac I hit “Print.” Ten minutes later, when the stack of 8 1/2" x 11" printouts was an inch and a half tall with no end in sight, I shut off the printer. I knew my senile brain couldn’t memorize the whole thing, and lugging that pile of paper around would seem to defeat the purpose of a compact camera.

The solution: the whole manual is online. I make it a point to take my I-Phone wherever I take the camera. Whenever I need to look something up, I google “Nikon P-520 Manual” and the whole thing pops up in front of me.

Terry, if you get that camera I envy you. Getting to know mine was one of the more fascinating experiences I’ve had in years. It’s an astonishing piece of equipment.

If you have photo editing software, you can adjust for color balance if the camera doesn’t do it well enough. You don’t need an expensive package like Photoshop, many cheaper programs offer this too. If it is not an automatic function there is usually an adjustment that will allow changing of color hue.

Good point, Don. I have Photoshop Elements (the cheaper version of Photoshop), which I picked up at Best Buy for about $85.00 as I remember. It’s a wonderful program - quite simple to use and intuitive. The Nikon camera will have come with its own editing software, but everybody I know prefers Photoshop or Photoshop Elements.

I never liked traditional darkroom much (probably because I never got enough experience to be good at it). Photoshop Elements has made photography a much more enjoyable experience for me. That program can make your pictures a whole lot better - and it’s just plain FUN.

If everyone will check John’s model photos he just posted with his new Nikon they illustrate one point I mentioned in my post yesterday.

While they are good shots of an excellent model, the white balance setting needs to be improved.

John it looks like you shot the photos under incandescent lights. The auto white balance from your Nikon corrected some but not all of the color shift that occurs with incandescent lights. The photos still have a brownish-cast to them which I imagine doesn’t quite show the model’s camo colors exactly right.

I imagine, as Don suggested, the photo editing software you received with the camera can fix it simply enough.

Without getting too technical, all light sources illuminate at different color temperatures. That’s a fancy way of saying that light sources add a cast to the color of a photo. Our brains adjust for the color changes so we normally don’t notice them, but cameras don’t have brains (not yet anyway) so they “see” the color cast. Photographers have to “train” their brains not to compensate for the color shift so they know how to correct for it.

Since human brains are wired to see mostly under daylight conditions, cameras are set-up to render colors most correctly under “daylight” conditions. Daylight casts a very blueish light that cameras, like human brains, see as “normal.” When daylight isn’t the photo’s primary light source, the camera’s white balance must be adjusted to compensate for the different color cast. This can be changed in the camera for the original image capture, or in photo editing software with something that adjusts or changes the color cast.

In the old film days this was quite a problem and required color correcting filters screwed onto the lens barrel or using a film balanced for the different light sources. Anybody remember seeing “DAYLIGHT OR BLUE FLASH” marked on film boxes when you were younger? That’s why Prof Tilley mentioned blue photo flood bulbs. All these methods were required to get that blueish daylight colorcast on the film when you weren’t shooting in daylight.

Does anyone remember super 8 movie film when you had to buy “outdoor” or “indoor” film. The old indoor film was formatted to shoot under those hot, bright lights that were used when filming inside. That film was set to compensate for the reddish-brown light cast of incandescent bulbs.

So with a daylight set-up photos shot under incandescent light will look like John’s photos taken with his new camera.

If you care to see how blue daylight is, set your camera for an incandescent white balance and take a shot or two outside in sunlight. Or try a shot lit with sunlight through a window. The photos will definitely look too blue.

Does all this matter? Most of the time, nobody will notice. But if showing you used the correct paint colors on your model matters, it can.

Digital photography made this simpler, but it is still there.

There’s a function on my Pentax DSLR that lets you take a picture, then look at it on the monitor and push a menu button to see what it would have looked like if any of the other white balance options had been selected. Then you can shoot the picture again.

That comes in particularly handy when shooting in complex lighting situations like museum galleries (where there also may be a rule against using flash). The little Nikon P-520 may have a similar function buried in the menus somewhere, but if so I haven’t found it yet. (It does, however, allow manual adjustment of the white balance settings. It also has a “Museum” mode, in which it automatically takes nine exposures when you push the shutter button, and picks the one that’s sharpest. Amazing.)

The most challenging lighting situation I’ve encountered is the wonderful gallery of seventeenth- and eighteenth-century models at the Naval Academy Museum, in Annapolis. Several kinds of light are shining on those models at the same time, you can’t use flash, and there’s the additional problem of reflections on glass cases. The best solution is to let the pros take the models out of their cases and shoot them under controlled lighting. I wasn’t able to get satisfactory results.

Pilotjohn,

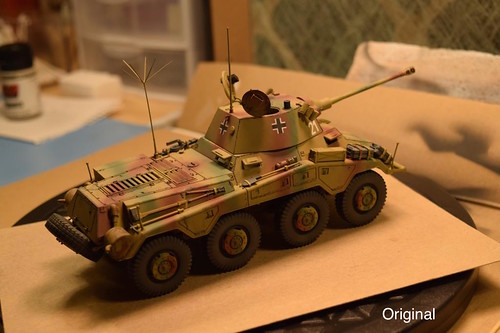
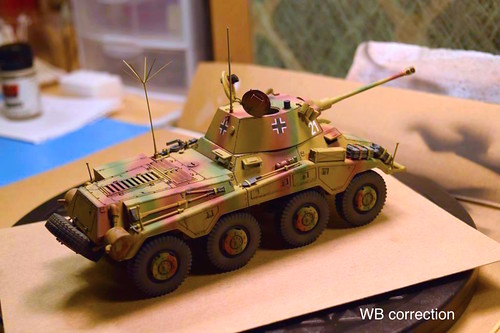
Important things first! WOW, what a gorgeous build. I don’t build armor but your build makes me think I should try - just a great job. And, as to photography as Mike said, your camera didn’t fully correct for white balance (did you have your D3300 set for autoWB?). Unfortunately, ViewNX2 software which comes with your Nikon only allows WB correction with RAW files and not JPEG IIRC (I don’t use ViewNX2). If you have a Mac, Preview allows WB correction and you can do it in about 5 seconds (Windows must have something similar). I DL’ed one of your pics and just did it on my Mac. I can post a before and after if it would be of use. But, back to important things, I am impressed with the model - great build!!!

Bick;

Thanks for the kind words. I have been using this guy as a test dummy for some weathering that I am doing all with Acrylics. I have rust and some grime effects to go and then the light mud for the underside and the running gear. But that is for another thread as we are on photography on this one. I would love to see the before and after. The lights I am using are LED. I understand what you are all saying about the white balance, but I honestly don’t know about my setting. I am doing point-and-shoot mode with everything but the lens on auto. I will have to check tonight and try a couple. I did notice that on some of the shots (which I didn’t post) that the camo rot braun came out with a rose colored tint to it.

I have not downloaded the NX2 software and I don’t own any of the Photoshop tools as that will be next. I really appreciate all the discussion about the settings and the “physics” behind it all. Kind of like a free class in how to:)

John

John,

Hope this works using Flickr - I use Photobucket but haven’t been able to log on there. The only change I made was to adjust color temperature using Preview on my Mac. The change is quite obvious in the white and blue on upper left. Hope it’s useful

pilotjohnorig by Bick6, on Flickr

pilotjohn by Bick6, on Flickr

Thanks! The change is very easy to see. I will try to check on that setting and take some more. I appreciate your work to help on this one. That blue is spot on.

John

OK, learned a little more tonight. I went to auto mode to record what the settings were and confirmed that the WB was auto. Then I went to Manual mode and set the values to 1/125 and 400. Set the image size to medium and the WB to incandescent. Here are some samples. Much better I think.

The more I learn, the more I don’t know:)

John

Lookin good John. Next thing you know you’ll be using ‘raw’ and putting all of us to shame. One thing nice about ‘digital’ is you can take lots of pics without wasting film - I know, I’ve wasted my share.

If only I knew what raw means:) I have some more to post tonight. Finally just about finished with the kit.

John