I totally dig those ram air TAs. I’ve always wanted one. My brother had a black one. I’m totally stoked to watch this one come alive.
BK
I totally dig those ram air TAs. I’ve always wanted one. My brother had a black one. I’m totally stoked to watch this one come alive.
BK
Good looking build, Joe! Great job! I rebuilt the '89 Turbo Trans Am a little while ago.

Brandon: Glad you’re taggin’ along. I think Pontiac released a commercial with a black T/A Ram Air. It’s a little rough and grainy but this is it.
https://www.youtube.com/watch?v=WCtipr5B0Hk
Mike: Thanks bud. I aint got it built just yet now. lol. That T/A of yours looks great!
Got the engine finished up this morning. It only took me around a week to get everything painted and together on this one and I stuck to my guns on the OOB goal all except for the oil filter decal. It’s not much but it adds a lot to any engine build. For some reason the exhaust manifold texture came out grainy in the photos but it looks smooth in real life. Weird. Anyways, here’s my 5.7 liter LS1 engine for this beast. It’s my first OOB engine in decades.
|
|
|
|
|
|
|
|
|
|
|
|
|
|
|
|
|
|
|
|
|
|
|
|
|
|
|
|
|
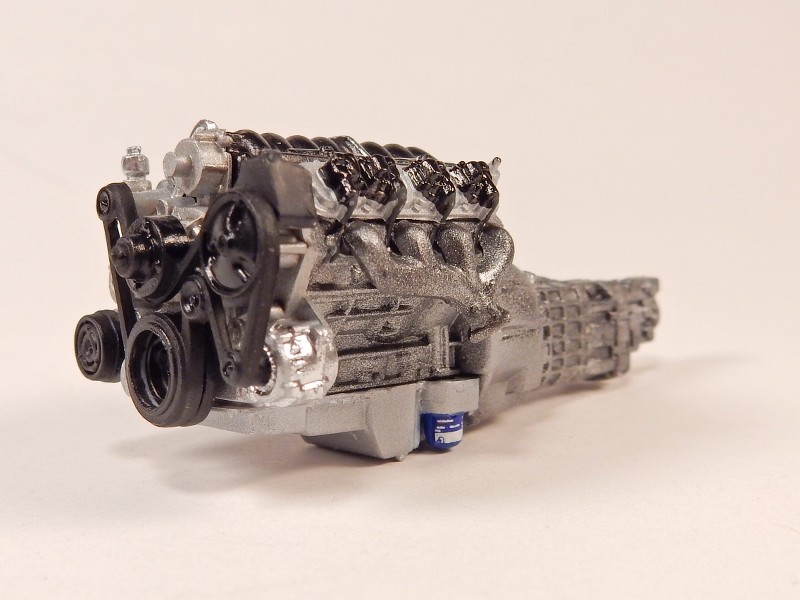
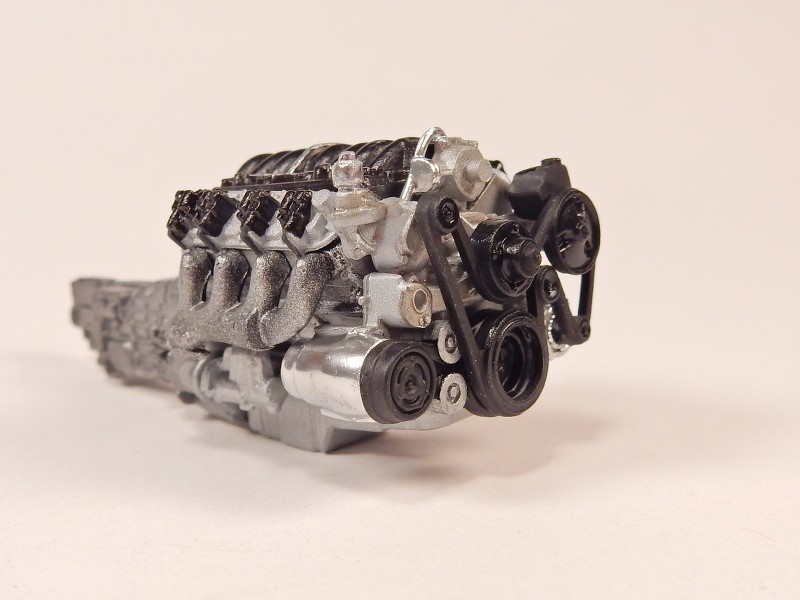
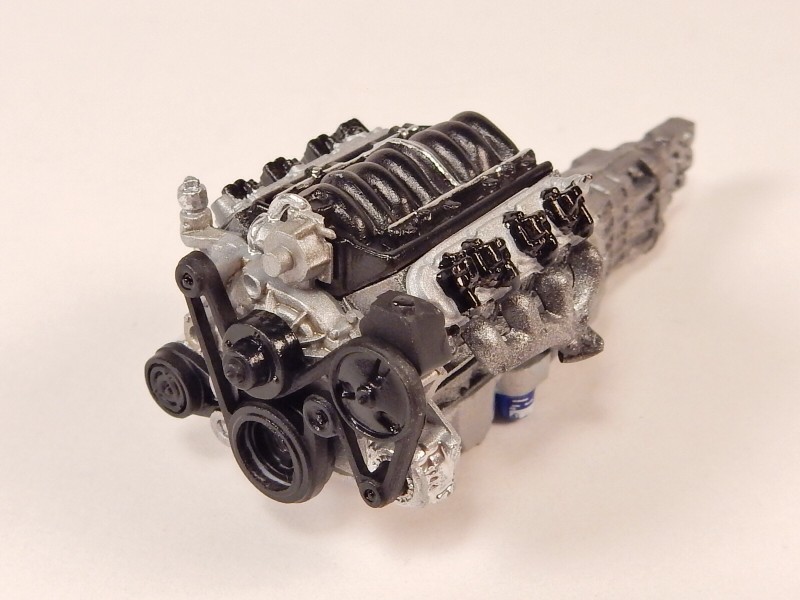
Considering that’s a Revel engine, I’d say it looks amazing. One would think that was a resin piece. Nice!!
BK
I would love to find one of these in a kit. Let me know if anyone knows of any for reasonable prices.
BK
That turned out fantastic Joe. You managed to capture a true sense of realism. Superb job of cleaning up the parts and some top notch painting. Yes, the oil filter decal is real nice touch and adds to the effect. Well done Sir!
Mustang: Great job there!!! Almost a shame to stick that under the hood.
Mike: Ohhhhhhhhh cool!!!
That’s a mean looking LS1 Joe!
Taking a picture of a real motor and saying that it’s the kit motor does not count.[:D]. Back in the day, GM used to do a thing called Autoshows in Motion, where you could drive the entire GM lineup. I got into a GTO, and was a little aggressive with it (I may have been warned by by the overseers not to do that again, but I plead the Fifth). My friend asked me what I thought of it and told him that I liked it, but could do without the annoying beeping every time I turned the steering wheel. He tells me that was the traction control alarm. Lone Star Park’s parking lot was (and still is, makes autocrossing much more fun) very gravelly, and the beeping occurred when the tires broke loose. Never really took to the F-body or GTO, but a G8 GXP or first gen CTS-V is on the wish list.
[whstl]Joe, you don’t know how to do oob factory stock! All joking aside, should be good and the engine off the bat is looking great.
Thanks Brandon, Joe, Cliff, Chad, Lew and Lee.
Cliff: Hope I’m doing this thing justice. lol
Lew: I remember that 06 GTO very well. I always liked the cars but totally hated the securitiy system in that thing. Don’t loose a key is all I’ve gotta say. lol
Lee: Thanks pal. Hey…there’s a first time for everything.
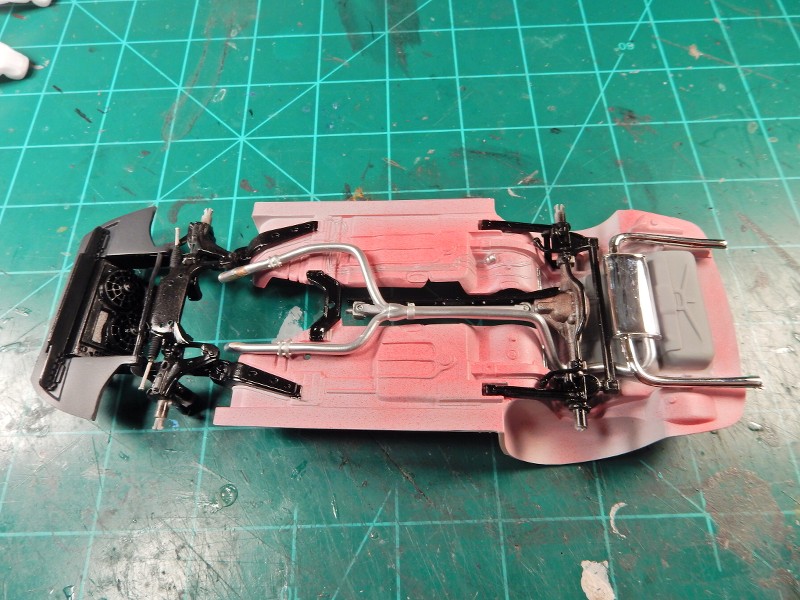
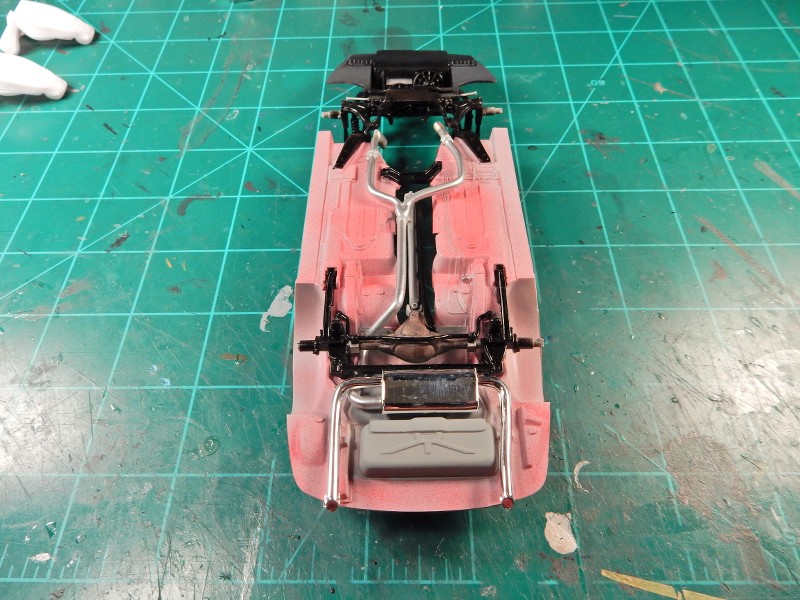
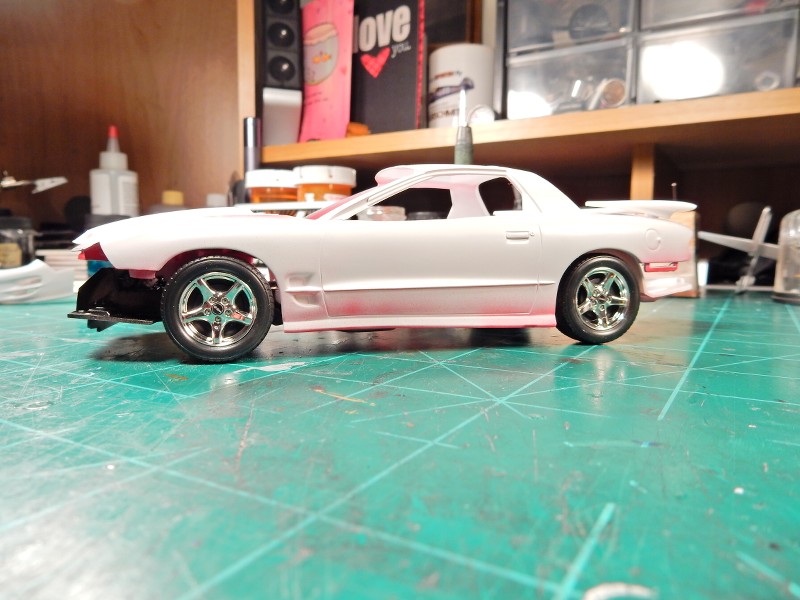
Ok folks. It’s been a couple of weeks since my last progress post but I’m trying not to “update” everyone do death. I’ve been payin’ alot of attention to progress pictures (some of which Cliff sent to me of his personal car) and trying to get it as close to those and from things that I can remember back when I used to work on these cars when they were brand new. I managed to acquire a Revell Camaro kit which had the dual outlet muffler which drops right into place on this chassis so I’ll be using that one instead of the single outlet muffler that came with this kit. The muffler is just laid into place for display purposes for now. I’ll be stripping the chrome from the whole assembly and cleaning all of the flash and mold lines from it as well as hollowing out the ends of the pipes. I used alot of different tones of black on the surfaces that required that color to add more depth and detail to the overall look of the chassis. The differentials on these cars always had a rusty appearance so I finished that part up in a semi rusted state to depict a “soon after new” appearance after the car had been on the road for a month or two. I used Matte Aluminum BMF on the heat shield detail just in front of the differential and used a dark to medium gray on the fuel tank and storage cavity in the back of chassis to add some contrast.
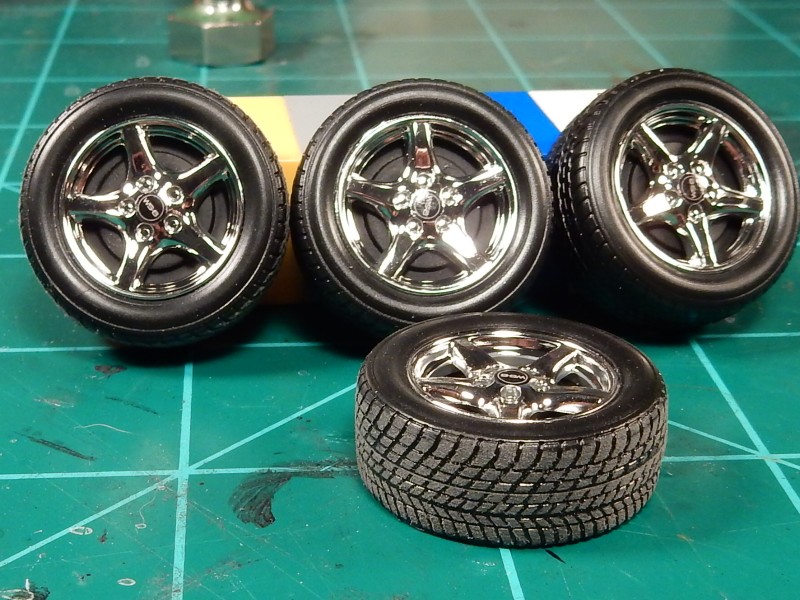
I cleaned the wheels up, added the WS-6 center cap decals and coated them with a light coating of Tamiya Smoke to get rid of the toy chrome look. I also gave the tire tread areas a light sanding to give 'em that “road wear” look (uh-oh…looks like I might’ve missed one ). Pretty happy with these.
I’m really glad that I chose to lower the car some because there would’ve been a whole LOT of air between the tires and the top of the wheel openings. I might try to lower the front just a smidgen more to get it where I want it…
Sweet Joe. I like the smoke idea, that factory chrome in those kits looks ridiculous. The Revell Viper was the same. Looked like toy parts. [:(]
Thanks alot Chad. That trick with the Tamiya Smoke has made a big difference in my past auto builds.
The Tamiya smoke trick is new to me, too.
Looking good, Joe. You’re sticking to your word so far.
So far.
[:)]
Excellent progress there Joe. The wheels and tires do indeed look sharp. Glad you discovered the “smoke” technique. You are doing some righteous work OOB.
Looking good. Tamiya smoke on chrome is one of the best tips I’ve learned over the past year.
That looks good!!! The new muffler looks just right and I hadn’t heard of the Tamiya smoke trick. Will remember this for the next time I use chrome. Thanks!
Thanks Greg, Joe, John and Cliff.
Yeah that “Smoke” idea was a real eye opener for kit chrome.
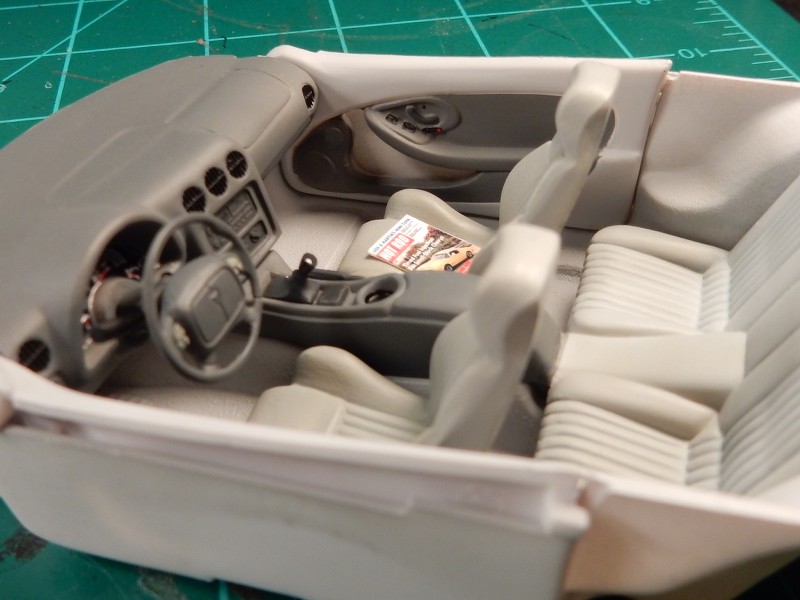
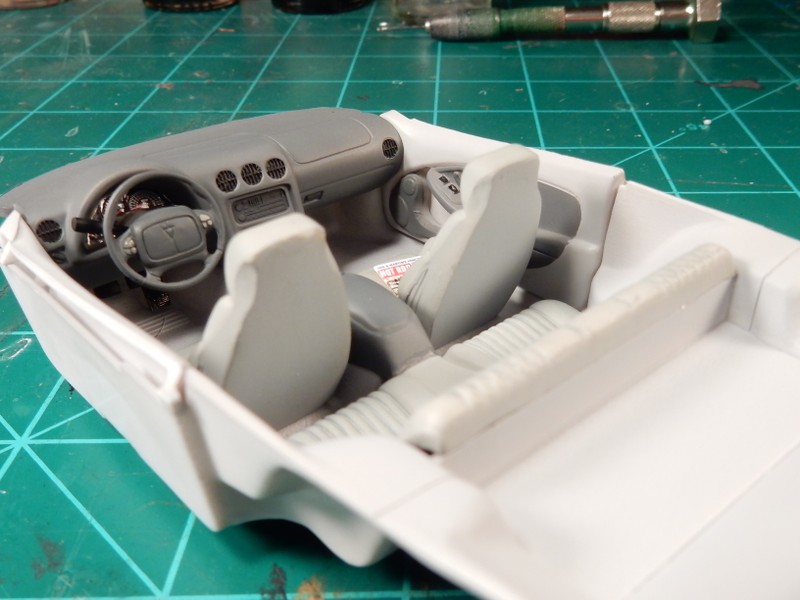
I just finished the interior up this morning. The door panels were giving me a lot of trouble at first in regards to painting the two tone effect but I managed a way around it.
Just remove the hard to mask area.
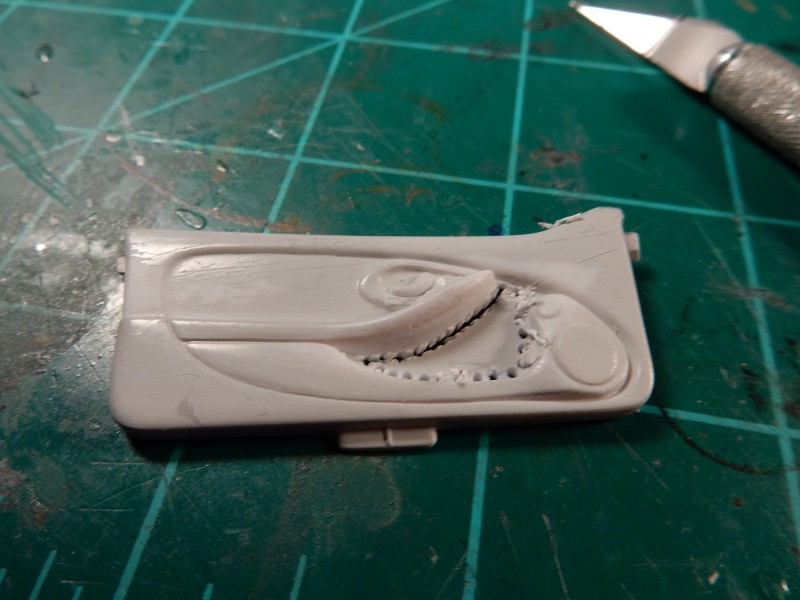
and then just mask and paint the rest of it: