it helps plenty. thanks for the help. also I’ve said thie before but that is a bueatiful ship. just out of curiosity, how long did it take to build?
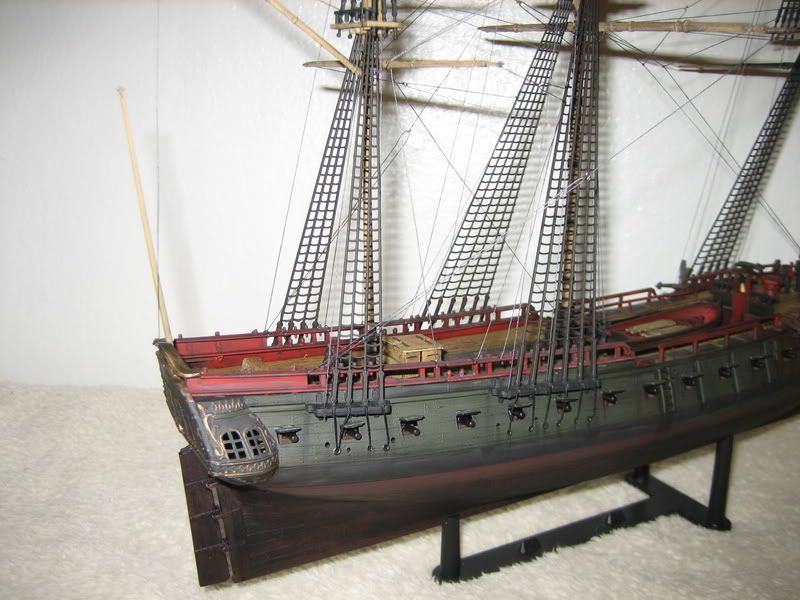
This is coming along very nicely and has a very effective weathered look to her.
Of all things, I’m building one as well right now - a boardroom style hull model as a graduation gift. Its weird building such a modern ship, but she has beautiful lines and it will be fun to actually get to paint the insides red for a change.
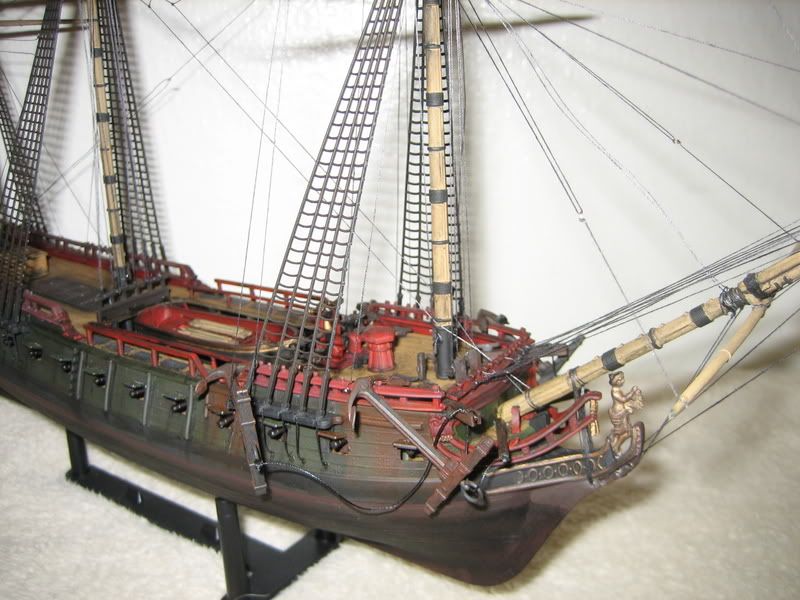
The problem with the head rails is inherent in the kit. They should go all the way to the figure head, but if you do so, they do not mount against the side of the hull where the blank space suggests they should go. BUT - they should not actually mount against the hull. The Kennedy model shows the aft end of the head rails forward of the hull - they curve out to accomodate the catheads. So the head rails are actually correctly proportioned, but someone molded the hull with the blank space by mistake. Se la vie.
All in all, its a dandy model - a handsome subject and nicely done. It has a few problems typical of kits of this type, but not many, and all easily solvable.
Keep up the good work,
Jim
Current:
Tijger, a Dutch jacht of 1617 (modified POB)
Statenjacht Utrecht 1743, an Artitec resin model
In planning:
A jacht of Willem Barants, 1597 (scratch POB)
An Anglo-Danish Pinnace, ca. 1613 (scratch POB)
Matthew Baker’s “Fish Drawing” ca. 1586 (scratch POB)
Many thanks, enemeink. I worked on that Hancock model for about six years, but that figure is deceptive; there were periods of months when I didn’t touch it. And I changed jobs twice (from grad school at Ohio State to the Mariners’ Museum to East Carolina University) and residences (from Ohio to Virginia to North Carolina) while it was in progress - which meant taking the workshop apart and and setting it up again twice. I think the total number of hours I spent on the thing - not counting research - was somewhere in the neighborhood of a thousand, but I wasn’t counting. And when I was working on it I certainly wasn’t in a hurry.
I’d undoubtedly have taken a different attitude if I’d been building the thing for money. That’s one big reason why I am a committed, permanently amateur modeler. I vividly remember several times in grad school when, staying up late at night fighting deadlines for papers, reading assignments, dissertation, etc., I’d look at that unfinished model over in the corner and think, “well there’s something I don’t need to worry about, because nobody but me gives a d[censored]m if it ever gets finished.” That knowledge helped keep me sane (to the extent that anything did - which of course is highly debatable).
I recall a conversation with a guy who’d spent some time working on models in a booth at a museum. He said he the visitors usually had two questions for him: “How long?” and “How much?” He’d gotten those questions so many times, he said, that he’d started wondering whether he was a ship modeler or a prostitute.
Holy cow, I’d forgotten how beautiful that model is, its really inspiring. Thanks for posting the link again, jtilly, I’ve added it to my favorites list. The detail is spectacular - even the letters are shaded.
I notice something on the Hancock that’s also on the Kennedy LaFlore model - the absence of gunport lids. This has puzzled me, since gunport lids would be a good thing to have in a heavy sea, and they come in the Lindberg kit. But the Kennedy model, and now yours, show no lids at all. What’s going on there?
Jim
I just bought this kit at Hobby Lobby about a month ago, thought I’d try it out.
I was hugely disappointed in what was in the box. All those raised lines on the wood grain… I thought there was no way I was ever gonna get a nice model from that kit.
Then I discovered this thread. Your model is inspirational. It made me realise that w/ a little work, it can be a really good looking piece.
Thank you, thank you.
Woodburner - many thanks.
I have no idea what evidence may exist about the gunport lid arrangement of La Flore. As we established recently in another thread, the Lindberg kit is a model of a model - of a ship that, apparently, was never built. I’d have to look up some photos of the “prototype” (i.e., the model in the Musee de la Marine).
I thought quite a bit before adopting the port lid configuration I did for the Hancock. There are two contemporary pictorial sources regarding this ship: the “Admiralty draught” made by the British after they captured her, and a series of four oil paintings, probably by Francis Holman, now in the Peabody-Essex Museum in Salem, Massachusetts. (The paintings depict the action in which the Hancock was captured. One of the ships involved in that fight was H.M.S. Flora, a frigate that, under her original name Vestale, had been captured the French. They re-acquired her much later and named her La Flore. That, at least, is M. Boudriot’s conclusion. Unfortuately that’s not the Flore represented by the Musee de la Marine model, or the Lindberg kit.) [Later edit - I screwed up the last sentence originally. Sorting out all those Flores is enough to give anybody a migraine. I think I’ve got it right now.] While I was working on the model I had occasion to take a trip to England (actually to do dissertation research), and spent several weeks working in the National Maritime Museum. I used my lunch breaks to study the museum’s collection of eighteenth-century frigate models (more of which were on public exhibit then than are now).
On the basis of those models, and a considerable number of contemporary paintings of other frigates, I concluded that it was common (though by no means universal) practice to install lids only on the ports that were well under the quarterdeck and forecastle. The thinking may have been that any sea high enough to reach the port sills probably would come over the bulwark anyway. In the Hancock’s case, another factor is the configuration of the fore and main channels. There’s so little space under them that gunport lids would be barely workable, if at all.
At any rate, I eventually decided to put lids on the two foremost and three aftermost ports on each side. I can’t prove that arrangement is correct for that particular ship, but I’m convinced it was fairly typical.
thank you Cosmic J. with a good base of primer and all of the painting plus clear coat it really helps with the size of the wood grains. Just regular applications and it helps.
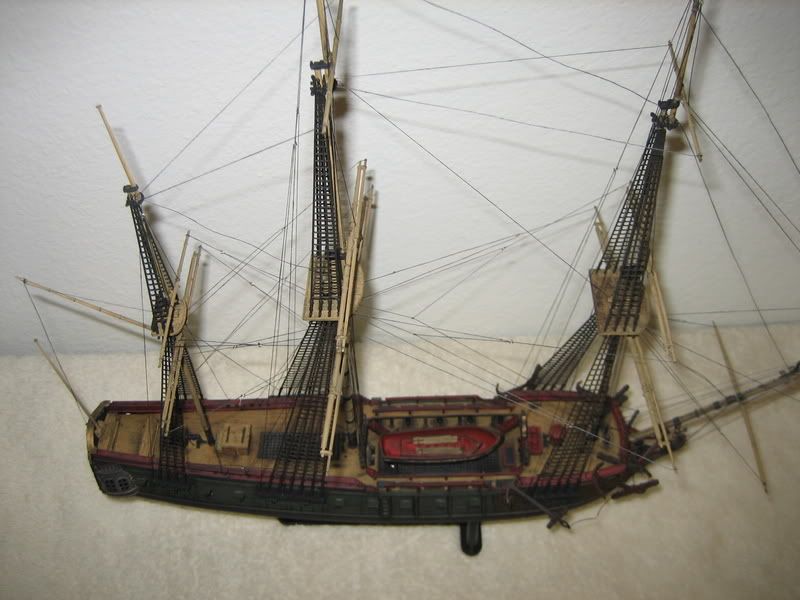
I started to rig this last night. The rigging diagram for this whip is a little out of hand. I like you they show all of the blocks that are not included and they don’t even bother to show where the lines are tied off… good times though. i’m enjoying the learning experiance. I added some brown at the bow of the ship where the anchors will be hung to add a little bit of crud that the anchor would hual up and whatever else would run off. Also as part of the ratline assembly you are supposed to bend the plastic peice and stick it into the side of the hull. this looked pretty goofy so I cut those off and just ran some string instead. This looked much better than bent plastic. Thanks gain to everybody that has given advice and tips.
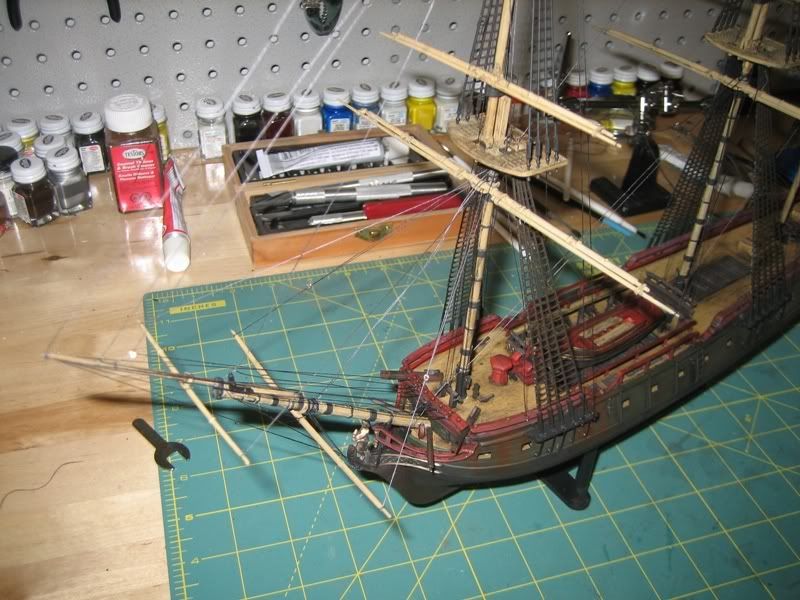
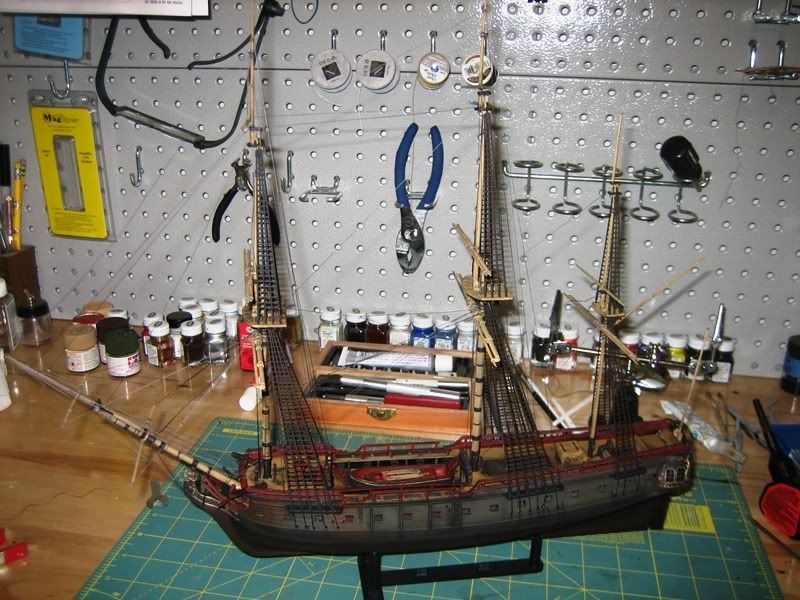
Emeneink, your work is going nicely and great pictures. I noticed the rigging issue too, like the lines that should be prepped before the decks and hull are assembled. You did a good job on the catheads, too, they really jocky for position with the rails there.
jtilley, thanks for the explaination about the gunport lids. Its something I would not have thought of, but it does make sense - a sea large enough to broach them would also be knocking through the quarter galley lights. I was going on faith following the Kennedy model, and your example allows me to go with confidence - thanks.
The La Flore discussion on the other thread is very interesting, and the Peabody-Essex paintings are great to see.
Thanks again, Jim
Thanks woodburner!
jtilley,
I really admire your Continental Navy Frigate Hancock. You did a really fantastic job! Did you scratch build her or convert her from another kit?
Bill Morrison
Many thanks, warshipguy.
It’s what might be called “semi-scratchbuilt.” The hull was built on the “bread and butter” system from laminations of basswood, with a plywood “keel plate.” The hull planking is styrene strip. (That’s a somewhat unusual method of hull construction that I used largely because I wanted to see if it would work. I’m generally satisfied with it, but I’m not sure I’d recommend it to anybody else.) The decks are planked with 1/16" x 1/32" basswood. (I got access to some nice holly while I was working on this model; if I’d had it earlier I would have used it for the decks. I did use holly for the planking of the tops, and for the hulls of the boats.) The masts and yards are turned from degama wood; the gun barrels are turned brass and sit on styrene carriages with brass wheels.
The manufactured parts are the Bluejacket britannia metal blocks and deadeyes (I have the means to make such things, but I figured six years on one model were enough) and the crew figures, which came from various plastic kits. (Some of them were subjected to rather brutal modification. The Continental Marine on the forecastle started out as the guy with the helmet and breastplate in the old Revell Santa Maria, and the one on the spritsail yard footrope is the captain of the old Revell tugboat Long Beach, with a new hat. Captains Cook, from the Airfix Endeavour, and Bligh, from the Revell Bounty, are standing on the quarterdeck, disguised in Continental Navy uniforms.) The figurehead started life as a Preiser HO railroad figure. (The real figurehead was larger than life-size; by pure coincidence putting the model on 3/32" scale made the HO figure right for the figurehead. He got a new hat, jacket, and legs from styrene stock.) All the other “carved” detail on the bow and stern was made from Milliput epoxy putty. Most of the rigging is silk thread, made up on a crude “rope-making machine” that I put together from parts in a Lego set. The exceptions are the ratlines, which are nickel-chromium wire.
In the unlikely event that anybody’s interested, the British quarterly Model Shipwright published a series of four articles about this model, with some in-progress photos (the negatives of which have long since disappeared) back in 1983-84 (issues 45-48). I think those articles may have been reprinted in one of the magazine’s bound anthology volumes, but I’m not sure about that.
The photos on the website that I linked in the above post were taken a couple of years ago. I’m pleased to say that the model has held up quite well during the 24 years since I finished it (and, for that matter, the 30 years since I started it). It, along with several other models from our ship model club, is currently on display at the visitor center alongside the U.S.S*. North Carolina*, in Wilmington.
jtilley,
And, the answer is . . . “d. All of the above”. Thank you for your detailed answer! I will look into that article. Perhaps we could recommend some of the Revolutionary War ships to Revell of USA for future projects. Ships of that period are exceptionally beautiful to me and are all too underrepresented as modeling subjects. Thanks again! You do beautiful work.
Bill Morrison
I’ve given some thought to using styrene strips for hull planks, on a keel and bulkhead/egg carton form. Would you be willing to post the benefits, and disadvantages to this method of hull construction? Where most of the sailing ship models here are styrene, it might be beneficial for all to hear about this process, especially where it might aid modifying a kit hull. Yes, it is a somewhat unusual method, but it just might be a technique that can be developed into something very useful. ( If you’ve already done this…please post a link to the page. )
Ok. The big advantages to styrene as a planking material are that it’s flexible and it doesn’t have any grain, so it’s easy to trim to any required shape. The big disadvantage is that it doesn’t have any grain, so it doesn’t look like wood unless it’s given some sort of treatment in the way of paint, texturing, etc. That makes it appropriate for planks (e.g., exterior hull planking) that are going to be painted, but less so for unpainted decks.
I worked from a copy of the plans by Howard I. Chapelle, which I bought from the Smithsonian. I checked them frequently against copies of the original Admiralty drawings; Chapelle was a great man, but he’s somewhat infamous for his habit of making changes, some justifiable and some not, when he redrew old plans. But he saved me the trouble of “fairing up” the lines in the Admiralty drawings. (They were made on linen, and stored in rolls for almost two hundred years; those old plans invariably have stretched and/or shrunk.)
I started out by carving the basic hull shape, up to the level of the maindeck, out of laminations of basswood - in two halves, to fit the plywood “keel plate.” (I cut the latter out of birch plywood with a scroll saw. It runs up to the level of the underside of the maindeck at the centerline, with notches cut in the top for the deck beams. Amidships the keel plate is cut down to the level of the berthdeck, which I wanted to be visible through the hatches in the waist.) I hollowed out the two halves of the hull to a thickness of about 3/16", then secured them to the keel plate. I built up the bulwarks above the maindeck with basswood strips - the first one being the height of the gunport sills.
I then laid in a stock of Evergreen strip styrene (which, if I remember correctly, had recently come on the market) in the appropriate dimensions. (I’d have to measure to see just what those dimensions were; I think the thickness of the “common plank” was .010," but I’m not sure. The wales, of course, are thicker.) The adhesive was old-fashioned Revell “Type-S” styrene cement in a tube. I wish that stuff was still on the market; I continue to think that tube glue has its uses. In this case it worked quite satisfactorily, softening up the surface of the styrene and soaking into the basswood. (Basswood is far from the best wood for many ship modeling purposes, but it’s great for things that have to be glued.) I worked alternately from the wale down and the keel up. I was surprised at how little tapering was needed on the planks between them to get the planking lines to run fair on this particular ship. I expected to need a couple of “stealers” at the stern, but they were in fact unnecessary.
The flexibility of the plastic, and the speed with which the glue dried, were such that no preparation of the planks was necessary and they didn’t need to be clamped - even on the sharp curves around the bow. Just holding them in place with finger pressure for a minute or so was enough. I finished up with a little judicious sanding and scraping of the plank edges, but not too much; I wanted the edges of the planks to be faintly visible through the paint. I covered the visible parts of the keel plate - the keel itself, the sterpost, the stem, and the knee of the head - with styrene sheet.
That styrene has now been held to the basswood hull by the Revell cement for just about thirty years, and, contrary to what some of my traditionalist friends predicted, shows no sign of coming loose.
There are several decorative moldings, with rather delicate T-shaped cross-sections, above the gunports. I ground a female version of the cross-section in an old X-acto blade. The height of the molding worked out to .040" (if I remember right), so I clamped a sheet of .040" styrene in a vise and scraped the profile on the edge of it. Then I sliced off a strip of the right thickness and cemented it to the hull.
The last step in the planking process was to plank the insides of the bulwarks. That was easy.
Styrene sheet really came into its own in the construction of the headrail assembly, the quarter galleries, and the transom. That’s another story, though, and this post has gone on more than long enough.
If I were building the model again (gawd forbid) I’m not sure whether I’d use this method of planking or not. Since then I’ve acquired a good stock of nice holly veneer, which I really like; I suspect it would be just about as easy to work with as styrene in this context. I do think, though, that if I were building another model with one of those complicated, basket-shaped headrail assemblies I’d use styrene for that part again.
Hope that helps a little.
Thank You Professor!
I have come to appreciate the positives of styrene strip, and sheet, in the model railroading, and modern ship model construction, and had thought of using styrene strip for sailing ship planking. Your “Hancock” shows the validity of its use. Your use of the old revell “type S”, reminded me of using the current “user safe” tube glue to attach a plastic building to a basswood foundation. Applying the glue to the wood, and “working it into” the wood grain, and letting it dry, then, a second coat on the dry, and a light coat on the plastic formed a reasonalby good bond. For this use, however I have found that silicone adhesives work better, although taking much longer to set up, and harder to control.
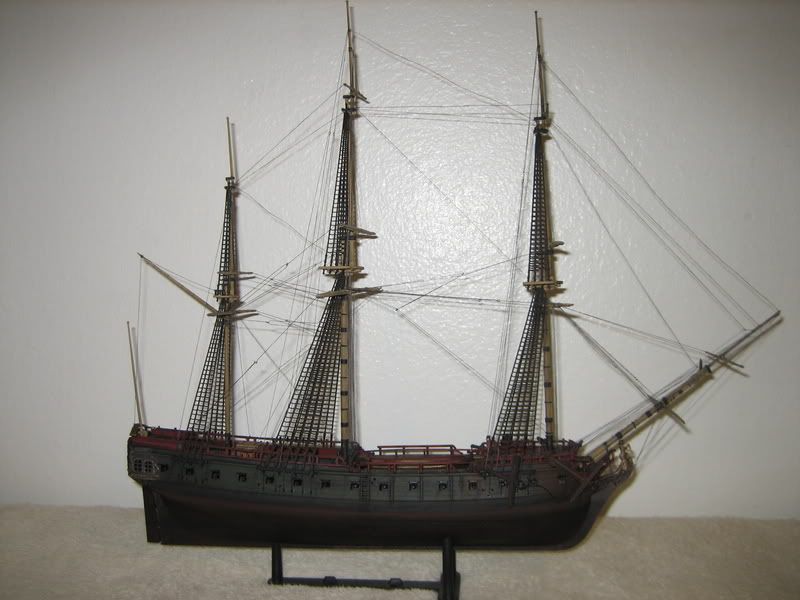
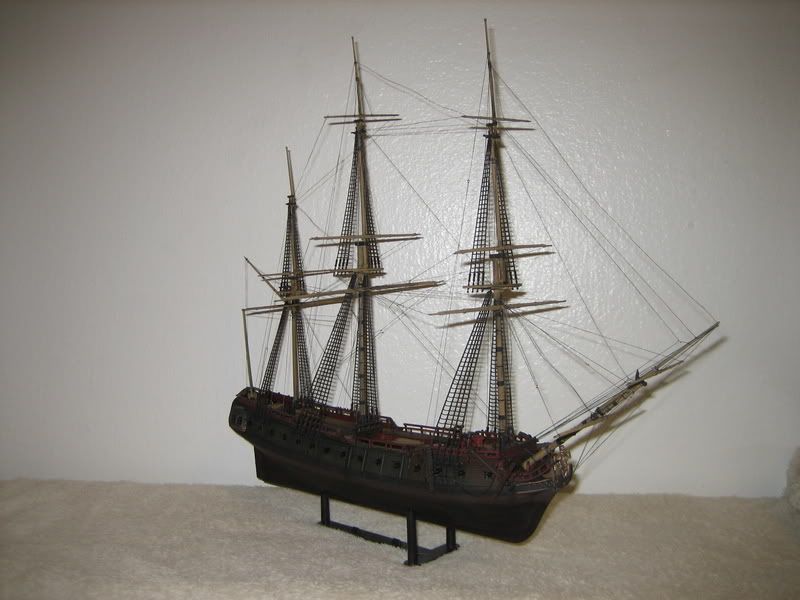
Finished! Funny how not hand tying rat lines can cut build time down to almost half. Of course when I start the Royal louis I hope to have that one done by christmas… There’s nothing too fancy with the rigging. I just used the same gold chain that I used on the Wasa to do some of the rigging instead of using the thick plastic ones that came with the kit. I decided to leave the sailors off and use them on another build maybe the HMS bounty or the La Flore. I haven’t decided yet. anyway if anybody has any questions please ask away…
thanks for looking.
Hi “Enemienk”,
Awesome! I have really enjoyed your build progress and pictures - thanks very much for sharing. I can’t remember if you mentioned earlier in the thread, but where did you pick this kit up from?
Keep 'em coming - looking forward to your Bounty or La Flore!
Cheers, Rick
Not to mention the time needed to mount the lower deadeyes, with chainplates, and rig shrouds. I’m still in that process.
Very nice model indeed!, looking forward to your next project.
Thanks Rick!
I bought two of these at my LHS in the discount bin for about $9.00 a piece. It seems like every month his dicount bin has a themed clearance sale. Right now it’s old airliners.
thanks sumpter,
I’ll be doing this on the Royal louis. I’ve just ordered some 2.5mm deadeyes and blocks for this so it’s be awhile before that one is done. I might have to do some in between builds to keep my mind from going crazy…