If you haven’t seen this, here’s a link to the National Geographic site abt the ship, which is the basis of the article in “Men, Ships and the Sea”.
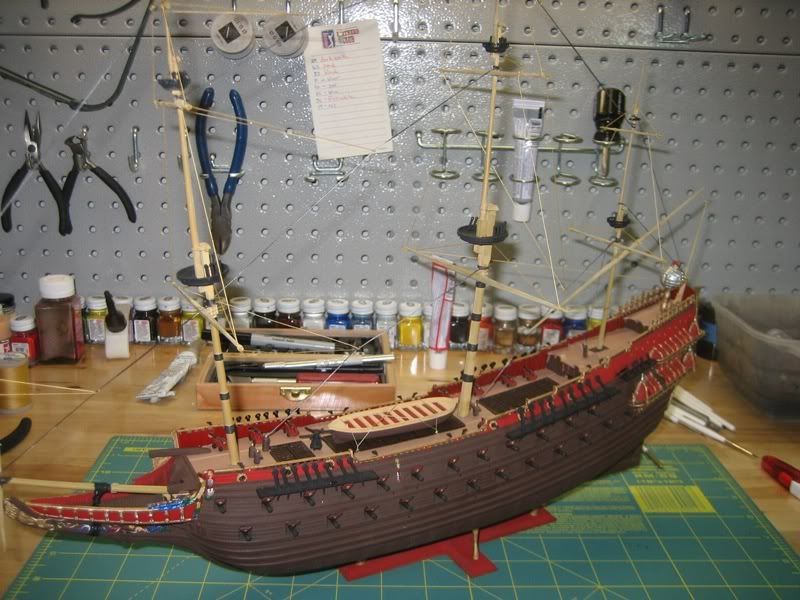
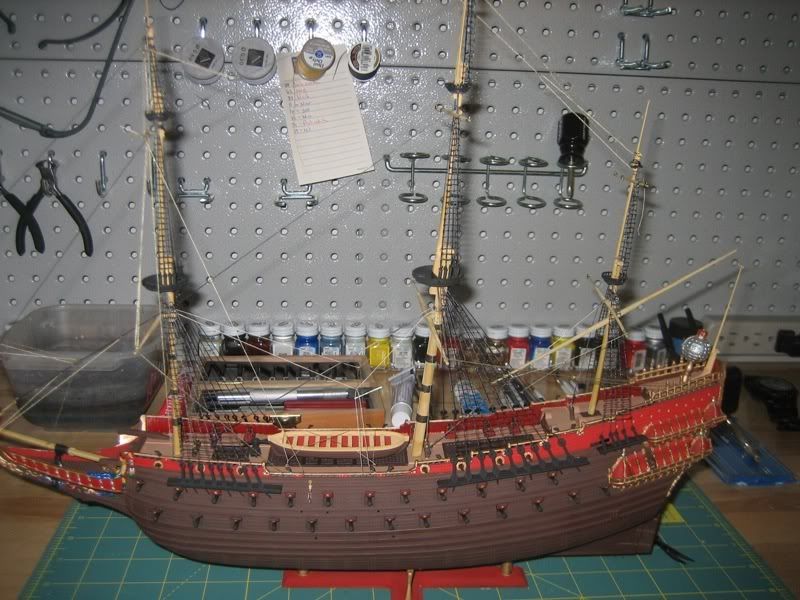
I managed to put up some of the rigging last night. I’ve got to say that the second time around is always easier and much faster. After everything was said and done, the riggings had a little bit of sag on them so to tighten them all up again I added string on the bow-spirit to give everything proper tension. next up ratlines…
i’m going to try to get some better pics with some butchers paper that I have for a back drop. hopefully that will help with the detail.
so I decide last night that the rigging that i did was boring and not very good. so i decided to take most of it off and restart from the beginning. I don’t know why the thought never crossed my mind that the instructions were basic and didn’t have very much detail. So after some google searches I think I have pretty good idea of what needs to be done.
I didn’t want to say this earlier, but since you’ve removed the rigging you’d already installed…I think most sailing ship modelers who’ve been at it for a while would agree that the easiest and most practical way to rig a ship model is to follow (with certain deviations) the sequence that the riggers of the real things followed. That means the first lines to go into place are the shrouds. Then come the stays and other standing rigging, followed by the running rigging.
The old timers also were in the habit of rigging the masts section-by-section - that is, installing and rigging all three lower masts, then adding and rigging the topmasts, then the topgallant masts. That sequence minimizes the tendency of spars and lines to interfere with each other. It also helps ensure that the rigging of the lower masts and yards doesn’t intefere with that of the upper spars. The rigging of the real ship was designed in such a way that the topmasts, for instance, could be taken out of the ship without disturbing the rigging that held up the lower masts.
Hope that helps a little. Good luck.
well so far i’ve only been removing as I go. so it’s only been section by section and side to side. the idea is to do a before and after. the Airfix instructions vs google. basically I’ve found some pics of what other modelers have done with wood kits and used that as a reference. Thanks for the help and the heads up you always seem to give direction right when it’s needed. [:D]


In regards to using paper sails, I am having pretty good success with experimenting on this Heller Royal Luise. It is about the same size as the Wasa and I have been using high quality resume’ paper as what was suggested to me here on this forum.
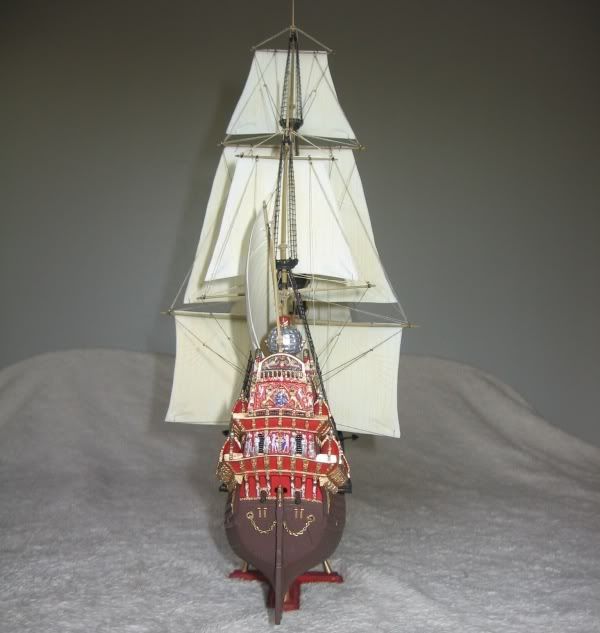
The masts seem out of alignment because I just started running rigging.
Scott
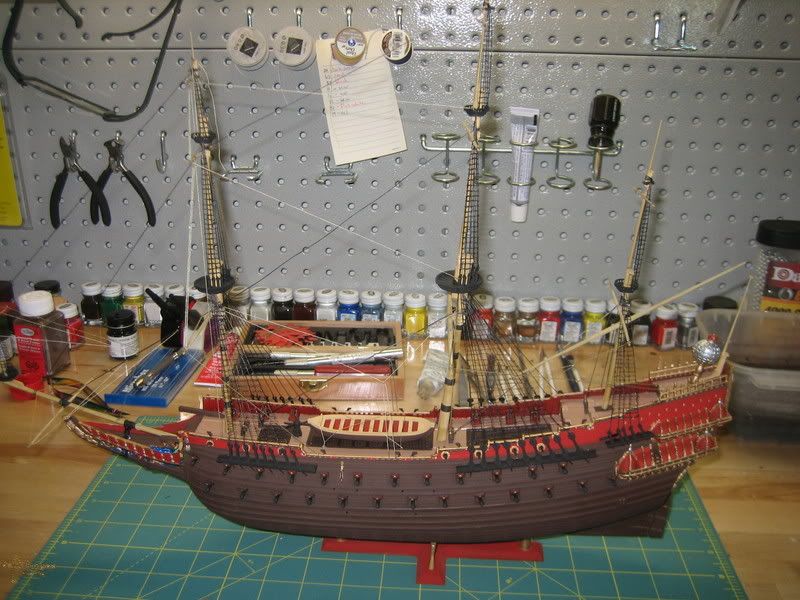
so it turns out that there is no place to run the shrouds lines through some of the tops. so I’m waiting on some tools that I ordered to help with this…lame. I am thinking about starting another build while I wait…
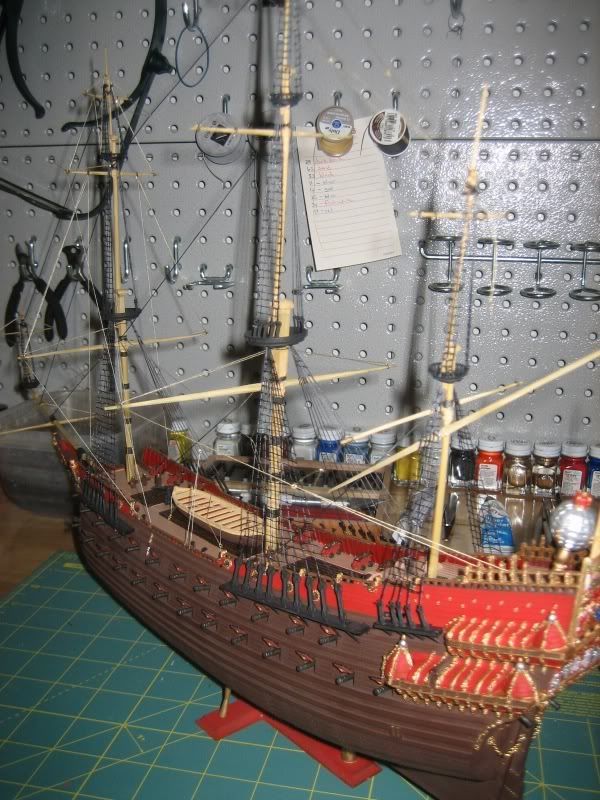
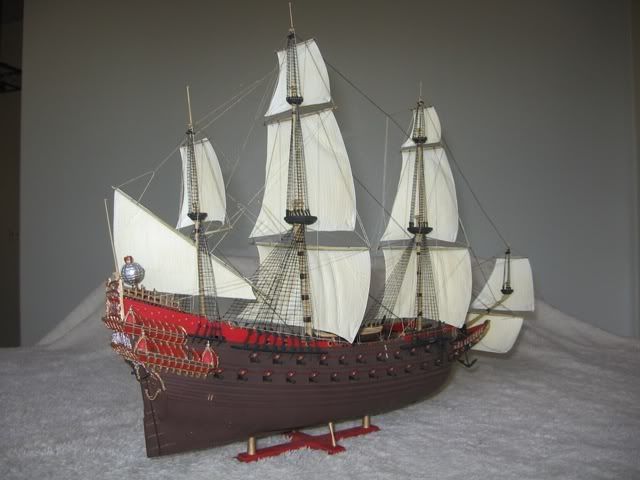
So it’s been awhile since I’ve added an update. So here it is. It took awhile to get the tools to get this going. I’m pretty close to finishing this off so i’ll put up more pics as they come. Enjoy.
Looking very good Enemeink.A very well executed paint job !
Julian
Thanks Grem!
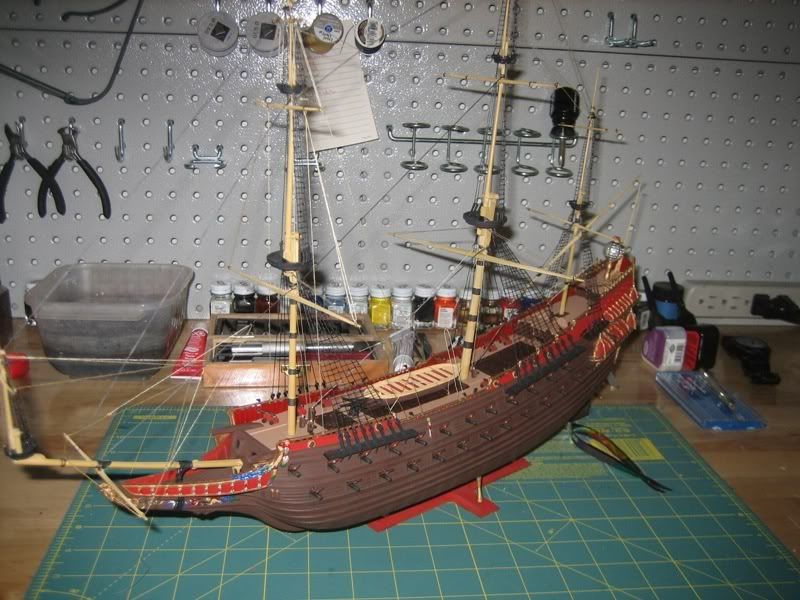
I seem to be dragging my feet on finishing this. I don’t know why but i just don’t like doing ratlines. But spring cleaning and getting things ready for the summer has kept me pretty busy as well. not much of an update but it’s still an update. enjoy!
I am extremely impressed! You are doing a magnificent job! And, thanks for the excellent photos; they are a big help.
Thanks warshipguy!
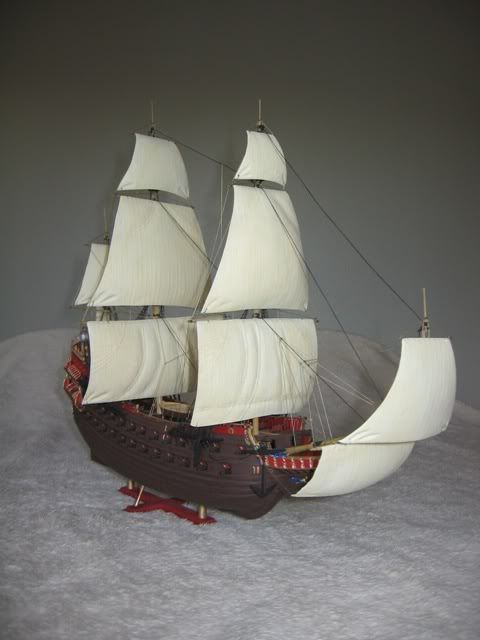
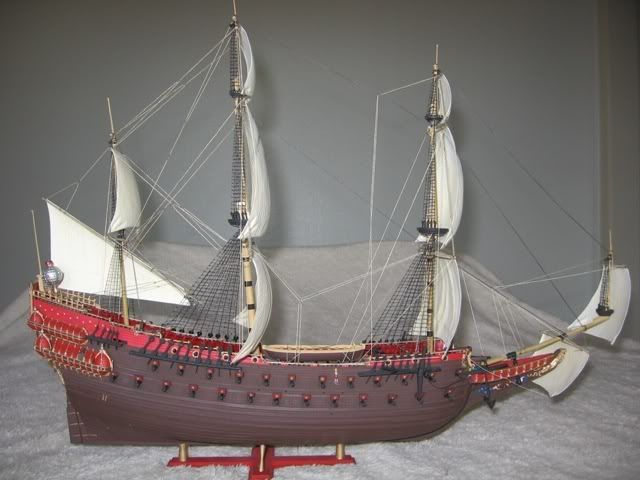
I put the finishing touches last night to my Wasa, Except for the flags. I don’t know what to do with them just yet. they seem to be just printed on 90lb card stock so they haven’t been added. for the rigging I found a picture of a wooden ship by Corel for reference. I have to admit that I did try to use the rigging tool that was provided (just to see) and it was more of a headache then it was worth to use. Thanks for the discussions and advise to all of those who gave it and made this build fun. This is only my second rigged model ship and i don’t think that it would have been half as good if it wasn’t for the community. Thanks and enjoy!
Jaron.
Enemeink,
Have you considered silkscreening your own flags? Use the existing flags to create the patterns. I have done this with many kits. It works well.
Bill Morrison
yeah I have thought of this but in the long run I don’t think the cost will out weigh the results. I also thought about using a blending marker to get the ink to bleed out but that might not work to well and could smudge. i’m thinking that i’m just going to scan them and reprint them on a thinner paper, then glue them together. it’s kind of disappointing that the material for the flags was overlooked.
Flags present a challenge to any ship modeler. Maybe the best approach to it is to start by getting a thorough understanding of the real thing.
Real flags, especially during the sailing ship era, were often extremely large. In order for them to be practical in terms of handling, they had to be made of relatively lightweight material. (I suspect another consideration had to do with the ship’s navigation. Some of the flags flown by those old ships were as big as their topgallants; if a huge flag got snarled up in the rigging in just the wrong way it could really mess things up.) The surviving examples indicate that flags often were made of some tough material with the texture of coarsely-woven gauze - so coarse that the wind could literally blow through it. The old master marine artists often made their flags look downright translucent. (Here’s an example: http://www.artforbeauty.com/sailpaintings/Resolution3582.html .)
The museum where I used to work had a big British blue ensign that had belonged to the liner Queen Elizabeth. The flag itself was gone by the time I got there (the file indicated “destroyed by rodents” - a thoroughly embarrassing confession for any museum to make), but the file photos established that it had been made of a material that most people would describe as “netting.” The openings in the mesh must have been almost an inch wide.
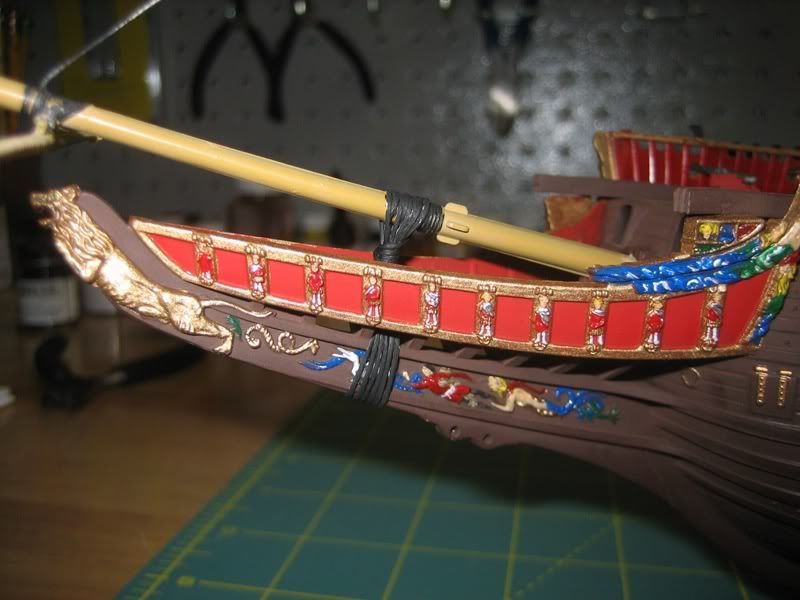
The *Wasa’*s flags (I’m basing this on the box art) were, with the notable exception of the big ensign on the stern ensign staff, pretty simple in design: yellow crosses on blue backgrounds. I imagine the real ones were made by stitching together pieces of blue and yellow fabric. The big ensign, with the heraldic figures on it, is another matter. The lions and other devices probably were embroidered separately and stitched onto the background fabric. (An interesting question: would the lions on the other side of the flag be facing right or left? The rules of heraldry are, I believe, quite specific about that - but if the lions were facing to the left as seen from both sides of the flag, and the basic fabric of the flag was indeed translucent, the result would look pretty odd - especially if the sun was behind the flag.)
Fortunately, for the modeler working on 1/144 scale much of this isn’t directly relevant. My own usual approach to the problem is to paint the flags with diluted acrylic artist colors on thin white tissue paper or drafting vellum, with the paper taped down over a pattern (which is covered with Scotch tape to prevent the paint from soaking through the flag and sticking to the pattern). I deliberately keep the colors a bit pale, to give at least an impression of that transucent look. When the paint’s dry I cut the flag out and take a look at the reverse side. If the design is fairly simple the paint usually will have soaked through enough that I only have to touch up a few spots. In a U.S. flag, I have to paint the stars on both sides. My target is to make the flag, and the paint, thin enough that light can shine through it - at least where there’s no additional layer of fabric. (Take a look at the first shot in the movie “Saving Private Ryan.” It shows an American flag with the sun behind it. The stripes and the blue field are translucent, but the stars look almost black. That’s because they were sewn onto the flag separately - and they’re in silhouette.)
This process is easier than a lot of people seem to think. Believe me, painting those flags would be a h[censored]l of a lot eaiser than painting the “carvings” on the Wasa. And if you don’t get your flag right the first time you can throw it away and start over.
But I’ve never tackled anything as intricate as those Swedish lions. I’m not sure I could paint them acceptably - though using the Airfix flag as the pattern would certainly help.
One tip. Some people use colored marking pens to make flags. If you do that, make sure the pen is clearly marked “Permanent.” Most of them aren’t, and their ink fades almost beyond recognition in a few weeks.
The paper on which the manufacturers print flags is indeed ludicrously thick for the purpose - especially when folded over double. Maybe a partial solution (which I haven’t tried, but I don’t see why it wouldn’t work) would be to make a color copy of the flagsheet with an inkjet or laser printer onto a thinner paper. (I do know that my Epson RX580 works perfectly well with drafting vellum. I suspect it would even print on tissue paper, if the tissue were taped down to a heavier backing sheet.) Maybe the copies could be cut in half and painted on their backs to match the fronts. Even if they were doubled over, they’d be a lot thinner than the ones in the kit.
Sailing ship kit designers do, thank goodness, seem to have abandoned a remarkably silly tradition that used to be common in the business: making flags with “ripples” drawn in perspective. I remember in particular the Revell Santa Maria, whose flag sheet featured exquisitely intricate Spanish Renaissance designs printed in great detail on what amounted to “pictures” of flags fluttering in a “breeze.” The person who drew those designs (twice - once for each side of the foldover flag) was a real artist. But didn’t it occur to anybody that a two-dimensional picture of a rippling flag attached to a three-dimensional ship model would look utterly ridiculous? And that anybody who’s capable of dressing himself is also capable of putting genuine, three-dimensional ripples in a miniature flag in a few seconds? (By coincidence, Revell Europe has just reissued that kit - complete with the original flags: http://www.revell.de/3d-view/galery.php?objID=05405&lang=en . See what I mean?)
Just how the finished flag should be shaped is worth thinking about. I personally tend to like models with furled sails or bare spars. (That’s a personal opinion - and subject to change.) On a model like that the flags, to my eye at least, look best drooping - especially if the model is a full-hull one mounted on pedestals. Einemeink’s Wasa, on the other hand, seems to be experiencing a moderate wind, which is filling the sails. That wind obviously would have a similar effect on the flags. Given that the yards are squared, the wind must be coming from dead astern or nearly so; the flags therefore would be blowing almost straight ahead. (A seventeenth-century ship couldn’t move fast enough to make the flags stream out behind. Note that in that Van de Velde painting, the wind is blowing from the port side and the flags are streaming out to starboard.)
Some time ago I had to do a drawing project that involved showing flags blowing in a breeze, and I quickly found out that drawing a flag in that configuration isn’t as easy as it looks. So I picked a breezy, sunny day and took my digital camera, with the shutter speed set high, over to the campus library, which has a nice big flag on the pole in front of it. I got some curious looks from people who couldn’t imagine why I was snapping dozens of pictures of that flag waving in the breeze, but when I was done I had a useful collection of pictures showing the configurations real flags get into. (Some of those shapes were a little surprising.)
Too long as usual, but I hope it helps a little. That fine model really deserves some nice flags. Good luck.
Later edit: I must have been typing this post when warshipguy’s and einemeink’s went up. Looks like einemeink thought of the same idea I did.
I have one question. Is there a reason for not painting the hull below the waterline in a tallow color? I’m not intending an implied criticism but rather that I’m curious.
Bill Morrison
I hope enemeink will forgive me if I answer that last one - because I think the subject is interesting. The researchers in Stockholm recently completed a thorough study of the paint on the Wasa. (That’s the same project that blew away the old assumption that the carvings were all gold-leafed on a blue background.) Their conclusion regarding the hull was that the entire external surface of it (below the red-painted parts) was simply coated with tar. There was no indication that anything resembling a “waterline” had ever been marked on it.
All that gentleman’s commentary was included in a letter from him that was quoted in Ships in Scale magazine a year or so ago. I’m sorry I can’t lay hands on it at the moment; it was extremely interesting.
According to the folks from our university who went over there and did research on the ship last December, that tar on the external surfaces was the source of a more-or-less false alarm that scared a lot of people last year. Some sort of chemical compound seems to be leeching out of the hull timbers, and the conservators thought it was related to the polyethelene glycol (PEG) that had been applied back in the 1960s. It turned out, as I understand it, to be related somehow to the old tar coating from the seventeenth century. The conservators now, as I understand it, have the problem under control.
I don’t think anybody can be exactly sure just what shade of brown the hull originally was, but einemeink’s certainly looks believable to me.
Thanks jtilley,
I did a lot of research on the Wasa way before I started the build on this. I actually did a large amount while I was building the Revell-Germany Victory. There are some great links in this thread that have loads of research. I also could not find anything suggesting that a waterline was ever added. Also almost every illustration that I have seen does not have a tarred waterline.
Gentlemen,
Thank you so much for clarifying that for me! I really appreciate it. Your responses are what makes this forum so valuable.
Bill Morrison
thanks for the discussions. it what makes these forums fun and the builds that much more enjoyable.