Oops, just read through Cerberus’ last post (which is packed with good info!) and saw that there have been found many different sizes of trucks per ship. I think for my part, I’ll settle on a couple of different sizes.
D
Oops, just read through Cerberus’ last post (which is packed with good info!) and saw that there have been found many different sizes of trucks per ship. I think for my part, I’ll settle on a couple of different sizes.
D
I agree, this is a great thread.
For what it’s worth, Mr. Lees says 9regarding British practice): “The parrels for the yards comprised ribs and trucks, those on the lower yards made of of three rows of trucks, and the other parrels made up of two. The length[s] of the ribs on the lower parrels were one and a half times the diameter of the yard, those on the mizen yard, the topsail yards (except the sprit topsail and the spritsail yard were one and a half times the diameter of their yards; finally those on the sprit topsail, and all the topgallant yards, were twice the diameter. The depth of the ribs was equal to the diameter of the trucks and the width of the ribs was a quarter the diameter of the trucks. The trucks’ diameter was one fifth the rib’s length on parrels of three rows, and one third the length on parrels of two rows. The length of the trucks was one and a quarter times their diameter. A hole was bored through the trucks to take the parrel rope; holes were also bored through the ribs for the same purpose. The trucks were positioned so that 1/2 inch of truck protruded beyond the back of the rib. There was a slight cavity in the ribs in the way of the trucks. Though the above description may sound complicated, reference to the illustration should clarify the situation. Parrels for the gaff and boom did not require ribs; the trucks were similar to the others and were about three eighths the diameter of the gaff or boom.”
Got all that?
This book got published just in time for me to use it for my Hancock model. I plodded my way through the whole thing. Fortunately Radio Shack started selling a little calculator that works in feet, inches, and fractions at just about the same time. (I still have it; it still works perfectly after 30+ years.) That calculator saved my sanity (or at least a little of it). Several companies now make such calculators; they’re available at Lowe’s and even Wal-Mart for a fraction of the price I paid back in the eighties. And most of them have metric/imperial conversion built in. Very highly recommended.
One curious detail I notice in all these splendid drawings: the English drawings generally show the parrel ribs with graceful curves, where as those in the French drawings are more angular. Whether that was universally true I have no idea; I doubt it.
Bottom line: if you put three rows of beads on the lower yard parrels and two on all the others, and if the beads don’t look oversized, you’ll be working to a far higher standard of accuracy than the Heller designers did.
[Later edit: well, now that I’ve spent ten minutes meticulously copying all that stuff from Lees’s book I remember that Warshipguy already quoted it a few posts up. Well, [cnsod].]
In truth, Heller wasn’t the only kit designer that omitted parrels. Most sailing ship kits attach the yards with some sort of bracket designed to fit into slots at specific places on the masts, thereby preventing the full-sized yard from being hoisted and lowered. Indeed, Revell of Germany designed the yards on their 1/150(?) USS United States to pass through the masts! I think that it is therefore fair to say that no manufacturer has gotten this part of ship modeling right.
I believe that I prefer Heller’s approach to that of other designers; let the builder construct parrels without performing surgery on the masts and yards. It is simply this modeler’s preference. [:D]
Bill
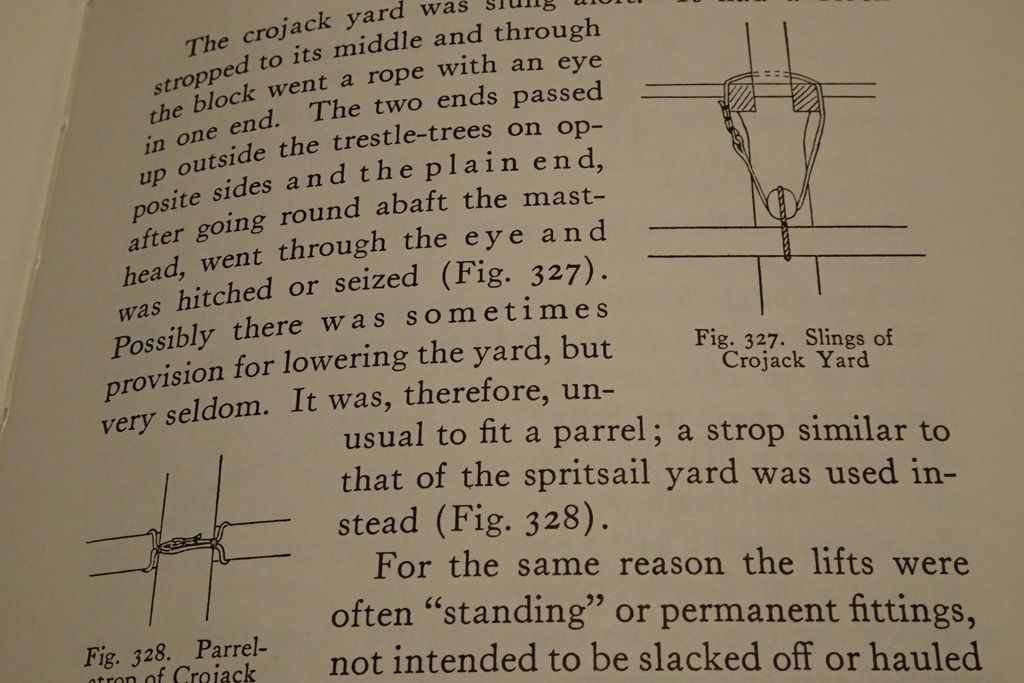
Anderson says there was no parrel on the crossjack on the mizzen mast, or at least it was unusual to fit one:-
IIRC he says that a parrel on the bowsprit is a luxury as the yard couldn’t move very far, but later says they were undoubtably used. Having said that, I haven’t seen one on a French model, but have come across it in Dutch practice
Nicolaes Witsenand
Shipbuilding in the Dutch Golden Age
The yard was held to the mast by the parrel. The parrel consisted of lines rove through trucks and ribs, the ends of which were bent to blocks (28 and 48); the parrel fall rove through these blocks belayed at the foot of the mast.
Mainmast
1 Parrel with 3 rows of trucks.
Foremast
1 Parrel with 3 rows of trucks.
Mizzen
*1 block for parrel (*but no mention of a parrel.)
To the Bowsprit.
1 Parrel.
Main topmast
1 Parrel.
Fore topmast
1 Parrel.
Main topgallant
1 Parrel.
Fore topgallant
no mention of a parrel
Mizzen topmast
1 Parrel.
Bowsprit topmast
1 Parrel.
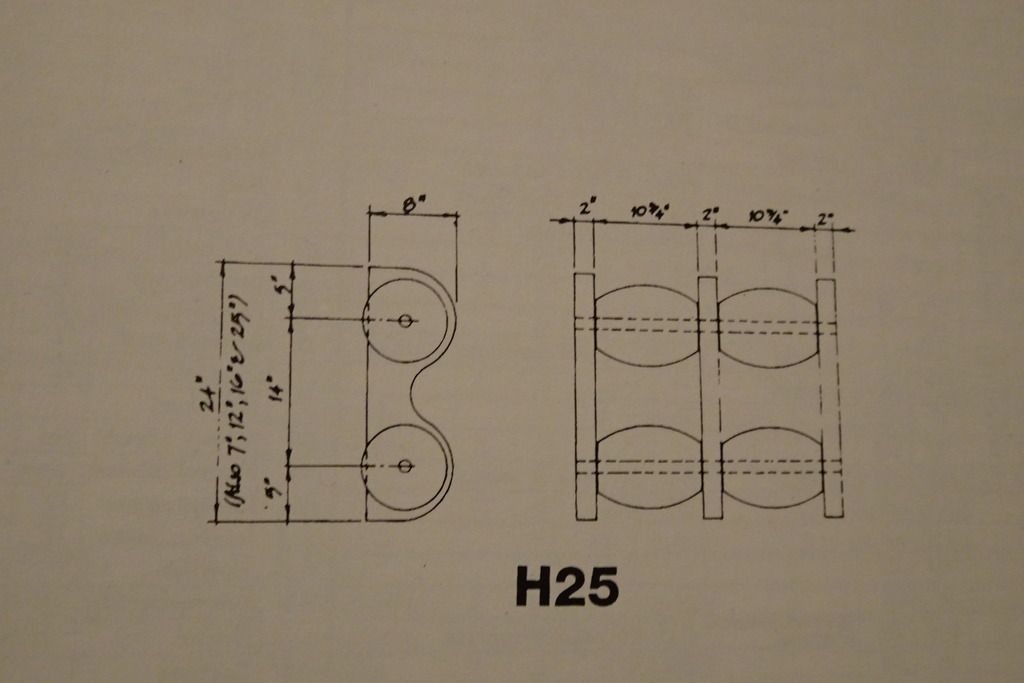
*The ribs of the main topsail parrel are 16 inches, combined with 10 Trucks of 8 inches. For the topsail parrel (*fore?), the ribs are 14 inches. For the mizzen parrel the ribs are 16 inches. A main parrel is 3 feet. A fore parrel is 2 1⁄2 feet.
The parrel fall blocks are of 16 or 17 inches, 12 in number, and are used for the parrels of the three masts.
The French did have different size of trucks in the C.17th as can be seen here from Boudriot’s l’Ambitieux:-

The largest truck is about 4mm at 1/48th scale.
“Victory” had more sausage-shaped trucks (topmast and topgallant only), these dimensions match Lees’ proportions pretty well. From AOTS “Victory”
Well, I now have about 4 pages of notes, and several of these posted images saved to my computer! I went ahead and made some rough size charts for all the parrels I’ll need (it ends up being a lot of small parts when added up!)…I still have yard blocks to attach, and I have to start working on some sail material techniques…but I could go ahead and focus on parrels for now…
Here’s my next question: How many ribs/trucks do I use per row? Some pics show a parrel extending about halfway around the mast, but some seem to go all the way from the yard, around the mast, and nearly abutting the yard on the other side?
I’m thinking if I go with about 6 ribs and 7 trucks I should be about halfway around the mainmast (my beads are pretty small)…should be good? Even at that, I’ll still be custom cutting about 54 ribs for the various yards…seems a bit daunting. Hoping I can figure out a good ol’ production line-style to make things go quickly, and most important, to achieve a uniform finished product.
Anyway, thanks again for everyone coming through with the good info!
Go team!
Dave
Wow, Cerberusjf beat me to posting the only other image I thought might be of use - he posted a zillion useful images!
When I was toying with the idea of building my Le Glorieux kit about 4 or 5 years ago I drove up to Portland to photocopy some pages from Jean Boudriot’s masterful work on French 74’s - There were no copies in the libraries here in Salem that I could find. I can’t afford the book - it’s quite expensive. Anyway, the one page I photocopied that might have helped David has already been posted but just to be clear about the image to which I refer, here it is again.

Terrific pic…that clarifies things a lot!
So, here’s where I decided to start:
I made a gauge/jig to help me determine the numbers of trucks and ribs I’ll need for each yard/mast instance.
It’s basically a false yard with a number of beads alternated with everygreen sheet (.020")…I made it long enough to go around the lower main mast, knwoing that all others will be thinner and thus require fewer trucks/ribs.

Then I simply hold the yard up the mast and draw the beads and styrene around the mast, and voila! Now I know that I need 11 beads and 10 ribs for the main yard!

Now I can hold that yard up to any position of any mast, and by pulling the string around, I can tell how many beads and ribs I’ll need for that yard by how many of each overlap.

For example, the sprit topsail yard only requires 3 beads and 2 ribs…
This way, I can go ahead and skeptch out how many parrels I need of each size before I set out to make them…
Anyway, just wanted to share it, in case anyone else might care to use this technique, or some variation of it…
Also, not sure if it’s been mentioned lately, but the latest update to the forum has made posting photos here HUGELY simplified…it was once a convoluted exercise in copying, pasting, opening HTML-accesible windows, etc., etc., but now (at least from Photobucket) all I have to do is click the IMG link on the image in Photobucket, and then right-click and paste (or ctrl+V) directly into the thread here and the code lays down…no more updating the text or anything…kudos to the admins!
Thanks for watching!
DaveK
Good day everybody,
Thanks to David, for this interesting discussion…
For my model parrels I used information/general idea, from this book , and all proportions just were taken from the drwngs…

and than construction was much simplified,just follow technical idea of this device-to hold yard agains the mast, and possibilities to be slacken when it is ness-ry ,for that I made two tackles

for parrel fabrication I used piece of waisted plastic(instant noodles container,s cap) and so called ,“japanese beads”, due to its small size ,approx of 1.3 mm in diam. it was quite suitable for my scale…there was more simplification -all parrels have the same beads diameters…


to adjust parrels ropes lenght I used almost the same way,as Daviv did…but instead of model mast, piece of plastic of right diam. was used


Thanks, Kirill, that’s very good information!
I started by cutting styrene sheet into small rectangles, and then began trying to shape and drill each individually…as you might guess, it was difficult to get consistent results.
For one thing, the parts are so small that handling them is very tricky.
I think I like your idea of tracing out all the dimensions while they are still a single piece of sheet styrene…then I can drill them, notch them, and only cut them off of the sheet when they are almost finished, performing final shaping as they are removed in small batches.
Back to square one!
Thanks!
Dave
Hi David,
Good, if you found it useful… I did them finish shape, also roundig edges by fine file ,and after that,just cut them into pieces and paint…regarding simplification of parrel rigging…when sails attached to the yard and everything installed at place, there is not possible to see ,haw is actual this ropes situated…the only tackles at the mast base you can see clear…actually , to attach lower parrel tackle block to deck by means of long sling,it was my idea, supposed it should be attached to the main stay loop,or to the mast…like here, William Rex model


Gentlemen,
I just purchased a book from Amazon called Eighteenth-century Rigs & Rigging by Karl Heinz Marquardt that compares and contrasts French, British, and Continental parrels in the 17th and 18th centuries. The primary difference between British and French parrels seem to be the locations of the trucks. British practice was to place the ribs outboard of the trucks, alternating thusly: rib, truck, rib, truck, and so forth. French practice was to do the opposite, truck, rib, truck, rib, and so forth. In British practice, a rib was closest to the yard on both ends; on French large ships, the outermost truck was closest to the yard. On smaller ships in the Meditterranean, the parrels only consisted of trucks. Another difference was that, in French ships, the ribs were slightly curved upwards on the ends. I’m not sure that that would be worth the effort.
If someone can advise me how to copy the appropriate pages and diagrams onto FSM, I will do so. Otherwise, I will send copies to anyone who wants them.
Bill
Good info, Bill!
I have noticed before that some models have had the configuration of truck/rib/truck, and others rib/truck/rib…now it makes sense.
By the by, I regret to inform that after several failed attempts to fabricate consistent ribs with styrene sheet, I have conceded to purchase some pre-fabbed parrels from an online source. I tried, and tried, and tried to make ribs…but they come out with too much variation for me. I have not the patience to make and waste dozens more!
So kudos to those who have what it takes…![]()
I’ll update soon with a review of the pieces, and perhaps even share my laughable attempts!
Dave
David,
I see nothing wrong with that. There might be another approach. Chuck Passaro has recommended using parts cut our from manila folders. He argues that they are indistinguishable from parts made from plastic or wood, but that they are easier to make.
I will be happy to send you the appropriate pages from Marquardt’s book if you want them.
Bill
Manila Folders would probably be a good material, easy to cut out for sure!
I went ahead and ordered some Amati Parrel kits from Agesofsail, they arrived yesterday, and I’m happy with them. The 10mm versions have ribs with 3 holes, and the 6mm have two holes…ribs appear to be molded styrene and the beads are wooden. The ribs might want for a little sanding, but the overall shape of the parts is consistent, and I like that!
Here’s a couple of pictures, of both the amati parts, and of my initial attempts to construct ribs from styrene sheet…

I started by making a grid of rectangles, and marking the spots for rib hole placement. I thought I was off to a good start, but after I started trying to shape the curve of the ribs, I had all kinds of trouble getting them to look right…I thought after awhile, I’d get a rhythm down, and they would start lookign better…I was wrong! I think I made 12-15 ribs, and the profiles of most of them ended up glaringly different, and also the styrene wasn’t sanding as cleanly as I’d hoped…these are the few that looked almost passable…but I still didn’t want to use them…


In the interest of saving time and frustration, I spent the cash on premade sets, and now I can just get on with it! They were a little over 2 bucks apiece, money well spent.
I’m currently attaching blocks to the yards of my SR, but once I get to assembling some parrels, I’ll likely share pics of that stuff on both this thread, and my SR WIP.
Again, those who can make parrels from scratch have my salute (Kirill has done a great job with his!)…but for me, I just wasn’t feeling the magic ![]()
Thanks for watching!
Dave
A Craft Store will be your best source of material for parrels. They were simply wooden “beads” about the size of a closed fist. (3 or 4 inches or, 7.5 - 10CM) so, in 1/96th scale a little over 1/32nd of an inch. In smaller scales, you could “represent” the parrels with knots tied in a piece of thread. Their color would be natural wood. After doing the math for scale purposes, you can shift over to the TLAR method (That Looks About Right) to polish it up…
David,
I like the Amati sets you purchased! You made an excellent decision, especially given the level of detail and craftsmanship/artistry that you have strived for throughout your build!
Bill
Agreed, Bill!
The parts are good quality, and they will translate to scale pretty well; the parts I was making were going to be 10mm and 7mm for the ribs, compared to 10 and 6 for the Amati parts…if I were adhering strictly to scale, I would need several different sizes, but for me, it works just great! (I like the that looks about right scale method!)
The parrel kits also each came with a length of rigging thread…it seems usable, but I may substitute my Syren mini rope for it…we’ll see.
Anxious to make progress and see how the parrels work out, but Summer is of course a tough time of the year to carve out spare hobbying hours…nonetheless, I’ll continue to make small advances as time allows.
DavidK
Quick update: I haven’t had much luck in figuring out a good, repeatable way to install a parrel onto a yard/mast yet. I’ve tried several times, and I keep ending up with it looking really messy, or being out of alignment…it’s frustrating.
Despite all the pictures and advice from the member here (which has been very helpful!) I’m still struggling.
I plan to meet with the members of the local ship modeling group Puget Sound Ship Modelers at the next meeting and see if anyone can give me a live demonstration of how they do it…it seems to be one of those common applications wherein seeing it done must be way easier than just reading about it!
So I’m pretty much at a standstill for now.
Dave
At last!
I’ve gotten a method for making and installing parrels that I like, and I’ve been making progress in the sail/yard/running rigging of my current model ship, Heller’s Soleil Royal.
I’ve only gotten the bowsprit rigging in progress right now, so the only parrel installed yet is the Sprit Topmast Yard Parrel. Being among the smallest of the yards, the parrel parts are a bit oversized for scale, but bear with me ![]()
Here’s a few photos of how I preassembled my Parrels:
First I took two lengths of line, and tied them together, sort of like an X

Then I threaded on the trucks and ribs (I used a mock-up of ribs and trucks for each mast to predetermine the number of each needed for all parrels)

Then I tied the line again on the other end of the parrel parts, making them more or less fixed in place so they can’t slide all over the place (Note: It’s important to keep the knots on either end of the assembly at a specific distance from the parts; they need to be held in place, but need to be flexible, and also the knots have to be close enough to the parts so that they can still be drawn up closely to the yard when it’s fastened so the parrels will not be too slack) Here’s the basic finished product for the sprit topmast yard

Then I went through and preassembled all of them for all yards that need a parrel (sprit yard and crossjack yard only required a basic sling, so I needed 9 parrels total)

Here’s a shot of the first installed parrel…installation is a little messy, and requires patience and fine-tuned long-tweezer skills! Just before moving the yard into place I used a needle threader to pull one free end of one side of the line between the yard and the furled sail. I then loosely tied that end to the other free end of that same side of the parrel, and drew the lines so that the knot was taken up behind the yard, and more or less hidden by the sail. Note: I do not cut off the loose trailing ends of the parrel lines at this time, some of them will be used to cross over the grooves in the parrel ribs in the final step! For a 1-groove rib, I need one line left long on either side…for a 2-groove rib parrel, I will keep all four lines long so I can cross over both grooves and then tie them to each other…so it’s worth mentioning that during initial preassembly of the parrels, make sure to leave a few inches of extra line trailing from both ends of the parrel, for use later!
Then I got the yard in place by attaching the halyard lines temporarily and, once the yard was in its proper location (lowered close to the cap, since the sails are furled!) I then drew one line of the remaining side of the parrel around the yard, using a needle threader as before. Then I tied the over-and-under ends of that side of the parrel (again, same as the first side) until I had them evenly tensioned and holding fast. That was the trickiest part. Tying the first side of the parrel onto the yard is pretty easy, it can be done with the yard off the model, but once it’s in place, I had to contend with mast, yard, standing rigging, etc., and try to gently get the lines tied. It took a few minutes, but it worked out prety good.
Finally, I trimmed two loose ends of the parrel lines, but I left two long (one from each side). I took one long end left from the first knot that holds the parrel to the yard, and drew it across the groove in the ribs over to the other side, and tied them together. Then I applied a couple small drops of Elmer’s to the parrel/yard knots, and trimmed the ends.

So there you go…that is how I decided to tackle (so to speak) parrels…
Hopefully this post isn’t too complicated to understand…I tired to be clear, and I think it should be helpful to anyone who may wish to use all or part of this technique when discovering their first atempt with Parrels! lol
I may post more pics and updates on this thread later, especially if I find anything of further instructional value as I continue on to more yards.
Thanks!
Dave