Yeah, after he gets the insanity plead he starts whining and crying about how he’d rather serve the sentence… Gee, you can’t please some people!!!
And the judge assigns the robot as his guardian. Which curse the episodic nature of the series- they could have milked this as a running gag for the rest of the show…
Last night a alien fight promoter shows up on the planet and wants to hire Prof. Robinson to box one of his huge gladiators. When he declines Smith offers to get in the ring vs. a midget. And then when the fight starts he finds out the midget can make himself invisible at will and gets his tush kicked. Now that’s funny!!!
And then tonight Ali Baba shows up on the planet (!?!??!)
I’m watching the series when I eat supper in the evening. Thanks for bringing this up, I’m loving this show, every goofy, silly, insane minuate…
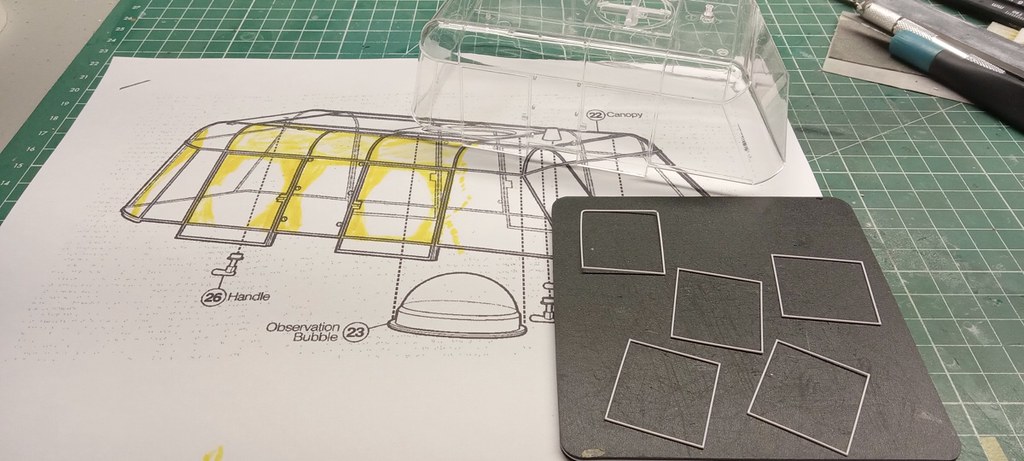
To be a little more serious, the Chopper II looks cool! I don’t generally cut enough stuff to need something like that. Though recently I have been cutting out decals strips for a project, the Chopper would probably be great for this.
Was not horrible at the first project, getting ther eat 0800, was only 92°F, and a light breeze.
Got to the 2nd one at 0940 (Ausitn traffic on I-35 is awful, 18 miles in 44 minutes). Was warmer, 95°F, but, I was in the shade for most of that.
Really was not that bad on the 3rd one at 1120, even for being 97°F, but, that building was mostly insulated and my tour was largely inside.
Austin traffic (and drivers) were doing their level best to turn me into Dr Smith, though. The Robot would have been stuck on “Danger! Danger!” near the full time of it.
I clearly needed a flying submarine to escape all the dam durty apes [:)]
The thing I have noticed over the years is that when the summer heat is on, especially the extended stretches… drivers go about like angry hornets. I have seen some angry road rage during these times. Not everyone has AC. Tired pissed off people.
That is a hoot, Gam. Too funny about the robot and heck yeah. They should have left Robot in charge of Smith going forward. That could have made for some interesting exchanges. lol.
And hey man. I love that your are watching and enjoying the show. I enjoy hearing about what you have watched. Funny stuff.
My first course of action was to enlarge the canopy illustration. I did this mainly to help my old eyes, and secondly, to create a cartoon showing what areas I need work, and what their proper orientations are. There are a few areas that the illustration cannot adequately show. I will do those on the fly.
Notice the top left frame. I started with bending corners on one end of the frame. The idea here was that by having a continuous connection, at least for one side of the frame, it would provide a stronger frame. Though, I think that might be true, I quickly found out that getting tight consistent bends, bends where the frame is not twisted… it was not an easy thing to do. You can see in the example that the frame does not rest flat. Add to the fact that I don’t like how those corners look, I needed to try something else. In the end, I could probably correct the warp issue when it is glued down, but in my mind, it does not look all that good. Add to that, that by starting with a flawed foundation, it most often leads to other problems down the road.
That is a lot of pontificating. Not saying it is right or wrong, just streaming through how I attacked this part of the build.
I tested cutting all four sides and then butt joined the pieces. Immediately, the frames look much more consistent and the warp issue went bye bye. The downside…they are very delicate. To counter that, and after setting the pieces in place using liquid cement, I flowed CA onto the joins. Once cured, it gives them much more strength. No matter what… the frames remain delicate, but I have given myself a fighting chance they will hold together until install. Which by the way, won’t be until the canopy is ready to go on. All the preliminary painting must be done first. I WILL, though, attach curtains to the frames before install. My goal is to make them plug and play for when the time comes.
From here, I need to start fabricating frames for the curved sections just above the side windows. That is the plan for now. I may find it too difficult and then try plan B, whatever plan B will be. We shall see.
Anyhow, not much to see here, but it is several hours work.
I forgot to note in my last post that I used Evergreen Plastic Rod to fabricate the frames. Their smallest size, .5mm/.020 turned out to be fairly close in scale to what I need.
They are a pita… but the curved pieces are doable. I tried various things. Things like heat combined with wrapping the styrene around a form. In the end, the easiest and most workable method was by using a fine point tweezers and incrementally bend the rod into the radius needed. A master was used to compare against.
Construction being the same as my previous post.
So, the two forward sections are done. More to do, but not today.
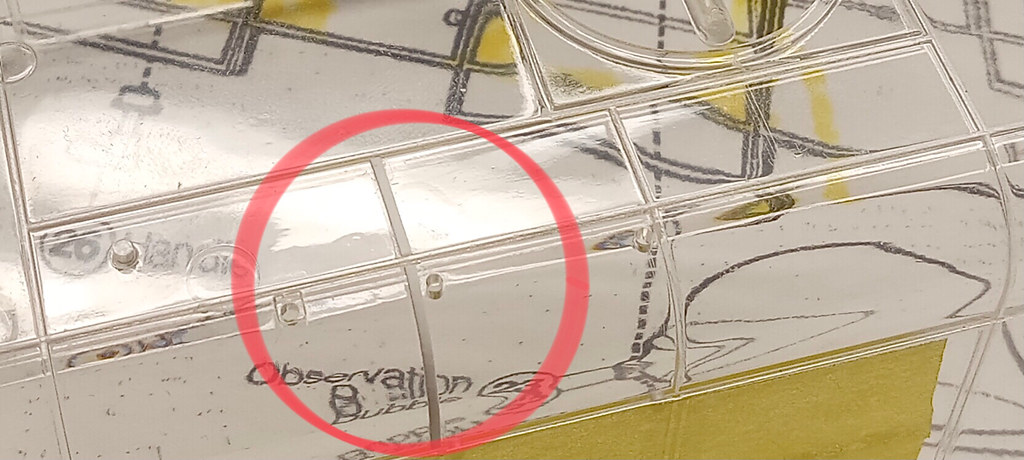
I noticed a manufacturing blooper. In the image below, follow the ladder up and over the canopy. There are joins that devide the area into its own section.
Below you can see the instruction sheet has the mentioned joins but, look at the canopy. It is missing that detail.
It is things like this that are a velocity killer. Do I ignore the flaw? Nope. I must deal with that before I progress on the remaining frames. Blah!
I found and have some in stock of .030 Evergreen strip that should be a very close fit. My biggest issue now is… what glue to use and how do I keep from making a mess of the canopy. I am leaning towards UV epoxy. I can shine UV light through the bottom of the canopy.
If anyone has other thoughts… feel free to comment.
For the curved portion I made sure to prebend the styrene. That takes the tension out of it.
I fitted and taped one end down so as to hold it in place.
I lifted the untaped end and applied resin underneath. Carefully, I pressed it down into position.
Any oozing resin can be wiped off with a cotton bud. That is a huge plus. Though, you can wipe it off, I tried to minimize the amount.
Making sure the piece is aligned correctly and pressed flat, I flipped the canopy and hit the location with UV light.
Then I followed the procedure on the taped end.
Boom! It looks good. It will not have the strongest bond but if I am careful, it should get through the build. If not, I will need to reattach it. I still need to do the other side but it shouldn’t be too much trouble. I hope.
The styrene strip should give a pretty good representation. It’s not exact but close enough for my taste.