Ha ha, more cross contamination! Good… Good… Your journey to the Dark Side is almost complete.
I finished modding the weapon pods and am starting the process of filling seams, gaps and sink marks. There is plenty to keep me busy!
I am at a point where I have to decide whether or not to light the model. But that was more a rhetorical question, because as we ALL know, they come mostly at night. Mostly. Time to source some lighting hardware. I should also go back to my APC and solder the electrical connections.
So, the plan is to use the huge cargo ramp as a convenient access point for the batteries and switches. I dislike seeing those yellow LED emitters when the lighting is turned off, so I am developing a workaround using indirect lighting. The lights on the landing gear have very little space to work with, but again, I have a plan involving indirect lightng.
To be honest, these old Halcyon kits look awful in the box, but built properly and given a lick of paint, they can look amazing. The APC and Drop Ship are the worst of the lot, as the Power Loader, Sulaco, and Narcissus are more cleanly molded.
Their vinyl kits were pretty good. I built the Space Jockey and have the Nostromo in the Closet of Doom.
I am replacing the rockets in the weapon pods with plastic rod.
My cunning plan is to salvage the kit’s front and back ends to save time carving the nose cones and adding fins. We’ll see how that works out. Halcyon molded the rockets in a 4x5 stack, but the movie prop has them at 4x4.
I ran out of plastic rod, so I gotta go to my LHS on the way home tonight.
I am naughty like that. Yes, it IS possible to go to a hobby shop and not buy anything! Plus, I was in a rush to go home to see if I still had my stash of 0.125" rod, which I did.
So, 32 tubes were cut to length and are now ready to be turned into rockets! The next issues to solve are how to make consistent nose cones and tail fins. I think a jig will need to be made to set the fins at equal spacing around the rocket bodies - all 128 of them! Plus, I need to come up with an unobtrusive rack design to align the rockets into neat 4x4 packs.
To be honest, I am doing an approximation of what I can see from photos of the movie prop and using some bits and pieces from the kit. Basically, a “best guess”. The weapon pods require the most work out of all the parts in the kit, which is why I decided to hit them first.
The forward weapon stations just need their hollow backsides filled in and the assorted bombs and missiles to be replaced. I recently came across a photo of some of the ordnance actually used on the prop, and there are all kinds of things in the mix like a rocket pod (probably off a 1/24 Airfix Harrier) and missiles that resembled the one Spunkmeyer loaded into “Bug Stomper” in the movie. I am NOT going to lose sleep over exactly replicating the weapon loadout.
But if anyone has access to detail photos of how the movie prop was outfitted, I would appreciate seeing them, and would make an effort to make my build as accurate as possible. I have a feeling that the big, expensive prop store collectible toy’s ordnance is not 100% accurate.
The last thing that will require additional attention are the landing gear, especially the rear unit. As the kit comes, it is in a partially compressed state, making the Drop Ship sit with a strange tail-down attitude. I’ll probably just add a pivot bar to the top of the gear leg and move the whole thing lower down in the gear well to make the Drop Ship sit level. Easy-peasy.
Speaking of gear wells, the front main gear needs shallow wheel wells to provide space for the legs to retract into. The pieces the kit provided as mounting points for the gear appear to be the front gear doors. Since the doors stand proud of the gear legs, I might have to resort to sticking little SMDs on their backsides to make landing lights.
I also noticed the damper struts on the forward landing gear skids are bent. The movie prop also has this “feature”. I really dislike the idea of bent hydraulic struts, so I’m changing them out to straight struts. More on this later when I get to the landing gear.
The project has settled into the motivational gravity well and is pulling me forward. We are in the pipe, 5x5.
Not just the work itself, but watching this project evolve as you get deeper into it. Every update seems to lead to another idea or another improvement, and it’s honestly pretty inspiring to watch.
You’ve definitely fallen into that motivational gravity well.
Thanks, Samphoto! I am always happy to spread the cross-contamination, I mean inspiration, in the forum!
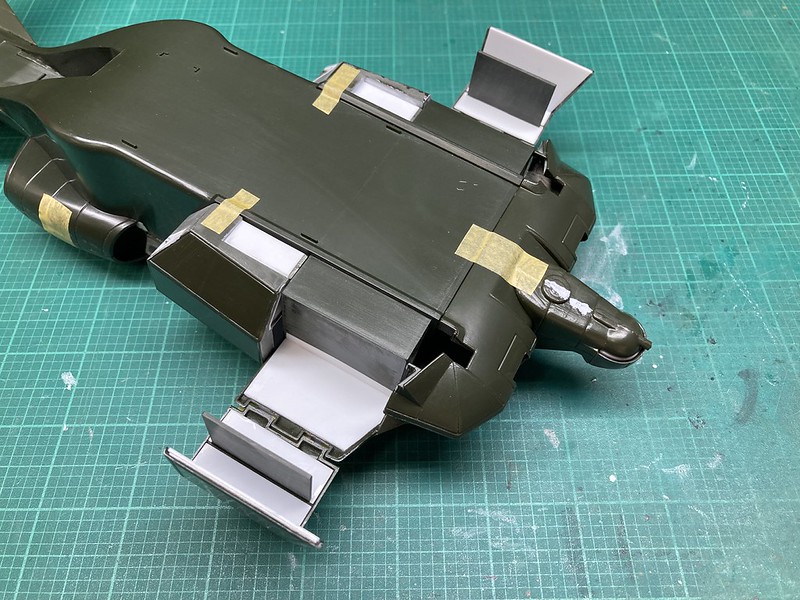
Work continues on the Drop Ship (for some reason I don’t like calling it a Cheyenne, because it was never referred to by that name in the movie). While waiting for some materials for the 16x16 rocket packs, I started to plate over the hollow inner areas of the forward weapon stations.
I cut notches in the 0.030" sheet plastic to accommodate the kit’s splitter plates. The kit lacks any sort of mounting point for the weapons, so I’ll have to add them. The movie prop appears to have used simple rectangles. I wonder how other people who built this kit handled the installation of the ordnance. It looks like Halcyon intended builders to just butt glue them in place,
I could not help taping the model together to get a look at the work in progress.
As Sgt Apone growled with satisfaction “Absolutely BAD a$$es! All right, let’s pack 'em in there!”
I did notice the intake ramps angle too far down, but they will be easy to correct. Once all the seams have been puttied and everything sanded down nicely, the airframe will be essentially complete.
Remaining work includes tweaking the landing gear (adding wheel wells for the forward gear, extending the rear landing gear leg), making all-new rockets, bombs, and missiles, and finishing outfitting the cockpit. I intend on adding some small details like the teardrop fairings on the forward windscreen framing.


 You are doing this old kit a lot of favors and it’s paying off. And of course you will light it. I’m watching.