Nice work so far on the B-29, Z. I always loved the crew compartments of WWII bombers! Looking good!
I don’t know if I will get to all my Gift building, but I got a massive surprize when another Birthday gift arrived in the post. This time a 1/32 Tamiya P-51D with all the extra bells and whistles there is!
This will be the crown jewel in my collection and I will be going all out with this one !
Theuns
Now that will be sweet. You want me to add it to the roster.
Great work so far fellas! The Gundam, Jag, and B-29 are all looking absolutely superb!
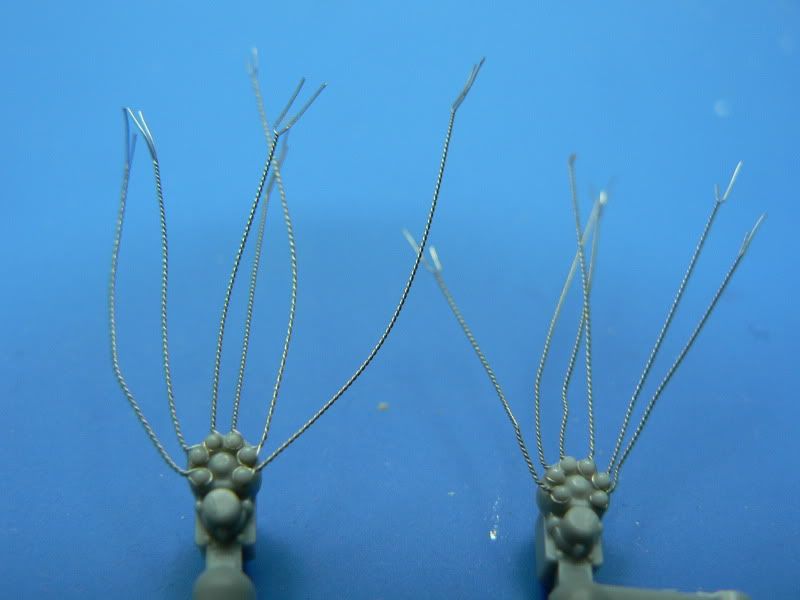
Been steadily plugging away at the D.VII and finally have some photo-worthy progress. The engine is complete and installed into the framework. For the ignition wiring, I twisted some ultra-fine wire tightly around a #70 drill bit - the loop made it a breeze to slip over the terminals on the magnitos and the twisting went a long way towards simulating the wrapped insulation on the actual wires…
Got the engine all painted up using Alclad II aluminum and Tamiya flat black, applied the 16 decals to the block and cylinder heads and weathered 'er up with Tamiya pastels and Citadel washes…
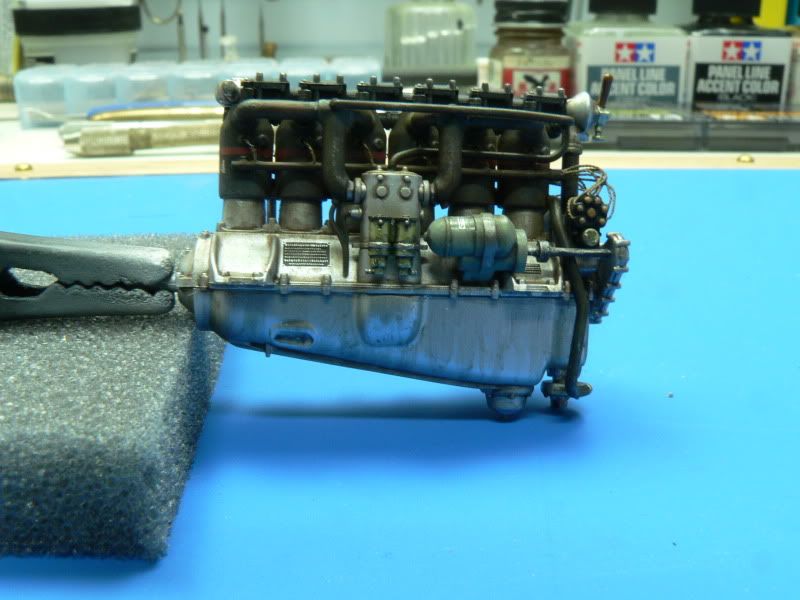
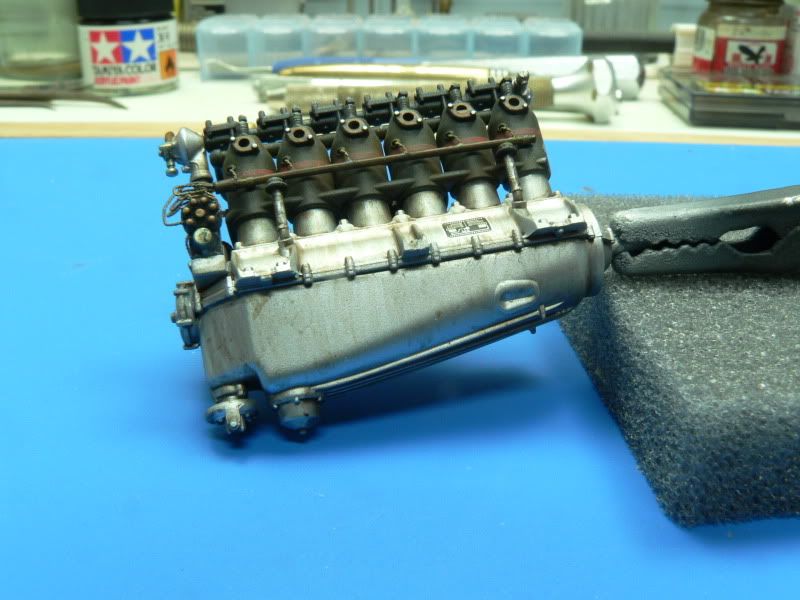
Finally, it was time to install it into the framework, and it fit like a glove…
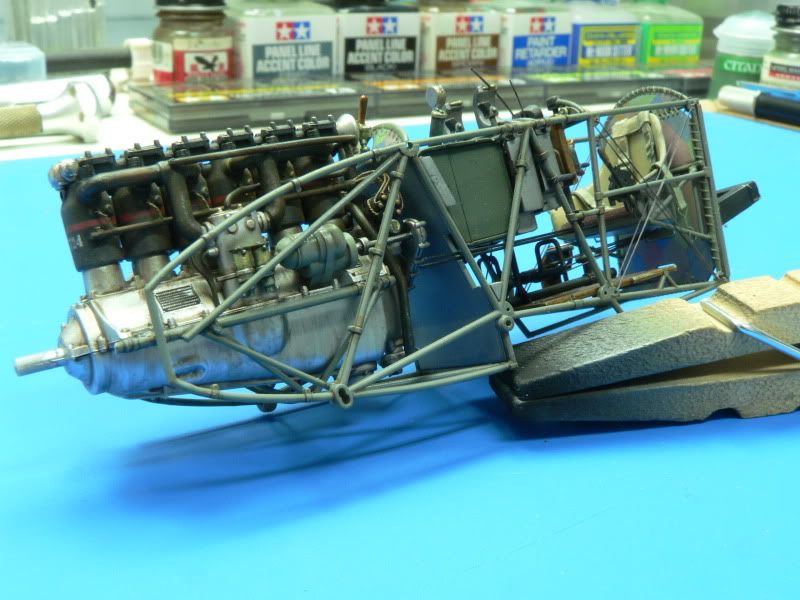
Next is the radiator assembly. When that’s complete, it’ll be time to button up the fuselage halves and have a go at the bigger parts like the wings, struts, and access panels.
Mike, lovely work on this. That engine is stunning. I like the slightly oiled look on the bottom half. Is that the Citadel wash.
That it is, Bish. A buddy of mine at work uses them on his Warhammer figures and suggested I give 'em a try. The one I used is referred to as Devlan Mud, and I was blown away by it’s resemblance to the grime that builds up on an engine block.
Ye, thats what i thought, it really looks like the sort of oil stains you get on engines. I think i will have to get some of this, got quite a few builds planned with engine covers of. Is it an enamel wash?
cancell my last. I just found a review which says they are water based. Thats perfect as they will go onto my enamel painted areas without having to protect it.
I think you’ll like 'em Bish. They are actually an acrylic wash, but when I took a whiff of them, the smell was like nothing I’d experienced with any previous washes - kinda funky, but they did the job.
Thanks for the heads up Mike and makeing me aware of this. Will deffinatly give it a try.
Yea why not. please add it, I hope 10 months will be enough to build the mustprang.
Theuns
Looking forward to seeing that P51…one of my fav aircraft. Enjoy the F4U corsair and may be my next build if I have trouble finding a Japanese “Tony” fighter.
Here is a complete look at my work space and added progress…spent several hours Saturday working on assemblies, painting, and finishing the prop decals. In first photo, you can see the stabilizers are assembled and the wing halves are in the dry set mode.


Dang that is a good looking 29 you have there…almost a pitty to close her up and not see all that lovely detail.
Theuns
I agree on the amazing B-29 build . The interior detail is awesome , particulary all the brush painted detail .
Very inspiring …[t$t]
I’ve been building a few kits over the past two and a half years for the Korean War GB and I was scrolling through some of the pages from 2010 and found a photo I posted of some kits I got for my birthday back then and one of them was the 1/72 Academy B-29 . http://cs.finescale.com/fsm/modeling_subjects/f/29/t/129001.aspx?sort=ASC&pi240=21
After looking at the incredible work Z square 8 is doing , I’m mighty tempted to have a go at my academy kit once the Jaguar is done .
And Ruddratt the detail and workmanship on the D.VII engine is supurb …[:D[
Great WIP pic’s guy’s .
BTW Bish , I must say I’m really starting to appreciate the simple but attractive lines of the GR-1 Jaguar .
One of my general aircraft reference books has it listed as one of the most cost effective attack aircraft of modern times . The hasegawa kit went together reasonably well and the Italeri kits look to be similar in their build instruction sheets . I do like how the wing sits right over the top of the fuselage , italeri took the same approach with their kit as did hasegawa ; No messy wing to fuselage join to sand and putty !
I wonder what Hannants have in the way of after market decals for other non Gulf War Jaguars , I’ll have to have a browse and see .
John
Z, agree with the other guys. The B-29 is looking great.
Helo, i agree, i do like the lines of the jag and it was a perfect aircraft for the task. Not sure about the cost, but i think they deffinatly proved there worth. Hannants have quite a few 72nd Jag decal sets, a lot of them are none RAF. The one si have for my 3 are the Xtradecal anneversary set, 72026, maiunly because it has 3 Coltishal Jag’s from the same period. But there a couple of nice looking Model Alliance Ltd Edt sets there.
As for the 72nd B-29, you should never resist that sort of temptation to much.
All-
the co-author of our website is in town this week and I was showing him the forum. I must correct an earlier statement on the bunk pkg on the 29 I posted earlier…the early production models had the bunks and after training missions, it was discovered that the bunks were not very practical as they needed more room. Possibly only 50 aircraft were initially equipped with them. The bunk area was then utilized for the radar operator position on the ship.
By 1952-53, the 29 was being phased out for the B-47 and then the 52. They were still being utilized thru the Korean conflict but were easy targets for the MIGs. The 29 was then used for other roles in research like the X-1 project as a mother ship, along with other support roles.
Z - sorry, I missed your question earlier. I’m originally from the states (NY to be precise), but my wife and I have resided the past 8 years in the country and province of her birth, British Columbia, Canada.
Morn’n Lads.
I was a little dissapointed this morning apon seeing that the primer I sprayed on the Jug has nearly filed the pannel detail. The scribed pannels on this Otaki kit is really fine! The paint wasn’t to thick , maybe I just laid it on to much (1 light and 1 med coat)
Anyhow, I will mask off a few pannels in the grey of the primer and paint the rest black ready for the alclad to go on.
Pix to follow.
Theuns
OK, so it seems I have been snifing to much paint fumes , hence the posting in the wrong thread! It was meant for the NMF thread, but as it was also a gift , maybe I am not all that far off LOL!
Theuns
Hey, folks! Been pretty busy with work and other things, but I have some updates on the Skyray.
I completed the cockpit, and I used the Eduards cockpit detail set. I didn’t use the entire things simply because I do not have the skills to fold and attach the tiny bits the require a scanning electron microscope to attach. I’m addressing my limitations!
I didn’t spray the cockpit a semi-gloss black. Instead I used a dark gull gray, overall, with Testors Interior Black for the side instrument panels. I then dry brushed with flat white, then did a wash with black oils to pop out details, and tone down any slightly overdone white drybrushing. I then added a few details with red, yellow and silver to make the swtiches and dials pop.

For the ejection seat, I used most of the Eduards details, but I also drilled holes into the ejection seat’s launch rails. I painted the launch rails gunmetal gray, and drybrushed silver highlights. The seat was light gray and drybrushed with light grey and Mig’s pigments to give it a little wear and tear. I pre-conformed the belts to the seat, then airbrushed olive green, and drybrushed highlights. I scraped off paint around the buckles so they were nice and shiny! I used a different technique to paint the stripes on the overhead ejection handles. I airbrushed the handles insignia yellow, and when the were dry, I cut very skinny strips of Tamiya masking tape. I taped the handles to a piece of paper with the skinny strips evenly spaced. I then drybrushed black on to the exposed areas. Other methods tend to be uneven and sketchy. This way I had perfect contol over how much paint I wanted to apply, and it ensured no leakage underneath the paint.

I then proceeded with the build, put it all together, except the engine exhaust, gear doors, and other assemblies. I added Tamiya putty around the nose area, intakes, leading wing edges, and vertical stabilizer. I sanded with Squadron sticks until I was satisfied with the finish.

Next up: Priming, painting inside the slats Tamiya Flat Red and the exhaust. This is where I am stuck! What color is the inside of the exhaust can? I’ve been all over the internet, and I 've not had any luck. Suggestions?