I beg to differ.[:$]
I agree it is that good so far.[H]
BUT- I know Doog’s got more planned and I wanna see it![:P]
[A]
I beg to differ.[:$]
I agree it is that good so far.[H]
BUT- I know Doog’s got more planned and I wanna see it![:P]
[A]
Dude!!!
That’s a given!!![:D]
There is something missing from all that clutter.
You gotta have some french fries spead out on the floor.[H]
Excellent WIP’s Doog!
Everyone can find a useful tid-bit or technique reading along while you have fun customizing the 'cruzer.
Plan on submitting this one to 'Great Scale Auto?’
Next time anyone complains about the format here I will suggest trying GSA’s forum so they can appreciate how good this one runs.
Jason
[pi] Not saying a Pizza box is required yet I like the idea of a few spilled fries’
Mr Squid, Ed and Jason, you guys are cracking me up!
I would put the fries on the floor if I had a fry container, perhaps. Otherwise, they might just look like specks of straw, out-of-context? [:(]
“Great Scale Auto”? Nah, I don’t think it would make it into that, but I may submit it for a FSM Gallery shot? [:D]
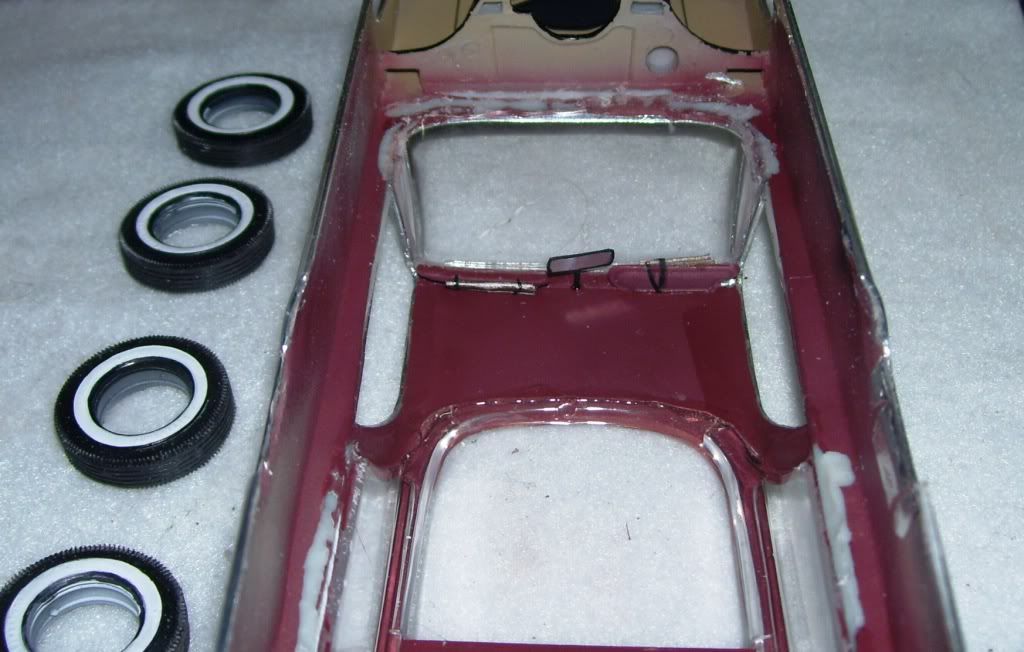
Working on the assembly now–I got the windows in clean, and am putting it together tonight! Should be getting near the finish line soon! I have to figure out how to cut that “Wood side” decal out–it’s all just one big piece!
I was thinking maybe a roll of duct tape somewhere.
This is fun![Y][Y]
Doog,
Thanks for the tip on the Embossing Powder again. I went out and grabbed some for my own projects.
The ‘side wood’ reminded me of years ago managing a body shop. We had a shop we sent all the station wagon work to when a panel needed to be done in that stuff. It turned out to be a vinyl style applique, like big side stripes on a muscle car, with the wood grain look of course. That stuff ws applied wet just like a decal! Now usually there were trim pieces to delineate the edges and they were cut in place. Sounds like your model lacks that?
If so, barring applying the decal then using a blade to cut the panels inside of “side trim pieces”- I’d lay down some masking tape where you want the decals to stop- apply them and let them partially set and carefully cut against the tape edge under the decal now, then pull the tape up along with the excess decal.
FWIW & HTH.[2cnts]
I found some reference photos for ya.They should come in handy!
Mr Squid, thanks for those interesting anecdotes about the trim, and for that suggestion. It makes sense, but I would be afraid of pulling off BMF in the process–there’s a lot more o this model than I would have originally thought!
. I think I’m going to make a template first, and then just trim out the decal and apply it. I have the body on, and will be posting some finished pics in a day or so!
Unfortunately, no fries made it into the final work, Ed…[:(] But thanks for the link. It almost made me hungry, lol!
doog,
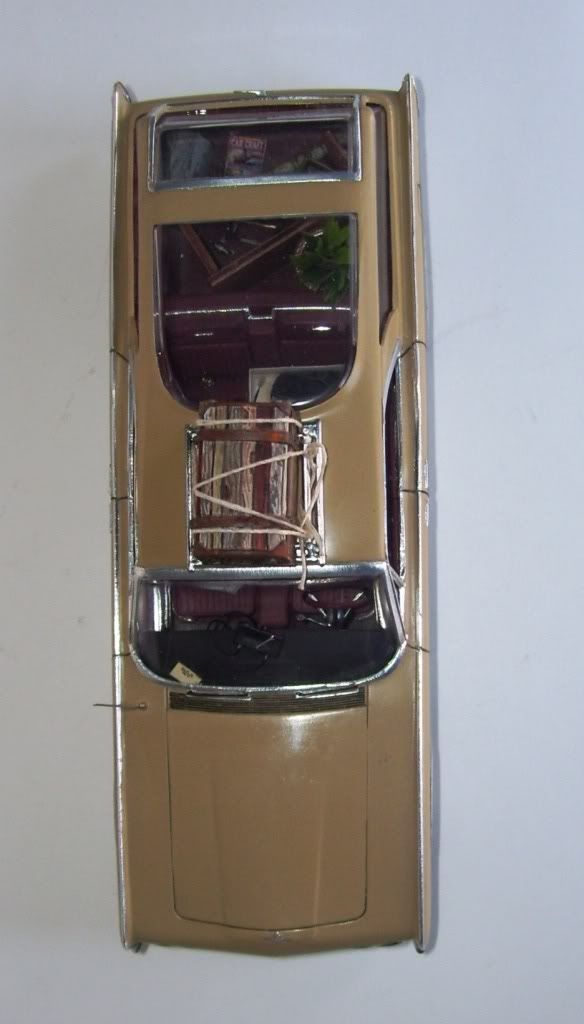
Stellar build as usual along with creativity. When I saw the MickyD’s bag and "pot"ted plant I was looking for the ![]() .
.
Ha ha, Ibuild48; you won’t find any of THAT junk in any car of mine! I’m listed in the Guinness Book of World Records as “The Most Anti-Smoking and Anti-Drug Modeler in the World”! [;)]
Thanks for your creative comment!
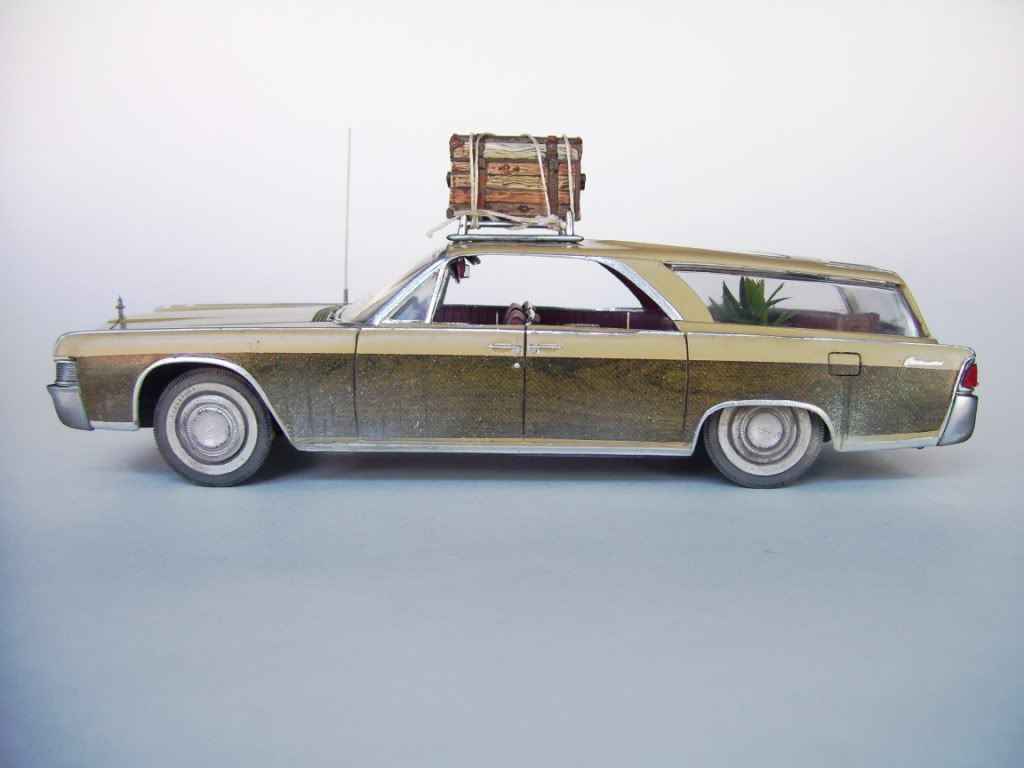
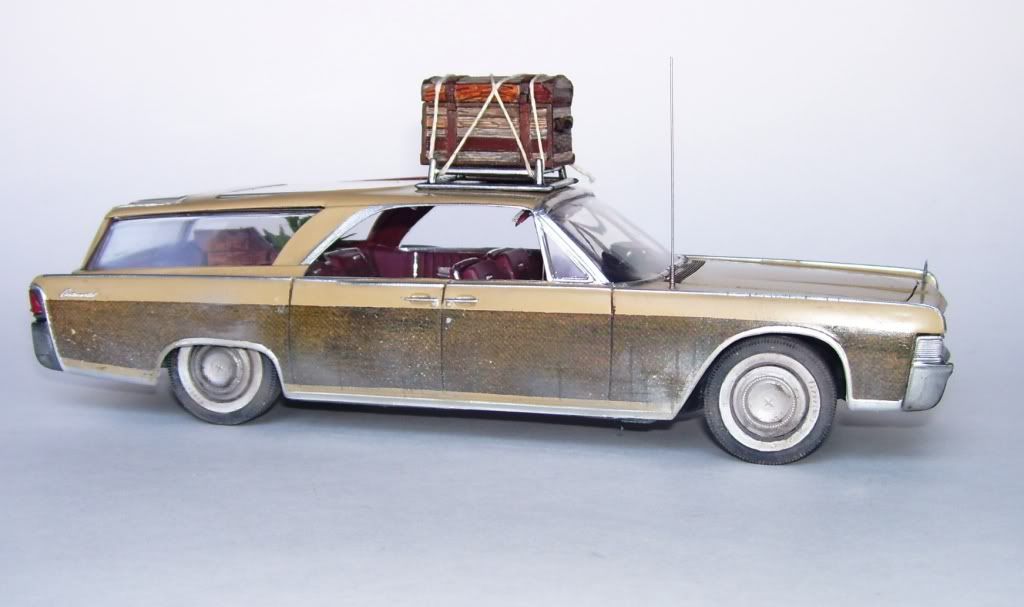
Well, it’s finished! Finally DONE! [:P]
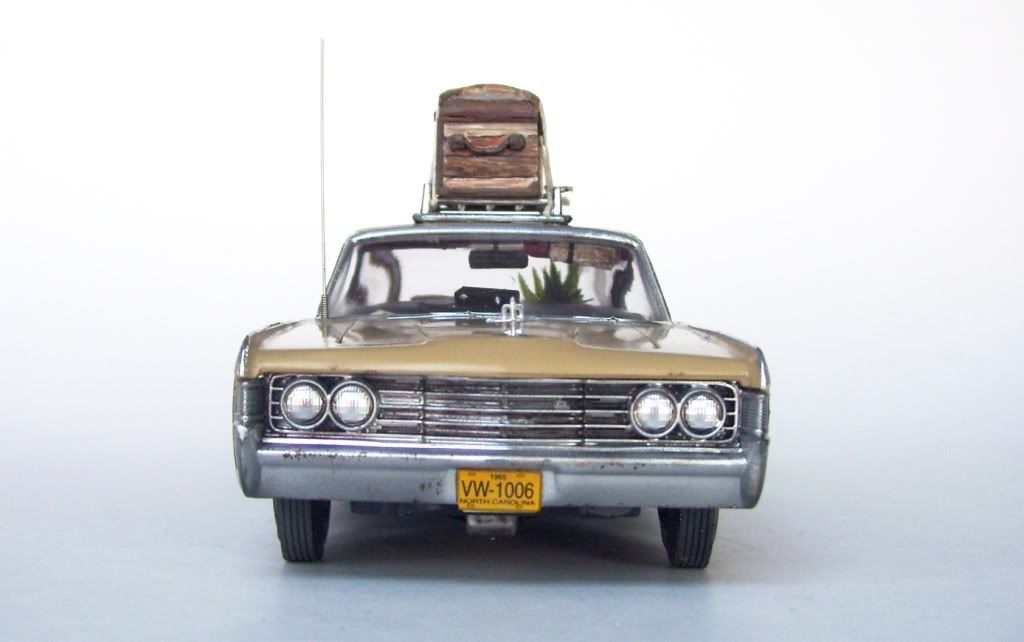
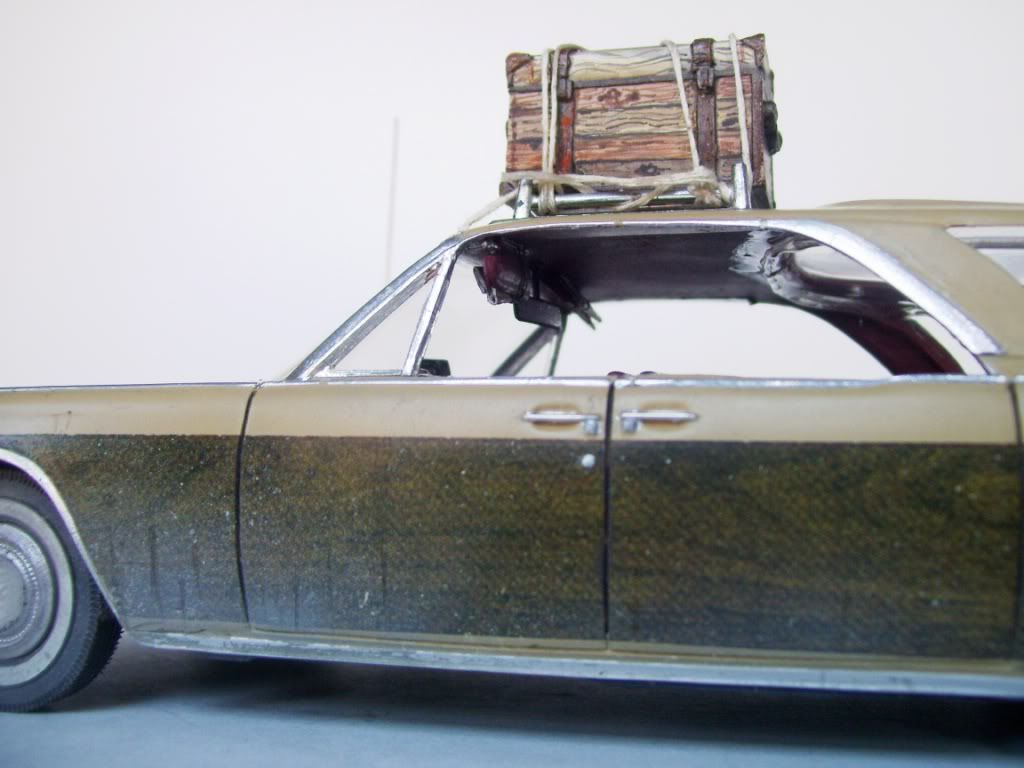
The final steps involved getting the window glass in, fitting the body, getting the stance, and applying remaining details. I glued the glass in with 5-minute epoxy, but the glass was SO thick that I had a bit of a struggle to get the body to sit correctly–all I can say is “Thank god for Dremel!” I ground quite a bit away from the glass edges and the bottom of the tub and even the chassis pan to get the model to sit how I wanted it–that hanging-low, sacked-out-springs-in-the-back look.
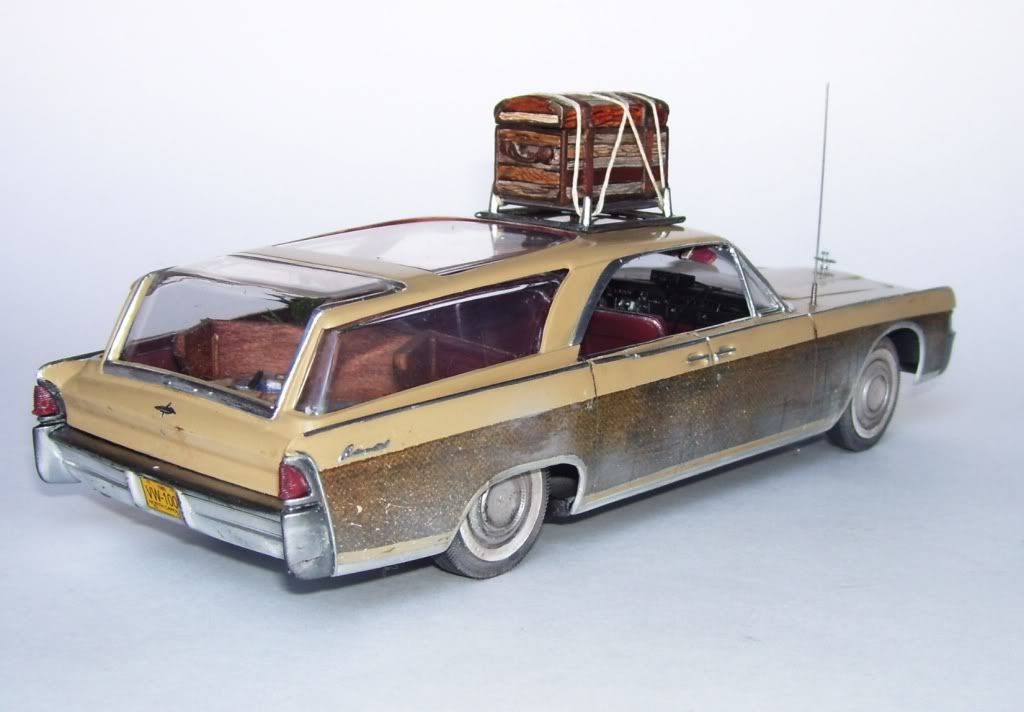
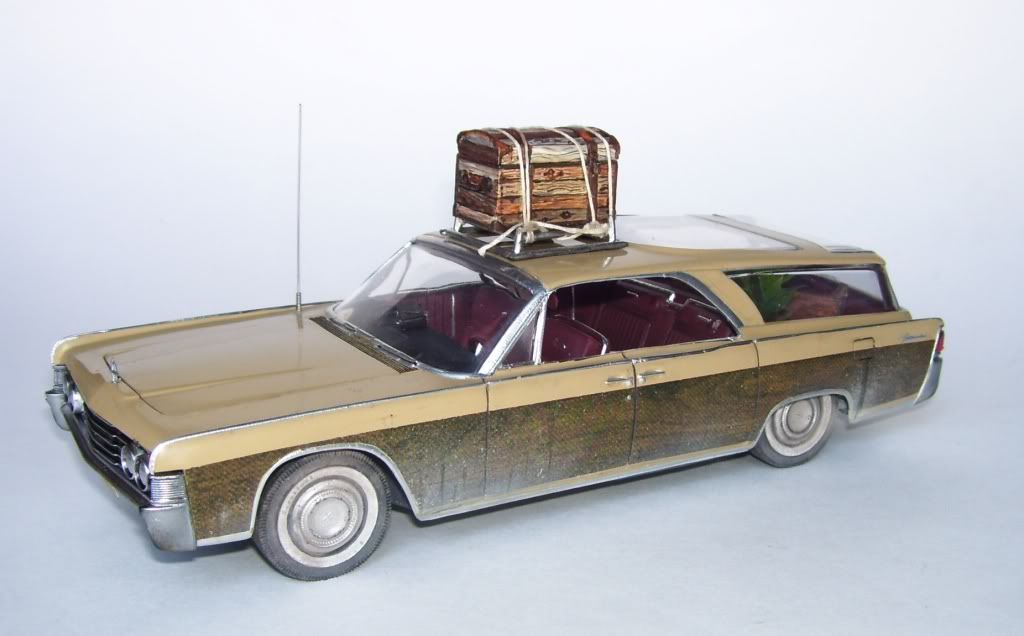
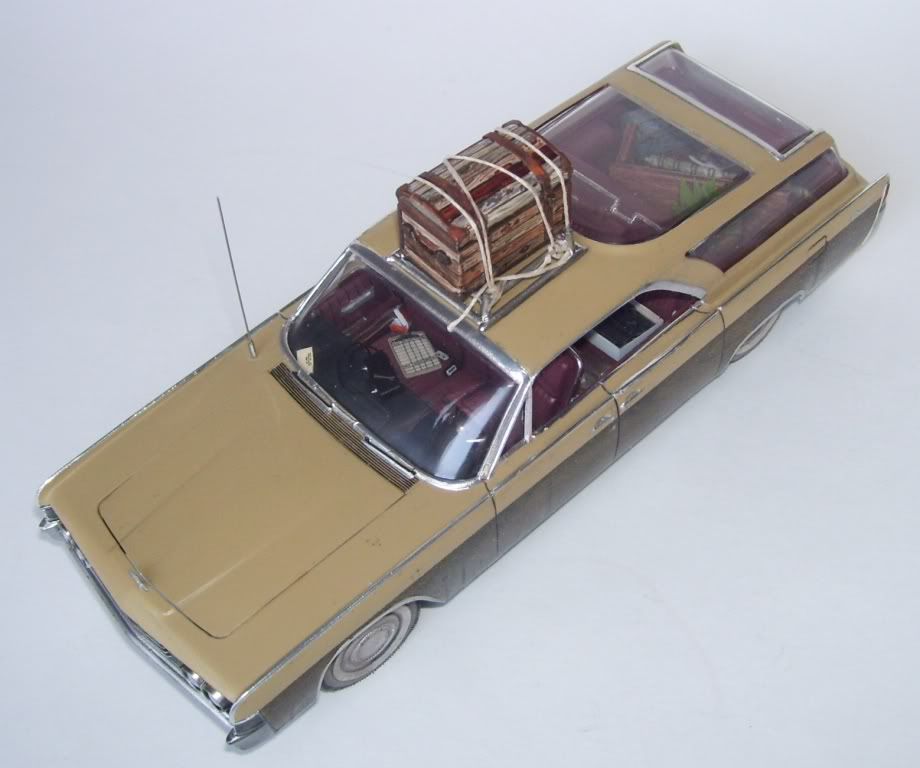
I scratched a rear view mirror out of sprue and strip, BMF’ed and painted it up. I also added some folded-up maps to the sun visors. These are military items from Verlinden. I used a circle template to paint the whitewalls.
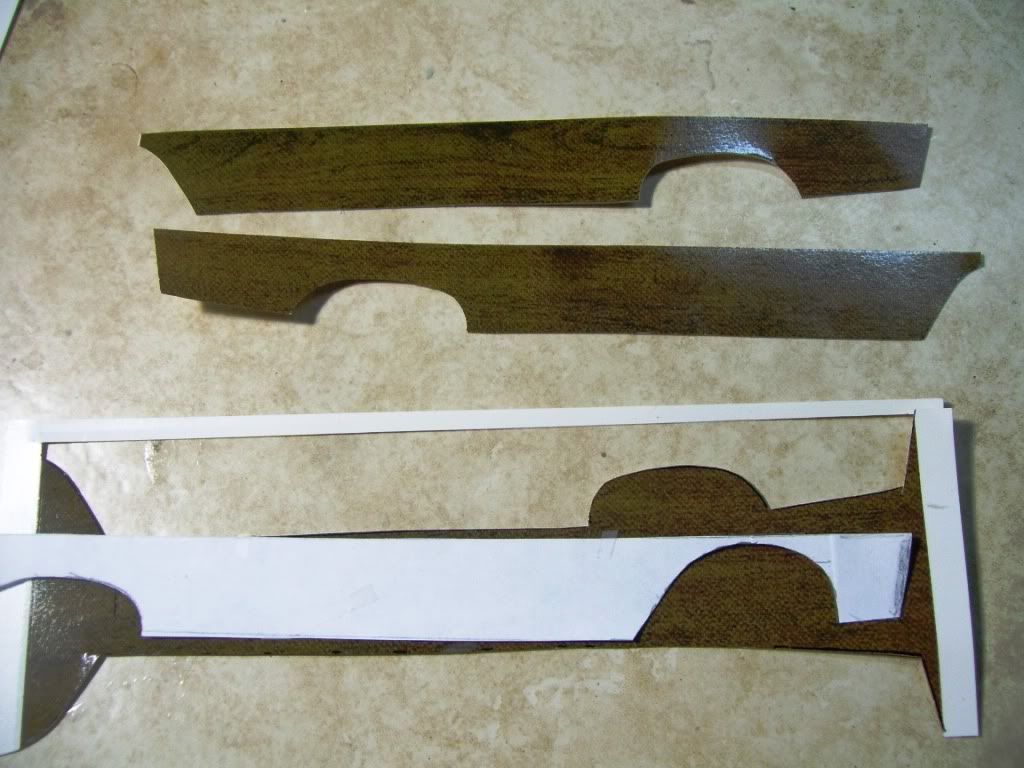
The decals were a sincere PITA! As I stated before, the wood paneling on the side of the car comes as one big flat panel–you have to cut out the decal yourself! [:'(]
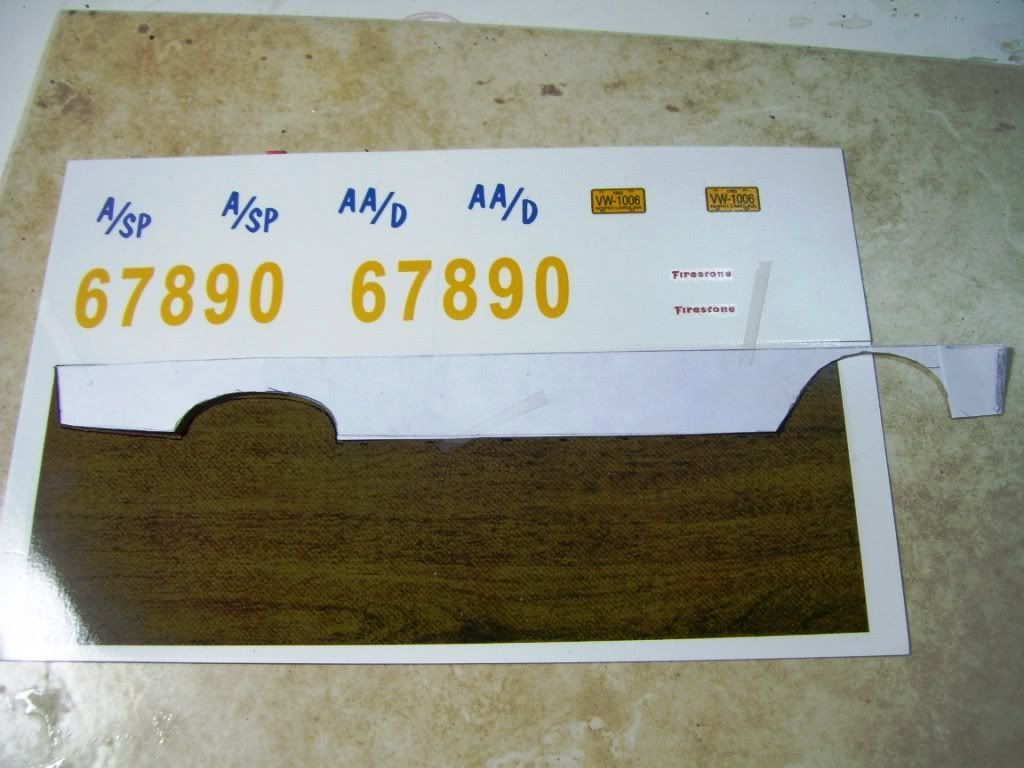
The span of the decal square is only long enough to extend to the front wheel well; fortunately, there is enough there to allow you to make up the missing length over and in front of the front wheel if you carefully measure and mate the two pieces. I spent a good hour or more cutting up and correcting templates to engineers and complete the entire span.
After all was said and done, I think I’ve captured the look that I want. [:)]
I dedicate this build to the memory of my late Uncle Ted. He was a decorated veteran, an independent spirit, and left this world with nary an ill word said nor bitter memory about him. He was a cat lover and a “picker” and throughout this build I kept finding myself asking myself “What would Uncle Ted’s car have looked like if he was driving this?”
I’ll let this “typical” hypothetical conversation set the mood for this build and the finished pictures;
“Uncle Ted, that’s a pretty neat vehicle you’re driving; what is that?”
TED: “That is a 1965 Lincoln Continental Station Wagon. I was driving around up there in the Gap (Delaware Water Gap) a few weeks ago and saw it on the side of the road with a 'For Sale” sign on it, and thought it was pretty neat looking, ya know? So I stopped to ask the guy what he’d take for it."
“Yeah? What’d ya pay for it?”
TED: Well, he wanted a five hundred bucks for it, but it didn’t have a gas tank in it"
“It didn’t have a gas tank?!?”
TED " No, it didn’t have a gas tank. So I traded him a few TV’s and an old sewing machine for it."
WOW, that sounds like a pretty good deal? So…you got a gas tank for it then?
TED "Well, no; what I did was I strung together a few milk jugs and connected 'em with a length of hose that I found in the back of the shop, and I duct taped the end of the hose to the gas filler hole there, ya know?
“Hmmm. That sounds kinda dangerous, isn’t it?”
**TED: "**Well, it might be just a little, but I keep an eye on it; I mean, it’s only a three-gallon tank. I just have to stop for gas every half-hour, and I can check it for leaks, so it’s not that bad, ya know? I just have to watch it, because that gas will eat away the plastic milk jugs, and so I might have to replace them every few stops, ya know?
"I see…hmmmm. So is that why you were late today?
TED: “Umm, no; I had to stop and get cat food, and went to open the rear window to put it in the back there, the handle fell off and I couldn’t get the window open. So I had to go under the car and use the wire that I have holding the muffler on to jimmy the lock on the window to put the cat food in there.”
“Gotcha! " Hmmm…hey that’s a pretty cool trunk you have on the top there; where’d you get that?”
TED: “Yeah, I got that from a guy who I met up at the Turning Stone (Turning Stone Casino, NY). It’s an old war chest from the 1800’s or something; he said there was some civil war pictures in it when he opened it, but he sold them, and needed some moolah, so I gave him fifty bucks and a box of resistors for it.”
“Wow, neat. What’cha got in it now?”
TED: “More milk jugs.”
That was my Uncle Ted…[:D]
Last pics:
To get the well-used, Northeast-Pennsylvania / New York winters salted-roads-look, I used some armor weathering techniques on the sides. I sprayed a light coat of Tamiya Buff+Neutral Gray on the sides, and quickly used some water to smudge away some of it before it hardened. I then applied some light streaks of Black and Raw Umber to simulate water streaks. There are also small patches of rust and scratches painted in the finish. Some MIG weathering pigments were used on the tires.
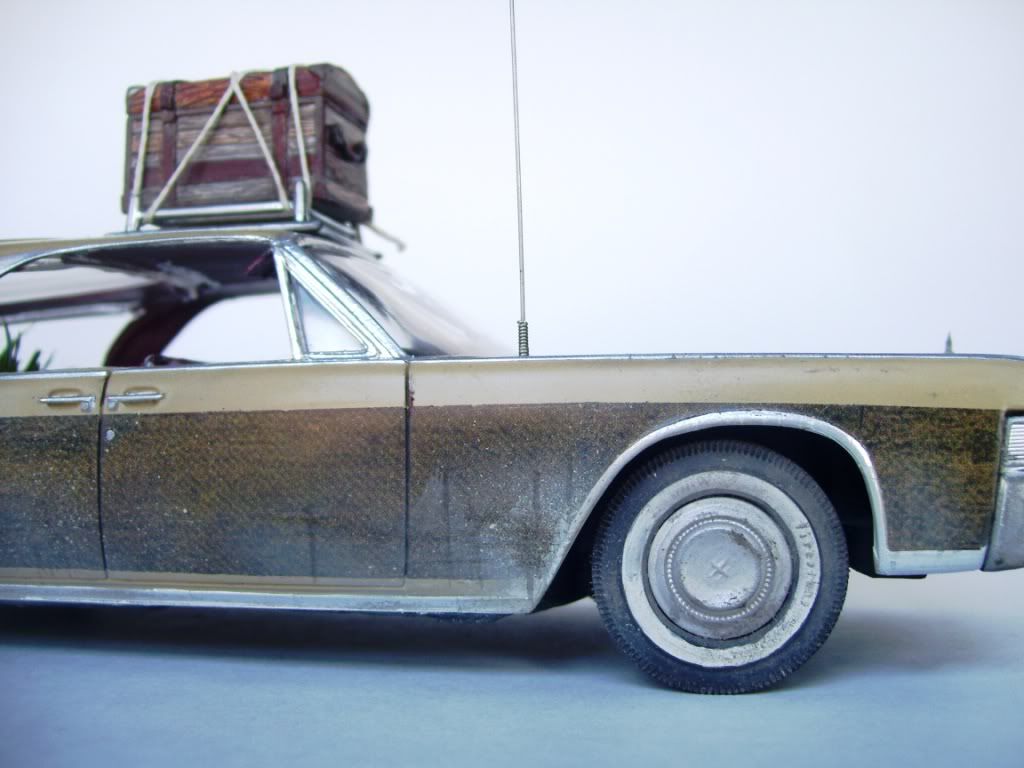
Note the sun visors and mirror here…the trunks as tied on with some ship-building twine that has a nice composition to it. I separated the weave, wet it and stretched it out overnight to get it to thin it and get it to straighten out.
Well, that puts the wraps on another project! I hope you all like it, and get some inspiration from it! Thanks for looking in and for taking the time to leave your comments! They are much appreciated! [:D]
Karl the doog. [:)]
doog,
Just so you know that was just tongue in cheek only.
DITTO on “The Most Anti-Smoking and Anti-Drug Modeler in the World”!
All I can say is "WOW!!! Simply Amazing! [:D[
AWESOME Doog!
OUTSTANDING work Karl. [:D[ [t$t] We’ve all gotten loads and loads of great ideas and learned a lot from you. Keep up the great work. [Y]
Jim [cptn]
Not a problem, sir! I didn’t think that you were serious! [;)]
Thanks too, Griffin, Hercmech, and Jim! I do sincerely appreciate the compliments and the kind words! [:)]
What amazes me the most,isn’t the actual build itself (for once).It’s definately masterful as usual.
What blows me away were the words FINALLY and FINISHED!
Considering the amount of work put into it,I’m shocked it’s done already.
I thought I worked fast when deep into build mode.
Awesome job dude!
Thank you for sharing the techniques and photos of this build, I have the same kit some where in the unbuilt stash.
As I went though this article I noticed your fotki site and just before clicking I said to myself, this guy must have a armor/figure/weathering background and I was right. The Impala in the snow…WOW. That is the kind of car modelling I enjoy, replicating reality, well done.
I have one suggestion for the trunk on top of the Lincolns roof, some more roping through the interior and back over the top for “safety”.
WOW!  Stellar Finish!