If its not too late, try some oil washes on some scraps first. They may look better than tamiya clear orange. Maybe not. But give it a try before you commit it to that beautiful carving. ![]()
You should try paint on the roundels Brandon. Get a circle template and a sharp exacto. Nice work so far, especially the prop…wow.
I know I should - probably what I’ll do in the future with roundels. There’s a really nice circle cutter I want to get, but it’s like $50. Once I get the money set aside for that, I’ll probably just paint them all. But also trying to see what I can do with the Silhouette Cameo machine we have at my office. I can use that to cut Kabuki and vinyl maks, which would then just require getting a file the right size, which should be really easy with just scanning the decal sheets and importing them to illustrator, then cutting them out.
TL;DR - weighing options.
-BD-
It’s hard to believe it’s been six months since I have worked on this thing, but I got at it again and made some progress.
Eduard kindly sent me a free new decal sheet after I messed up the first one, so I was able to get the decals down and clear coat them…and then I left the plane alone for too long.
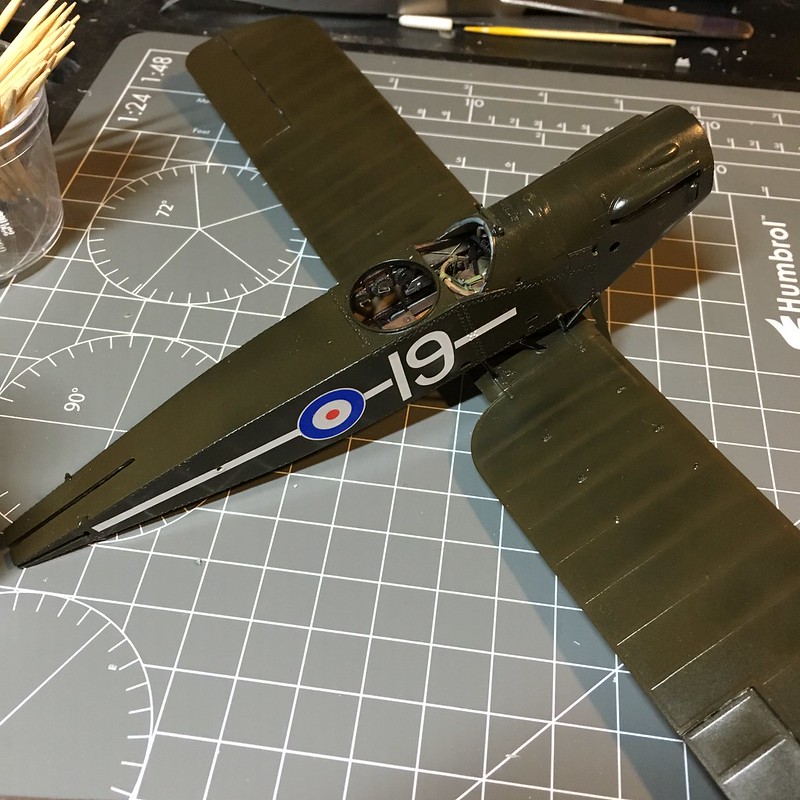
I decided to pull it back out and attach the lower wing. When selecting this kit as my first biplane, I didn’t realize the lower wing is actually not in contact with the fuselage except for four rods and the landing gear struts. I think the geometry is slightly off side-to-side, which might make for…interesting fit on the cabane struts. We shall see. It’s only 1-2mm, so hopefully not an issue.
Anyway, now it looks like about half an airplane. Next step is to finish the cabane and interplane struts like wood, then get the rigging going (gulp).
Hoping to finish this one in thenext month or so.
-BD-
Very cool of Eduard. Love the prop - great idea. I’ve been kicking around the idea of building a WWI bird - always loved the lines of the Albatross.
I’ll be following.
Wow. Great stuff. Dig the prop–that’s some real modeling there.
I’ve been eyeing WWI subjects. All the things that make WWI stuff intimidating—wood, rigging, etc. is kind of perking my curiosity.
I’ll be following with interest.
-J
What could be better than real wood to simulate a wooden prop,WOW. also think your interior is fabulous. how did you achieve the real leather look ?
Thanks, guys.
Jay Jay - I painted it Tamiya Red Brown and used a 4:1 mix of The Detailer Black and Brown washes, then stippled them when I took them off, just making sure they were still somewhat messy to give a dingy look to it.
-BD-
Thanks BD I’ll add that to my arsenal [Y]
Looking good! I don’t think I’ll ever attempt anything with rigging. I can see myself getting super irritated with it, lol.
Well, I got the prop mounted to the front of the aircraft. I think I’ll hit it with a satin coat to tone down the brightness.
The prop boss for the carved wood (which isn’t perfect, but is more symmetrical than the photo angle makes it appear) is a PE piece from Part. I used a Flory Dark Dirt wash on it to pick out the details, and am really happy with what they supply.
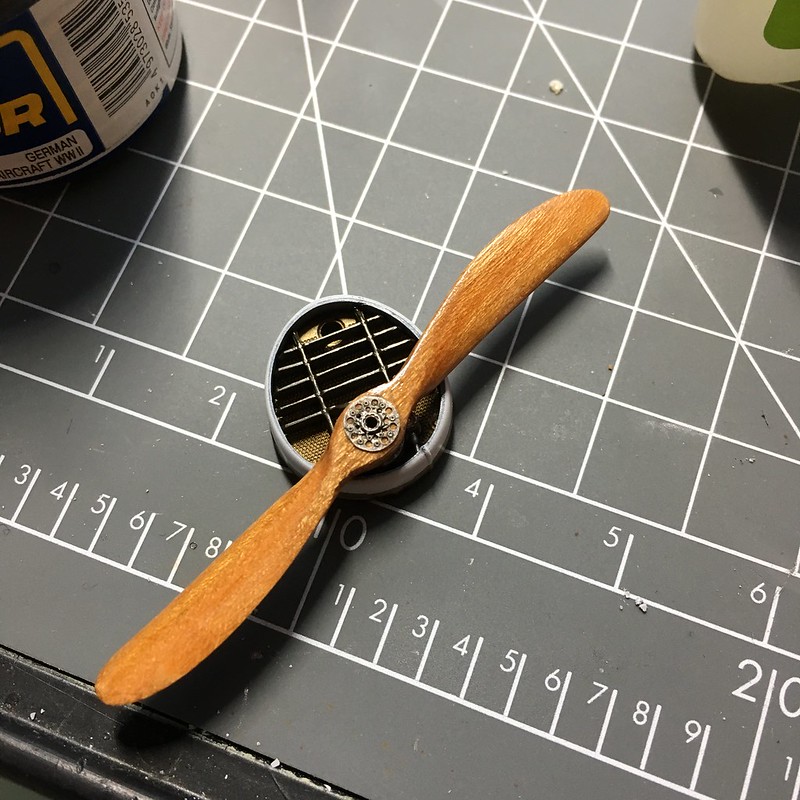
Ideally, I would have recessed it about 0.5mm into the prop face, but I don’t have a drill press and mill set, and didn’t know how else to pull that off.
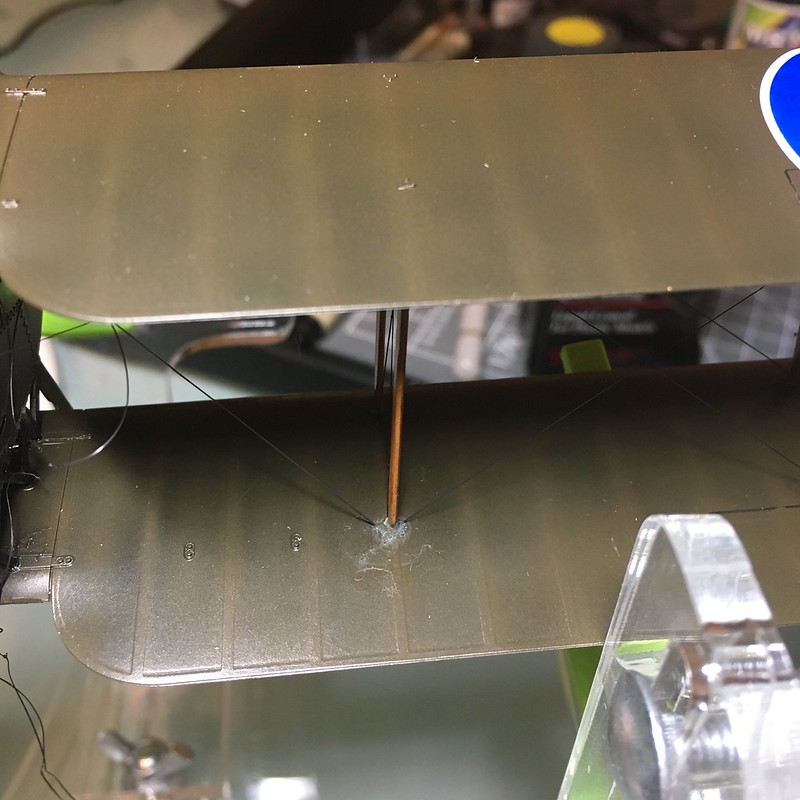
I also started to tackle the rigging, and actually am really enjoying it so far!
I used EZ line and extra-thin CA glue after drilling holes for all the mounting points. I used the GLue Looper to apply small amounts of the CA.
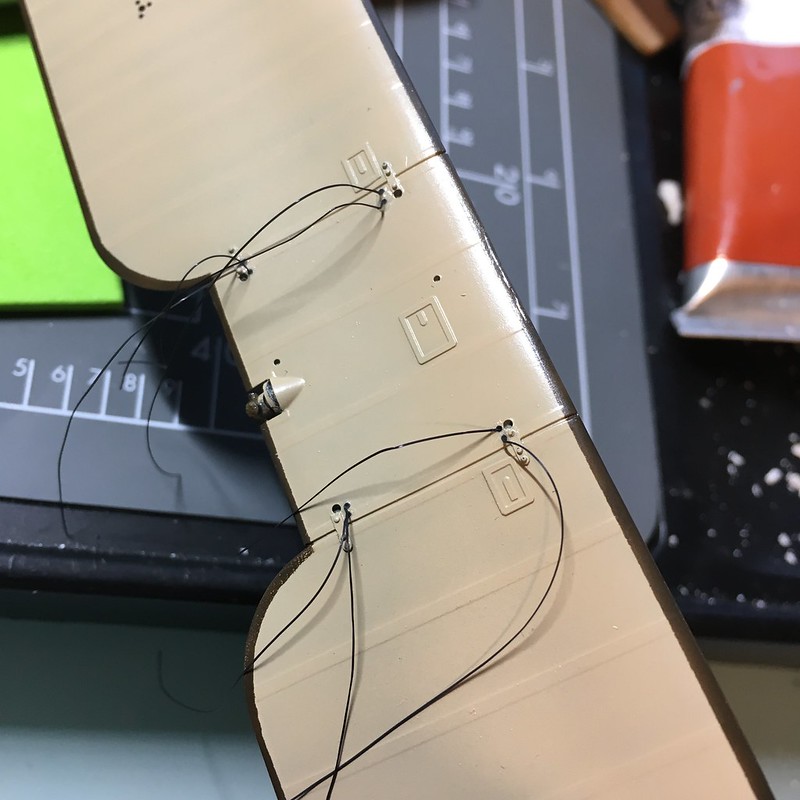
The only problem now is that I waited way too long to paint the cabane and interplane struts, and the oils I used to replicate the wood grain are still drying, so I can’t proceed, and I just have an upper wing sitting on the jig with a bunch of whiskers hanging off of it.
I did get the rigging lines for the undercarriage (all two of them) installed, making them the first rigging lines I’ve ever done. Now for those struts to hurry up and dry so I can get going on attaching the upper wing!
My plan is to work from the center out of the wings. The elevator control wires are also external and run from the outside of the cckpit to the elevators, so I will add those actuator arms before I add the upper wing, and leave the rigging loose, since I don’t want to horizontal stabilizers and tail installed before I’m done with the rigging, just to keep them out of the way.
It’s getting close, and I can’t wait to see it done.
-BD-
Very impressive build. Can’t wait to see the finished bird
So… Bristol Fighter is coming along withthe top wing mounted, but wow have I learned about rigging…
I started this build with the intent to make an aircraft I don’t particularly care about that I got for cheap to practice what I refer to as “biplane skills,” which are essentially making wood effects with oils, dealing with that second wing and, of course, rigging.
Well, two of three ain’t totally bad, is it?
ANd I did learn what I will do in the future regarding rigging, which essentially will be that I will make/buy eyelets/anchor points and attach those to the wings before I rig the thing, as rigging the EZ Line straight to the wing seems fraught with difficulty and I got super glue all over the place compared to the precision builds I see others producing.
Here are the pics of where I am now.
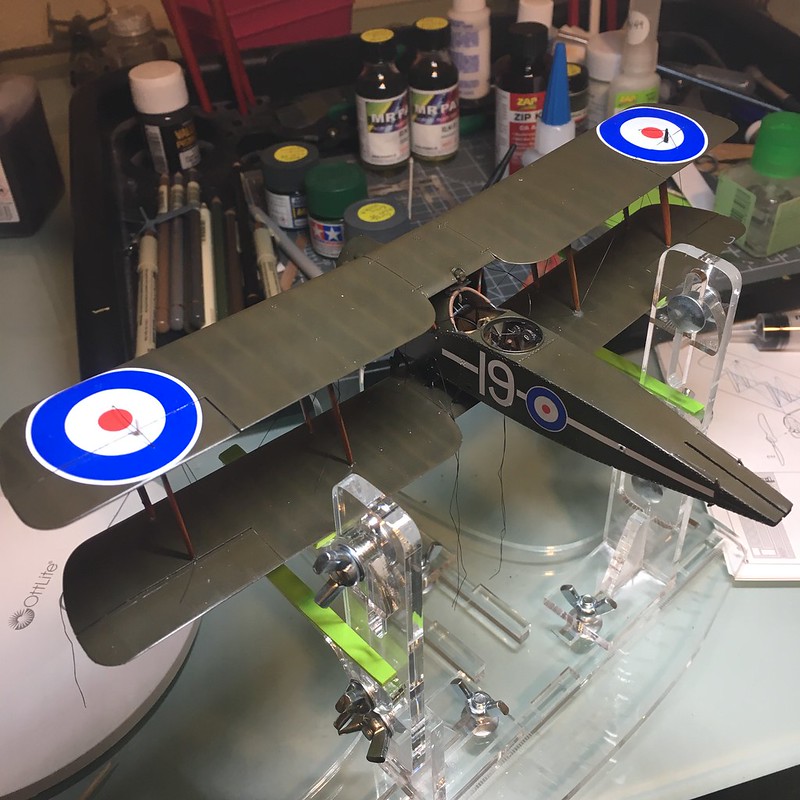

 As you can see, there is too much glue, especially on that last pic. I glued the EZ Line to the Glue Looper more than I glued it to theplane, but I have learned a lot, so I will finish this one, then feel more confident going forward on other biplanes.
It’s all very fun, inventing new swear words…
-BD-
I’ve got a few I can lend you…!!!
Swear words? Lol! I even went into the French vocab for this one. If I run out of those, I’ll ask my girlfriend for a few more German ones, so all are welcome ![]()
-BD-
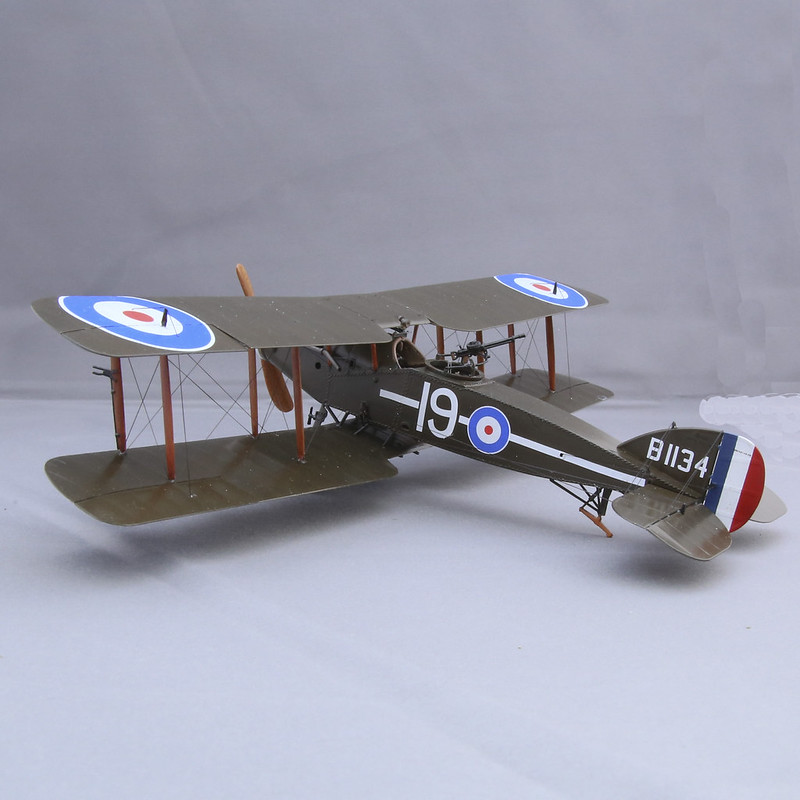
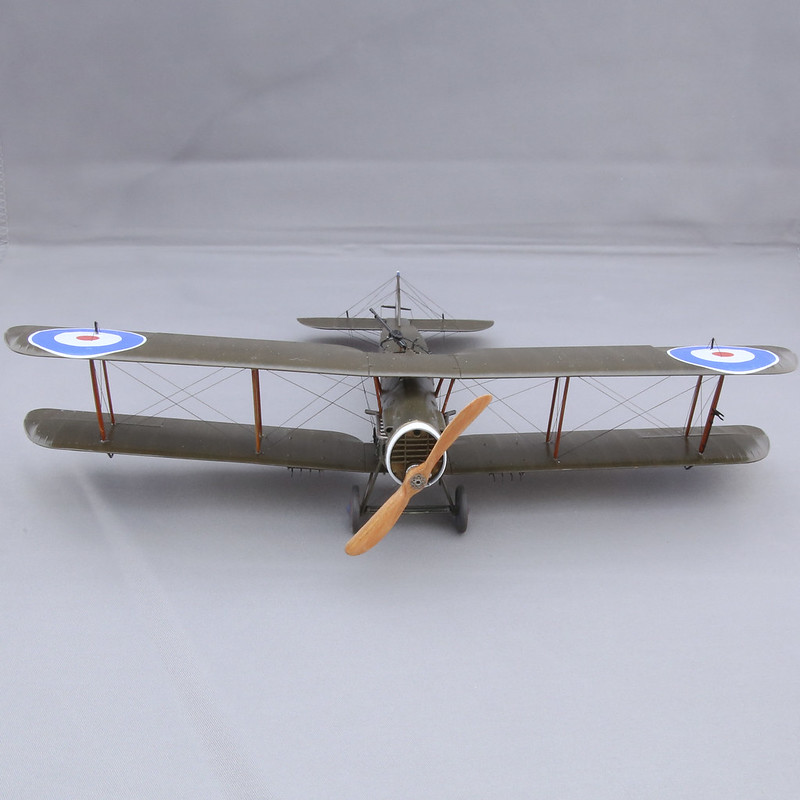
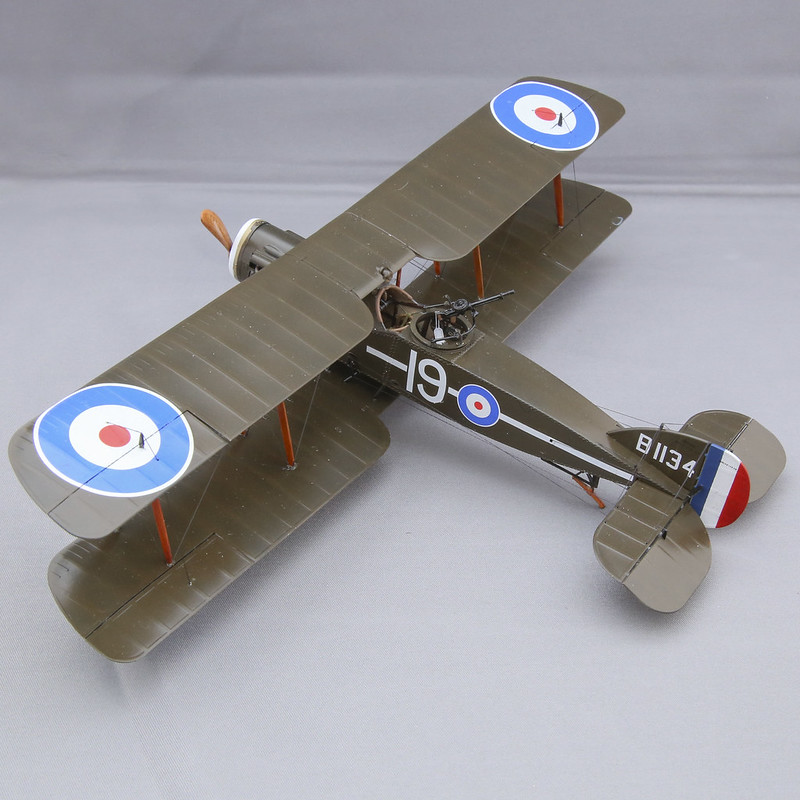
Well I finished it. I like to try new things on each build, and this kit was always meant to serve as a test bed for multiuple things:
-Working with pigments
-Carving a prop out of laminated veneer sheets
-Building a biplane
-Rigging!
I’m not going to say I achieved any of those exactly well, but I am generally happy with the outcome, and I learned a LOT.
Takeaways:
-Don’t glue rigging line directly to the wings. Make or buy attachment points
-Be careful when placing interplane struts, especially if they’r very slightly different (duh, right)
-Use a Glue Looper or similar to accurately place CA glue.
-Accelerator is your friend, and you can apparently spray it all over the painted surface without damaging the paint, but an eye dropper works a little better
-For a first biplane, build something easier, where at least the bottom wing mounts to the fuselage instead of on six little struts, and there is less rigging.
Anyway, with that, I’ll give you the reason you’re actually here:
 ;
;
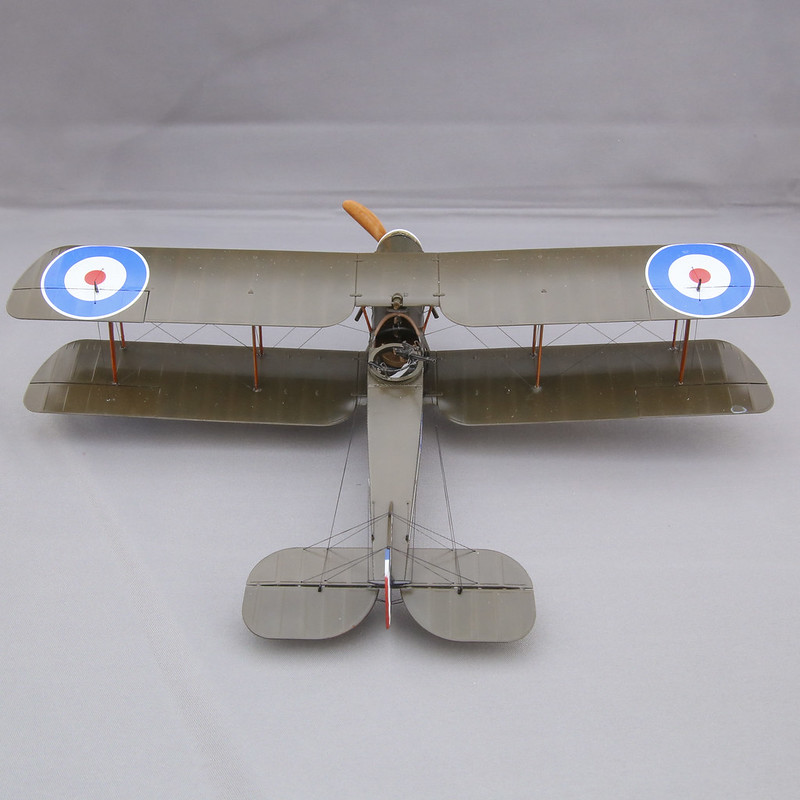
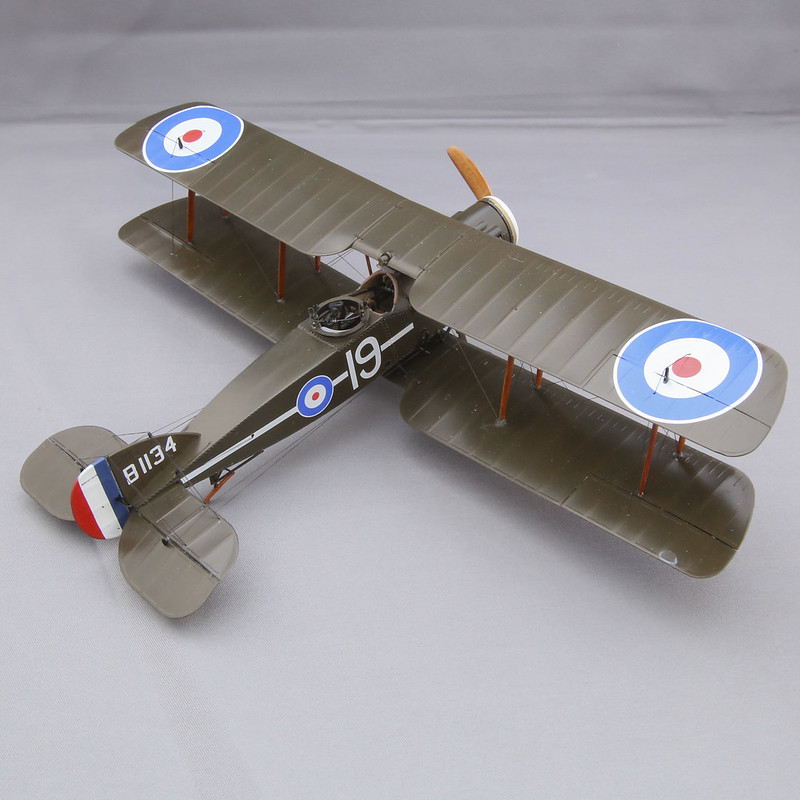
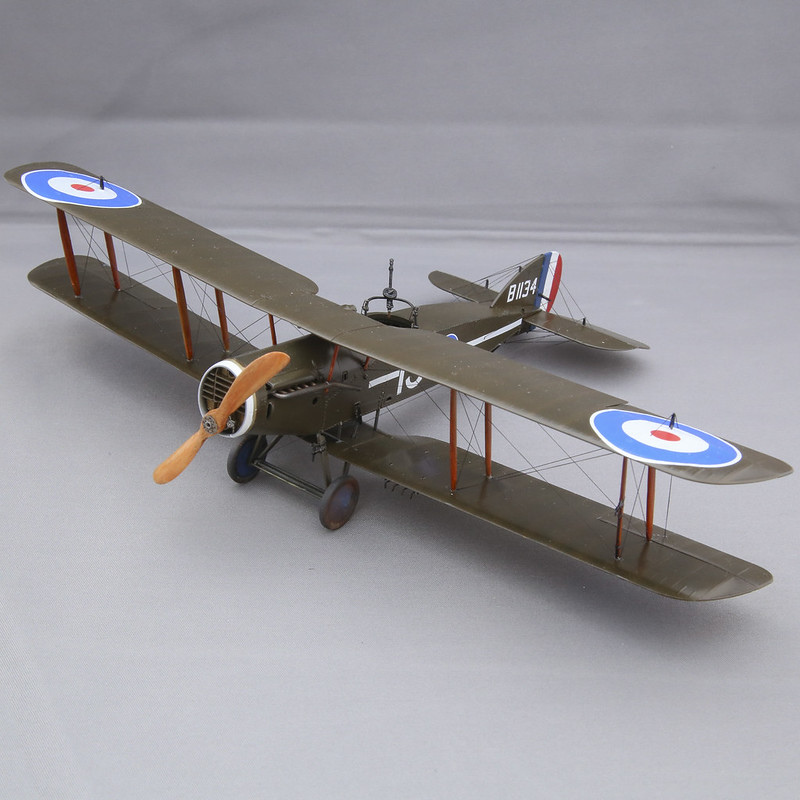
 -BD-
-BD-
Excellent biplane. Especially for your first one! You have definitely conquered rigging.
Nicely done for a first bipe. Maybe try a little touchup on the small blobs you pointed out with the wood and wing colors.
Even as is, very acceptable in my eyes. Kudos on the prop. Might play with the scraps and some stain to put a little more variation in the colors if needed next time.
D’oh - totally missed that spot on the wing when taking pics. Yep, definitely touchup to come. Thanks for pointing it out. ANd I also want to hit that prop with a dusting of flat to make it a little more satin. I also think the polyurethane I put on it was a little too…something. It just looks off. I think next time I’ll use something else.
-BD-
Thanks!
-BD-