CapnMac82,
Thanks for the information! I did find this picture:
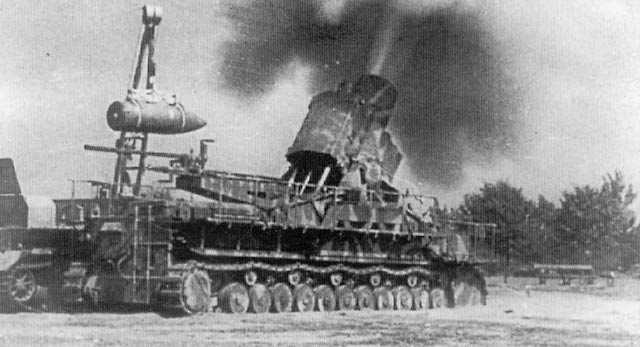
You can see the tank tracks of the carrier, which really makes sense as an appropriate vehicle for transport of such heavy projectiles.
CapnMac82,
Thanks for the information! I did find this picture:
You can see the tank tracks of the carrier, which really makes sense as an appropriate vehicle for transport of such heavy projectiles.
Thanks Bruce. I think this scheme is way better looking than the dark grey one.
Been doing oil washes so the parts are drying so on to the tracks. As a typical Dragon goof, there are no instructions on assembling them together. No big deal for me since I’ve done several armor builds with similar link and sectional tracks. They have two mold release marks on each link but they will be covered up with pigments once assembled and painted so no need to fill and sand them.
This is my highly sofisticated state of the art track jig, a piece of glass used as a straightedge to keep the links lined up. Tamiya thin glue goes on the joins and set aside for 20-30 minutes.

I can then mold and bend them to get the desired shape.

Dragon supplies straight sections and separate links so one has to play with the parts to see how many per side are used. None of this is mentioned in the instructions.

I have one side done so I let it cook for a while till they cure. Even after curing the links can be manipulated for sag and alignment. Next will be paint and weathering th
PJ,
The tracks look good. Funny, it looks like an elongated panzer IV! Which, in reality, I guess it is!
I’m looking forward to seeing your weathering.
Bruce thanks, this thing could be a Mk. IV on steroids LOL.
Got the other side of the tracks done. This thing is a long puzzle.

Did several oil washes for grime and light rust.


The weathering on the loading sled did not come out as I wanted. Vallego does not behave the same way with the hair spray method as Acrylic lacquers like Tamiya does, producing a fine feathered worn effect unlike here where the paint just peeled exposing the red primer. I just may re do the entire paint thing on the sled.


I’m letting the oil washes dry and then I will spray clear flat acrylic and do some DOT filters for additional wear followed by a #2 pencil for exposed metal edges.
I wanted to keep this as an OOB build but the darn round air intake kept bothering me. Eduard makes a pe detail set for this model but it really doesn’t increase the details that much. I only add pe if the plastic parts are replaced with more detailed metal ones. So with this in mind I decided to scratch out the intake screen cover. Whenever I see something that I can use for detailing I grab it and throw it in my junk box. I picked up this thin metal screen somewhere a while back.

Again I go back to those plastic advertisement cards that come in the mail and drew my circle using the cover plate as a template on the card and screen. Using my Xuron pe cutters I trimmed out the metal screen.

With the circle template taped down securing things I used my scribing needle to carefully score out the circle. I also used my beading tool set to add recessed bolt heads around the plastic ring.

I used my Xuron cutter to carefully cut the ring out.

Here’s the completed cover.

And over the air intake. I think it looks better with this additional detail.

I finally finished assembling and painting the tracks. I could not get the desired sag cause the guide horns interfeared with other parts along the drivetrain. The hull sides and road wheels got some dirt color pigments mixed with rubbing alcohol and brushed on. This mix dries within a few minutes and some was brushed off to fine tune the effect.
I also stained the wood base and is ready for some ground work. I think I will drill a small hole in the center of the hull to drive a screw to secure the model to the base. The hull sits VERY low to the ground so the screw will be easily hidden with some foliage or terrain junk.
The plan is to make my mix of Elmers white glue and Durham’s Water Putty and throw in some dirt color craft paint. The mix will then be spread over the wood base and the groundcover will be sprinkled and arranged. The hull will get embedded into the mix and secured with the screw. After curing for a few days the tracks can be weathered to match the groundwork. The superstructure will remain off to make the track weathering easier to apply.


I did a little more work on the weathring as the chipping continues.


The IP got done

and attached

The decals are really bad being thick and glossy. The Roman numeral VI that goes over the breech burst into a million pieces once it was dipped in water. That is easy enough for me to hand paint using a 10/0 brush.
The ‘Ziu’ name stencil that goes on both sides of the upper part of the gun got coated with decal saver liquid to keep them from fracturing in the water. I applied them on the model using multiple coats of Future brushed out away from the decal center and when dry, fine sanding pads were used to sand and smooth the decal area. This process gets rid of the ‘step’ left by the thick decal edges. Another coat of Future was brushed over to seal the decals and clear flatcoat will go on later to kill the gloss and even the fish out on the decaled area.

Done with this one finally. The VI numerals were painted with black enamel and a 10/0 brush. The decal fractured when dipped in water.

The Ziu decals were coated with decal saver solution to keep them in one piece. They were applied over wet Future followed by several coats of the same product were brushed on to help hide the thick decal edges. After about 6 coats when fully dried, a fine sanding pad was used to go over the decal then the area was wiped clean and another coat of Future was brushed on. Finally flat clear went on to kill the gloss. The final result looks like paint and not a decal.

While the terrain was wet, ground cover was sprinkled and the model was placed on the terrain to sink it into the mix so it looks weighted down and not floating on the base. The terrain was brought up to the running gear to tie things down.


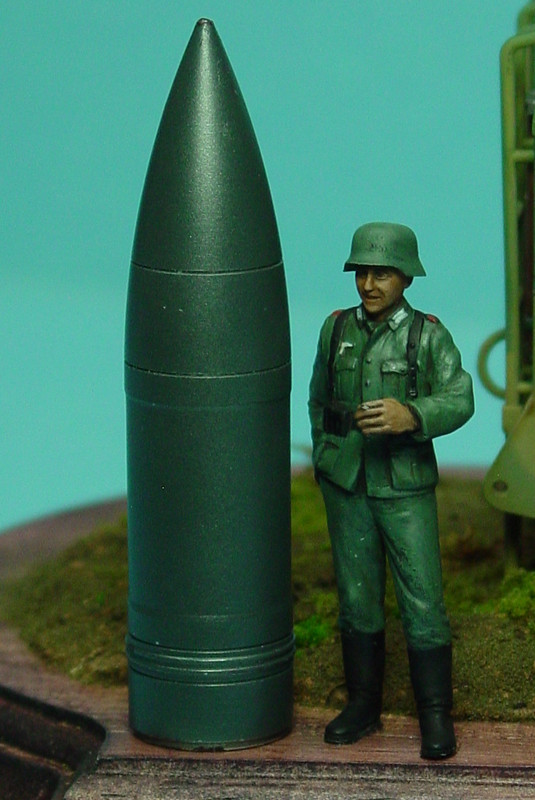
I looked in my spares box for a figure and used this Tamiya dude in a casual pose to show the size comparison to a person. I drilled his hand and made a cancer stick out of stretched sprue.
and the finished product

.jpg)
Closeups of some of the chipping and weathering.


The business end


The loading sled

Wow, PJ! Wonderful job on this beast of a machine! Bravo!
Thanks Bruce!
I thought the title was an April fools joke(complete). You built that monster in less than 30 days?!?! Really nice job. That is an impressive model.
Thanks John. It’s quite different from the other armor models I have built.
Here you go, the Karl Gerät Ammunitionwagen.

Can’t imagine driving this beast was any better than driving Karl.
I want to remember that ther was a kit of this, bbut cannot remember if in 1/72, 1/87, or 1/35. And my Scalemates-fu is poor today.
Excellent job on this beast.
Thanks CM! Great picture of a rarely seen vehicle.
Fantastic finish
Thanks Tojo!
Hi!
Atleast Trumpeter have two Munitionsscheppers in 1:35:
http://www.trumpeter-china.com/index.php?g=home&m=product&a=show&id=1820&l=en
http://www.trumpeter-china.com/index.php?g=home&m=product&a=show&id=1222&l=en
This will make quite an interesting dio. Wish I had seen this before.