CONTINUATION OF MY 1:20 SCALE SCRATCH BUILT B17G (RADIO ROOM)

Hi there Lads and Lasses!

I am off to the UK tomorrow but was able to do a quick update before I set off.;)

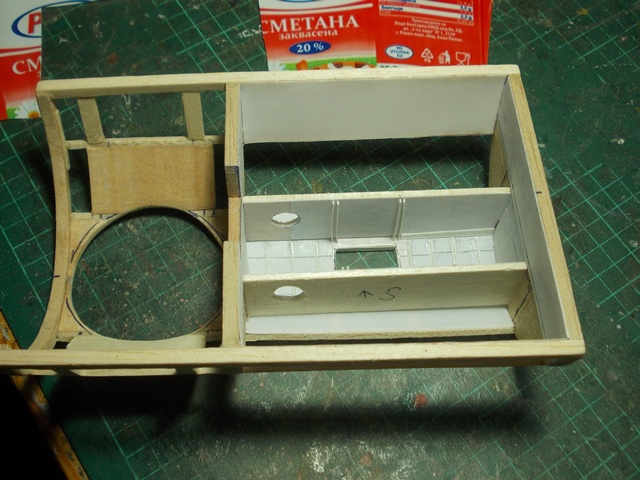
I haven’t done much but its a start to complete the ball turret part of this build.

Looking at photos convinced me that the next best thing to scratch build should be the ammo cans that are inside the ball!..they sit just above (and I mean just above) the gunners thighs!..I can see why the ball turret gunners had to be small…there is just no room to move an inch!..no wonder they got cramp!..lying there in that draughty enclosed space …dangling under the belly of the B17 with the deafening thunder of the 50 cals a few inches from their ears!.. great respect for them!:worthy:

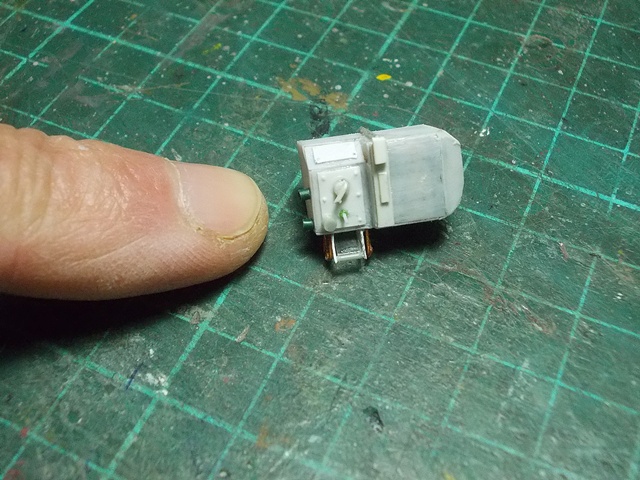
Scratch building the ammunition cans was a huge task in it self and I hope that they look something like them…I built them from a small block of balsa wood and then covered it with some yogurt pot plastic…just to save some of my plastic card!

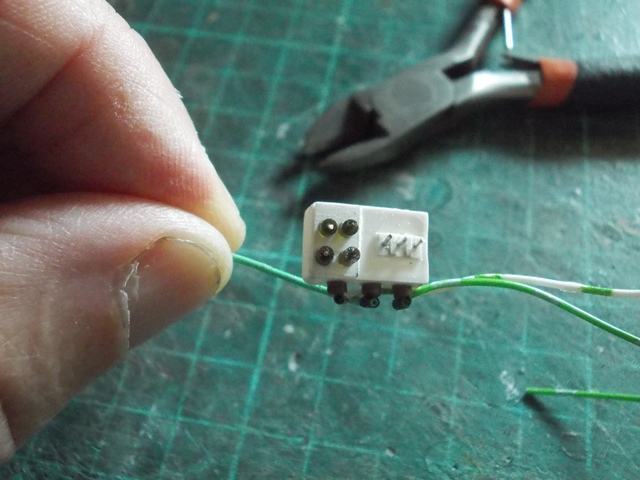
The rounds were made by cutting teeny pieces of telephone wire and gluing them on a strip of paper.

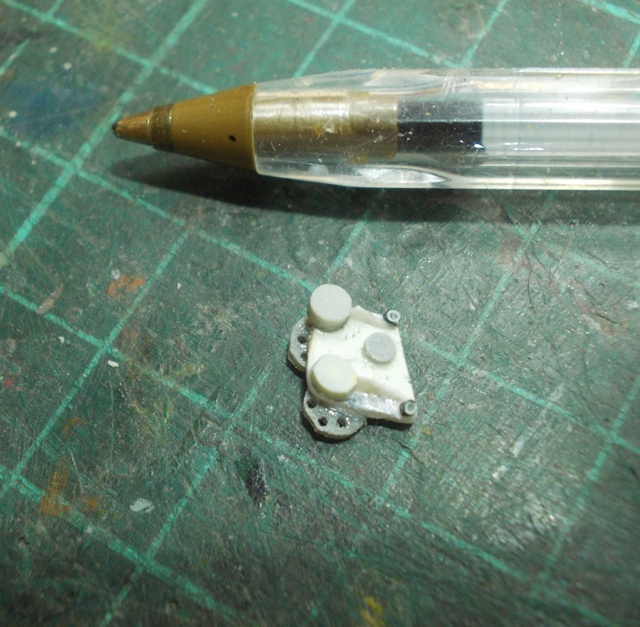
Here is a photo of the can’s and some of the ammunition that will be seen before painting…

The rounds were then glued into position and the whole thing was painted…

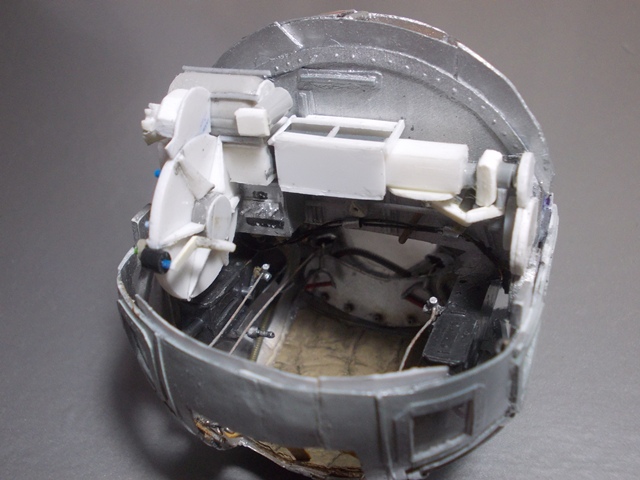
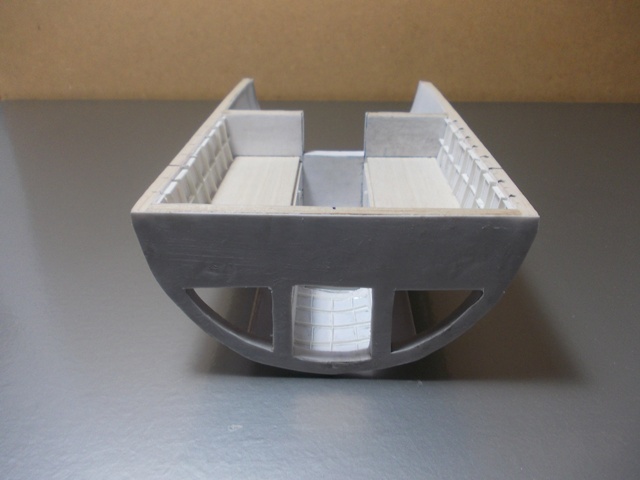
Then the real tricky part started!..fixing the whole lot into the small ball.

I decided a few days ago that the whole idea of this B17G project was mainly to show off all the interior detail…and so I thought that the top of the ball should be open so that when its in the fuselage you can look straight down into the turret as well as looking through the gunners hatch which will be on the outside of the fuselage…so to that end I cut part of the top off the ball as you will see in the next photos.

It took a lot of dry runs to make the cans fit in the ball with the top half on…but managed to do it in the end.

Here we have the ammunition cans in the turret minus the top half…

…and here is what it looks like with the top of the ball temporarily attached…

You might notice that only one side of the ammunition cans are painted…this is because a lot of detail will be attached to the un painted side later.

So now I am off to UK for a few weeks and will be back to continue this mid April.

Thanks as always for looking in and taking a peek!

Laters

Fozzy

Afternoon guys!

I have just returned from UK and I am now back in my office and can get to my bench!..the last time I posted was 15 March and of course not being able to do any modelling this post is going to be a small update.

So its the continuation of the Ball turret that seems to get more and more complicated the more I look at the photos. I have many photos of different angles of the interior of the turret that I have collected over the months and its a real slow process of interpreting what I see!..not to mention that some of the equipment I have scratch built will be able to be seen but only if you look carefully in all the nooks and crannies!..as in the real turret there isn’t a spare scrap of space!

So I continued with building an electrical control box that sits on the front of the ammo cans…here it is…

I painted the said object and before placing into the turret I built the manual elevation shaft control that the gunner would use if there was no power to the controls…this sits somehow on the front of the electrical control box!..

The last 3 photos show the progress I have made by looking at the white un painted parts…

So as you can see…real slow progress for such a small part in this B17G project!

When I have made a bit more progress I will post again…so until then…

Thanks for taking a look

Fozzy

Amazing work. I hope the rest of your pictures have not vanished. I loved looking at them last time I was checking your post.

Dont know why all my photos have disapeared…I hope its not going to be another Photo Bucket muck about…havent had any problems with Post image until a few days ago…any one else having problems?

I think postimage was hacked , I believe everything is alright now though . because I really like what’s doing in this build too .

steve5

I think I found the problem and have now rectified it…(hopefully)…we shall see!!

Hi there chaps

Been a while since I last posted due to the fact that Spring is here and every year I have to fix house problems tend to the garden etc etc also add to the mix that this turret build is pretty complicated! :unsure:

I am also experiencing problems with these posts as the photos keep disappearing…( Photobucket springs to mind!)…since Photobucket went silly I have been using… Postimage…I haven’t had any problems until just recently.I found out that they had been hacked…but I was told of a solution which works…some times!I am going to replace all the photos of this build one more time and hope that this time they stay here…but I’m not sure if they will…if they don’t then this whole Radio room blog is just a waste of time!..I will try again…is anybody else having this problem?

Any way on with this post…

I have a method in scratch building this turret now and that is to build it in layers!..from the top of the ammo cans to the next piece of equipment and then the next layer would be another part of the system to the next part and so forth. …because of the amount of stuff that’s packed into the ball its the only way I seem to be able to do it!

So here is the next layer! ;)

As you can see all the white parts are the detail that I have added since my last post…

This shot is looking in through the gunners hatch…

So with a bit of paint added here is what it looks like so far…

So now I have to put another layer of detail on…probably the last bit hopefully!..then I can get on with the Radio room!

Thanks for looking in

Cheers

Fozzy

Hi everyone

Just when you thought that it was impossible to cram any more equipment into the turret Mr Sperry thought it was best to install the K4 gun sight!..and it isn’t a small piece of equipment either!..it sat just above the gunners rib cage!

I made the gun sight by shaping a small piece of balsa wood and then covering it with some plastic card…then all the bits and bobs were simply glued on!

Here it is before being painted…

…and here are some different angles of the K 4 gun sight before being placed into the turret…

So here are some photos of the gun sight squeezed into the turret…poor gunner!

Looking through the gunners hatch…

Here is a shot through the front glass on the ball turret showing the (blue) sight glass…

Its a slow old process but I think I am getting there!

Next up is…yep you guessed it …more equipment!!

Till then thanks for taking a look…always appreciated

Fozzy

For the life of me I can’t imagine how anyone could squeeze their body into that thing. It must have been really uncomfortable.

The maximum height for a ball gunner was 5 foot 4 inches…even so …it must have been a tight squeeze!

Good afternoon chaps

May I just say before I start on this post…

Has anyone else noticed that some of the photos are coming back on the posts from Photobucket?..really odd as there was no warning…all the photos from some of my old posts from other models I have made years ago are returning!..please let me know if you are experiencing the same thing…not complaining but don’t trust the beggers and I won’t be returning to them![N]

Any how…onto the old ball turret!

I have added yet another layer of equipment that is found in the turret!..this time its the control pack for the gunner to move the turret from left to right and up and down and also the firing buttons for the 50 cals!

The control box was difficult as I really didn’t have many photos of different angles of it , so some of it was guess work I am afraid!..twice I got the scale wrong because of lack of photos but got there in the end and I think it looks reasonably accurate!

I also built a chain gear box for the movement of the ball which I will show you first… Here it is completely made from plastic scrap…

…and here is the difficult to build control unit!..

The next set of photos show the two parts built placed in their position in the turret…

So here we have the parts painted …

Now…your be pleased to know that were on the last push for finishing the internal construction…I know I will be!!!..just a box and cable here and there and then it will be the time to try and fit the top of the turret on and to start building the external detail.

I will be back with the last bit of detail soon…till then…thanks a lot for looking in guys [Y]

Fozzy

Hi guys

I am pleased to announce that the ball turret construction has come to an end! leaving me with just the detail above the ball that will be shown inside the fuselage.

I have to say that although it was a challenge… I thoroughly enjoyed this part of the B17G build!..I didn’t realize from the offset how much equipment there was inside the turret and I have learn’ t a lot about the operation of the turret along the way.

Since my last post I finished off by placing an electrical box and cable on top of all the other detail!..and had to make the gunners hatch door that I will show you first…

the next photo shows the inside of the door…

I have temporarily blue tacked the gunners door in its place on the turret for these next set of photos…

So here is the completed turret at different angles placed on a medicine dispenser I found that held it steady whilst photographing!!..took me ages to scratch build this so no apologies for the amount of photos!!

Here it is turned upside down so you can see the detail!..

Here is the turret temporarily placed in the fuselage to get some idea of what it might look like when finished!..

Well done for sticking around to look at all the photos!

So now its back to the Radio room section of the fuselage which will incorporate this ball turret.

I will start by skinning the interior of the bottom section half and will post again when I have made some progress.

Thanks a lot for looking in

Fozzy

Just amazing work I wish the rest of the photos in your post was working but the few up of the ball gunner position and what i seen before they disappeared this is a excellent build thank you for sharing it with us.

Thanks Clint…I am going to try and sort out the mess Photobucket made and replace the missing photos!..just takes time!

Afternoon all!

Been a while but work on my house was required which didn’t give me much time to get on with the radio room…plus I am getting ready to return to the UK for the summer which I do each year due to the extreme hot weather here during the summer months…which of course means that this will be the last post until I get back to my office at the end of August.

So I have made a start on the radio room with the lower half and the flooring. It’s nowhere finished but it’s a start!

As you can see the fuselage is Balsa based and the floor was built up also with pieces of balsa which I covered with “ye olde yogurt pots”…usual trick of mine to save money on plastic card!!

The center of the floor has the bay constructed for the camera section that the radio operator could gain access through a trap door…yet to be built!

The last few photos are of the radio room floor in place leaving the camera bay open minus the hatch for the time being…I will build the hatch door when all the camera equipment is installed…

That’s all until I get back from my summer break!

I hope you all have a great summer this year and I’ll catch you all later!

Cheers

Fozzy

Good afternoon guys

I do hope that everyone is “A” OK and you all had a great summer!..I certainly did![H]

Seems like an age since I last posted on here…in fact it has been nearly 4 months![:O]…I went back to Blighty for the summer and when I returned life’s little distractions kept me away from my work shop…what with fixing things around the house …car maintenance etc etc…you all know how it is!

Any way I have found a bit of time until I get my family knocking on my door for their yearly visit and until they come lets see if I can continue with this Radio room for my B17G!

Not an awful lot of progress I have to say but I have managed to prep the bottom half of the construction …covering and strengthening the Balsa construction.

I think the photos will show you what I mean…

The openings you see cut away are for viewing all the gubbings that’s found under the Radio room floor…like camera equipment…Oxygen bottles and prop anti icing main tank.

This photo shows the side of the fuselage and the opening will be for the viewing of said tanks!

Here are the oxygen tanks and anti icing glycerol tank …made from block balsa for the oxygen tanks and a converted 550lb bomb from a Stuka kit!

The two halves temporarily together to get the effect!

Well that’s all I have had time for so far but at least the ball has started to roll again with this build.

…Next up I will get the top half of the Radio room prepared the same as the bottom half…

Great to be back again BTW…and thanks for looking in !

Cheers

Fozzy

Good to see you back I love watching your build. Have you got all the broken photo links fixed now on the other parts?

what clint said mate , love watching this build .

steve5

This is just a very cool build. I really look forward to the updates on this one for sure!

Cheers Guys!

Working on it Clint!..I just need a bit of free time but I will definitely get it sorted!