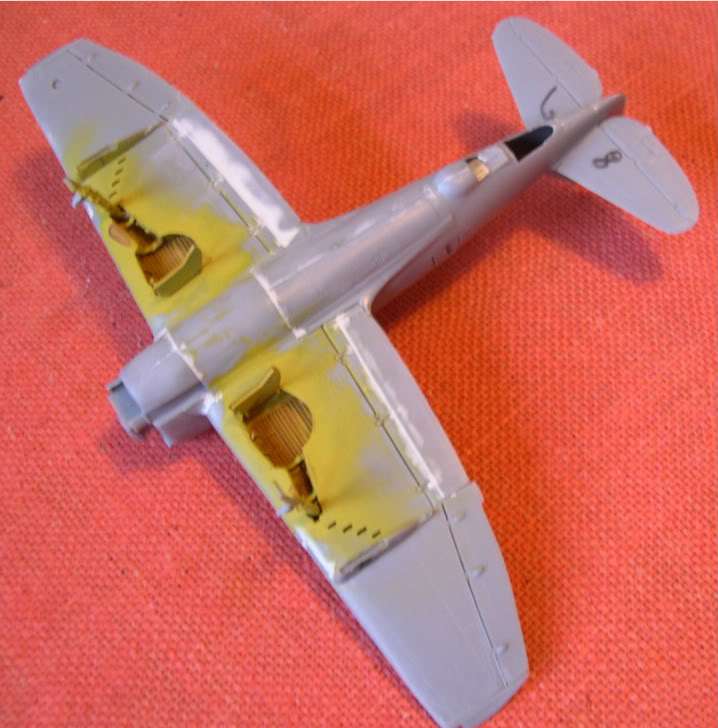
Toshi , I am in the process of foiling that plane ! I am going for Gabby Gabreski’s bird ! Best OOB I’ve run into in some time . Mine was a flea market find . Still sealed too !
I bought decals after - market , as the ones in the kit were crumpling off the paper ! T.B.
Hey guys, I guess that I am kind’f in the P-47 foray too. I have a Revell P-47N that I want to build; but I also have a bird cage D that I need to build first (S/B my next build)! I will be building Gabreski’s P-47D-11 HV-A 42-755110 mount. Tanker are you building one of his latter birds?
I built the Revell P-47N a couple of years age. It’s a real nice build with no issues. That was my first plane with Bare Metal Foil. Are you going to do a NMF? If so, how about trying Bare Metal Foil [;)][;)][;)]
How cool is that Tanker - Builder in that you’re foiling the same Thunderbolt kit. Gabby Gabreski’s bird should be a nice build. Thank you for the tip on the best OOB kit you’ve run into in sometime. My decals aren’t crumbling so I’ll try the Testors Decal Bonder Spray technique. If you get the chance, I’d love for you to post a photo of your Gabreski’s build here on my WIP build. Thank you for your support and the information regarding this build. I’m very excited!
This is so very cool in that we’re all building a P-47N Shipwreck. When and if you get a chance please post a photo here on my WIP. That’ll be great if you could. Thank you for always supporting my builds.
First step of the build, spray the decal sheet with Testors Decal Bonder Spray #9200. I did a light coat and will let it dry overnight and I will spray another light coat on tomorrow and to let that dry overnight as well. Thank you fox for the tip!
lol! lol! Thank you fox for the tip! This should work. If not, Gamera has some AM decals I can use. But you’re the pro here so if I follow your lead to the T, I should be good to go!
Thank you fox for always helping me in one way or another. It’s greatly appreciated!
Yeah, the landing gear legs are molded as a solid part with the outer gear bay walls. So you can’t attach them after you’re done with everything else. They’re just hanging out there while you’re painting. I was afraid I’d break them off on mine but they turned out ok.
And also the wing top and bottom halves connect with a seam in the middle of the flaps. Why on earth they didn’t put the seam ON the flaps/wing separation I have no idea. I managed to pull my photos of the one I built off PhotoBucket yesterday and move them to ImageShack. You can see the division line here where I puttied it:
Ya, the landing gears are built before the wing halves are closed and you are forced to have them installed early on. No way around this. I was able to spray, like Gamera did, the bays then put silly putty in and Alclad the gear and plane in one shot. It worked great and although I don’t like to install my gear so early, it works just fine on this kit.
That’s something I have yet to try. Right now I have several NMF paints I need to use. I don’t want to waste them. In the very near future, I’ll look into Bare Metal Foil. That’ll be my goal! Thank you JohnnyK for always supporting my builds and encouraging me to do better! I greatly appreciated.
Thank you BrandonK for the valuable information. I’ll do what you and Gamera have assembled. That’s a great idea to get around such an issue. I’m shocked by how many Forum members have this kit! Thanks for stopping by and sharing this info with me.
I looked at some photos that I took when I built my P-47 and everyone is correct regarding the landing gear. They have to be installed before the two halves of the main wing are assembled. That is really poor engineering on Monogram’s part.
A couple of other things:
The The way the landing gear doors are fastened to the wing is very weak. I added some flat plastic to reinforce the joint.
The way the guns are connected to the wing is also very strange. You need to glue a curved piece of plastic to the wing. It is difficult to get the curved plastic alaigned with the curve of the wing. More bad engineering.
Thank you for the information in regards to step #1. I’ll keep an eye open for the landing gear doors.
As for step #2, that is an interesting engineering mistake. Now I’ll know what to watch out for.
You’re a great forum member for helping me with this build. I so appreciate the assistance and warnings of the kit itself. Thank you once again JohnnyK for all you’ve done for me!
Here is the fueselage assembly. What’s different about this set up is that usually, you assemble the cockpit then glue it into the fueselage. In this instructions, you glue together the fueselage then you assemble the cockpit and slide it in. That’s a very different concept. Let’s see how this works out.
What’s neat about the instruction booklet is that it utilizes actual real photos of the section that you’re working on of a P-47 Thunderbolt. Not something you see everyday.