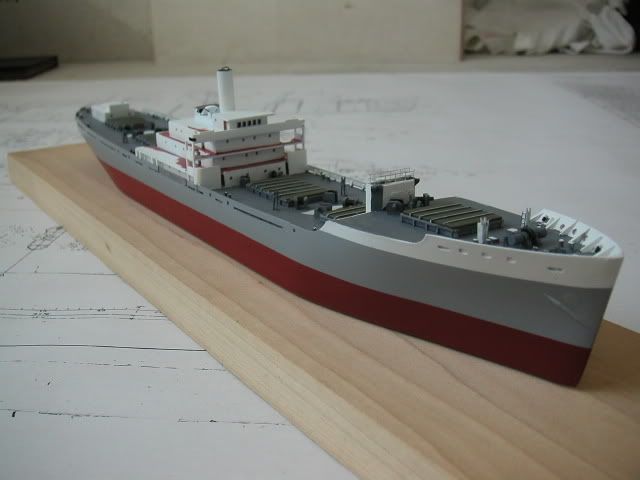
onyxman, I don’t mean to be picky (But I’m gonna be), are you sure the ventilators on top of the kingposts are square? I dug through my pictures of the American Victory and the ones on the aft kingposts are round. I don’t know if that’s stock or a postwar modification, but I looked at my 1/700 victory ship model and all of those vents are round as well.
Hey, picky is the name of the game in this sport right?[:D]
Actually, the vents are cylindrical. They look “squarish” only from a distance. They have a pretty complex shape of baffles and what-not. I did mine with a piece of styrene rod slighly larger than the diameter of the king post. Then I glued some very small vertical strips around the vent.
I had thought I’d cut off the top of the kingpost from the kit parts, but when I tried it, my scratch looked closer to reality than the kit’s.
By the way, I put on the “tipping bars” (thanks KP80 !)
The kit’s parts have the anchors and bars as one piece. I didn’t want to put the anchors on the hull just yet as it would interfer with masking the paint job. So I placed the anchors in the right place and marked where the tipping bars sit. Then I separated them from the anchors and glued them on.
It’s been way more work than I expected. Much of what you see here is still only dry fitted. There are all those complicated shaped superstructure decks, each in actually two sections with a passageway between, then they have to all tie together with that ladder-like piece from the bridge wing to the main deck.
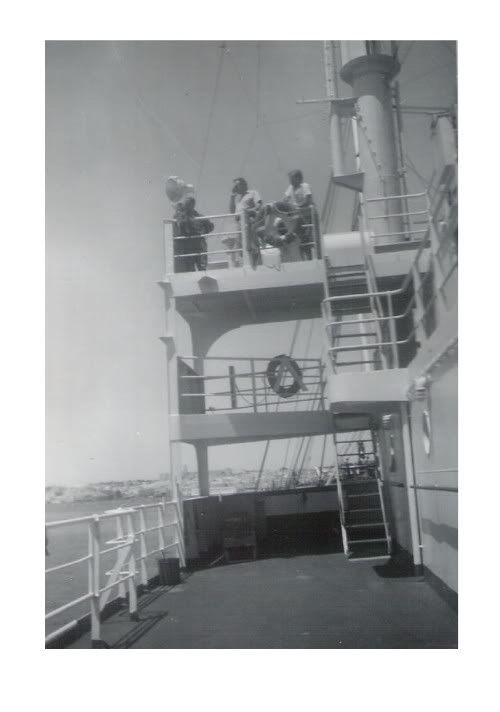
So, I have some paint on her now. I was leery about the very dark color of the decks. Over at the debris field site Mr Morris said he knew a long retired States Marine sailor who remembered the decks being “black”. I had my doubts about that. Then I found one rare color photo of the Sooner State. The main decks looked to be such a dark gray that I could see how someone remembered them as black.
Here is the picture.
http://www.us-maritime-commission.de/pictures.php?code=A1198d
Fred
Fred,
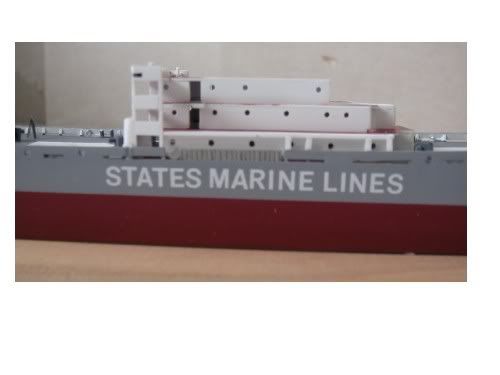
This is looking real nice! Just wondering, are you going to paint or decal States Marine on the side of the hull?
Bondoman you talking about the T2 Tanker San Juan Capistrano? I have 2 of them.
onyxman - my Dad served on several Victory ships at the end of the war and immediately postwar. I can’t find the piece of paper right now, naturally, but I’m pretty sure one was for that shipping firm. Another was Moore-McCormack, the Mormacmoon maybe, and I think the other was US Lines. I can ask him what color the decks were if you want, he got to do a lot of painting.
It can’t hurt to ask! But I think with that one color picture it’s a pretty good indication. The Sooner State was a C-2, but the companies usually standardized the major paint areas.
Speaking of Mormacmoon, here she is, a C-3
http://www.us-maritime-commission.de/pictures.php?code=A0063c
KP, I have a Microscale decal sheet with lettering for model railroads. I plan to use that, putting on one letter at a time. I’ll make my own for the names and stack insignia.
It occurs to me that I’ve been working on this for two months, and if it was a kit I’d be at the point where i just opened the box and dumped the parts out. But if I can keep momentum up it should start coming together quickly now.
I still have to build the lifeboat davits. The lifeboats from a NS Savannah kit are just the right size. I’m using the heavy lift booms from a Trumpeter Liberty kit. I won’t need them because I intend to build that kit as an aircraft transport version that didn’t have the heavy lifts.
PE is from Tom’s 1/400 railing, his 1/350 Liberty set, W/T doors, and some other odds and ends.
Then there is the base. Wouldn’t it be cool to place this in a case with a Hawaiian Pilot C-3 kit, maybe on both sides of a pier?
Yes sir I am. I’m working on the “Mission Carmel” and have cut her down to the waterline, and plan to modify the superstructure to accurately resemble a T2. Also better weapons- 1.1" I think.
What a great idea. I like the ships that have their names in bold letters on the sides, one of my favorites was “LYKES LINES”.
What scale is it they look bigger than 1/700 scale?
mikeym, This is 1/375 scale.
Fred
so that means it’s closer to 1/350 scale?
or 1/400 scale?
Take your pick, Mikeym. When it comes to PE, personally I prefer to use the smaller, 1/400 in this case.
Fred
When I built the Pine Island (Revell 1/400) it scaled out at about 1/420, so the 1/400 was the right choice. I’ve scaled the T2 but I don’t remember how it came out, I’ll have to check. I’m planning to try 1/350 armament on it though, as it’s all I can find.
I tried the lettering on the port side. It came out pretty close to the photos I have.
I need to decide soon just which ship this will be, as there are some minor differences. I have it narrowed down to S.S. GARDEN STATE, BEAVER STATE, or GREEN MOUNTAIN STATE. That last may be too long when it comes time to make decals.
Onyxman,
Very nice lettering job on the hull! This is looking good. Are the booms going to be up or down?
I’ve pulled out one of my Mission Capistrano’s and the 20mm guns look pretty close to 1/350 scale so does the 5 inch guns. The only ship I know that could probably be bacdated to use the 1.1 inch would be the USS Helena also from the Commanders series that the Capistrano is in.
Rich,
Booms will be topped, I hope, unless the rigging totally drives me bats.
Today I experimented with drilling tiny holes in the deck and inserting the smallest available sewing needles up to the eye. Makes passable padeyes. I found the rigging goes better if I plan for where the strands will be secured. The booms themselves will be brass rod. I had good luck with the masts and kingposts, which were styrene. I put the rod in a Dremel and spun it at slowest speed, using sandpaper to make the “telescoped” effect.
I’ve run off a couple of brass booms in the same way, to make them tapered, but I haven’t found anything that cuts the brass very well. Tried sandpaper, small files. Emery cloth works the best, but it’s still slow going.
Anybody have a suggestion?
I’ve got a couple of suggestions about padeyes.
One - if you’ve got a good hobby shop within driving distance, you may be able to find some excellent photo-etched metal eyebolts in the model railroad department. (Grandt Line and Detail Associates both make beautiful, extremely small ones in plastic, but don’t bother with them for this purpose; they look great, but snap when any strain is put on a line tied to them.)
Two - it’s ludicrously easy to make your own eyebolts from wire. A good, cheap source for the wire itself is stranded electrical wire. A quick trip to Radio Shack will get you a spool of some stuff that, separated into its individual strands, will be plenty fine enough - and will last the rest of your life. (For really, really fine copper wire, buy a pair of cheap , Walkman-type earphones and strip the wires from them. That stuff probably will be too thin for your purposes.) Use a small drill bit (#80, maybe) as a mandrel; clamp it in a vise and twist a piece of wire around it, like a pigtail. Drill a hole in the deck (or bulkhead, or whatever), superglue the pigtail into the hole, and you’re in business. If you’ve got access to the underside of the deck, spread the ends of the pigtail apart underneath and glue them to the bottom. That will eliminate any chance that the eyebolt will ever come loose.
I’ve got a soft spot in my heart for this particular kit. My father was a junior officer on board a Haskell-class APA in 1945; I vividly remember the day back in the fifties when the family made a pilgrimage to the hobby shop and bought the then-new Revell Randall. (My brother, who’s seven years older than me, was entrusted with the task of building it.) When I saw this thread get started my first thought was that onyxman was commiting a minor form of sacrilege. But this is turning into a beautiful, ingeniously-executed model of an important class of ship, and I’m eagerly waiting each new step in its progress.
I wish Revell had modified the kit into “civilian” format. The under-representation of merchant ships is a major gap in the plastic kit industry.
onyxman, I don’t have the plans like you do, but if memory serves the booms were about 1 foot in diameter (at least) at the thickest part - why not use some Evergreen 0.035 or 0.040 plastic rod, or even some of their round tubing, to aid in getting the correct tapered shape at each end of the boom?
But then what the heck do I know, I’m not even close to your league! Which is one advantage to building in 1/700, at that scale such details are so small even an anal retentive modeler like me can ignore them with a clear conscience.