Fermis…can I have the other one?..Are you going to replace the stretchers, or sustitute troop seats?
Thanks for the input J.H., but lookig at the pic in my initial post, the one where my buddy is standing next to it, I can see that on his bird, it’s weaved or webbed. I missed that initially. That’s the only pic that I can actually see somewhat of whats going on there.
Bondo- That seat has been religated to the round filing cabinet under the bench, nowhere to be found now. It really is quite simple to make, even the weave was pretty easy. I’m gonna go with crew seats, probably scratched also. A couple down and a couple stowed.
Fermis;
I understand completely, At some point, the set up changed. I got out in 1980, about a year and half after the “E” s started reaching the squadrons and of course they have gone through a bunch of changes since then.
I can remember thinking that one of the D models I crewed was “old” because it had been in service ten years…
Good progress and impressive detail work.
Bill
I can confirm that it was OD on top and black on the bottom with yellow tips. Also, the blade data markings should be on the underside of the blades so it could be read from the ground instead of having to climb on top to read it. This was information such as serial number, blade weight, trim tab angle, etc…
HTH
J Primm
Thanks J, and Ferm. It’s your thread so I’ll do my own build WIP in the Helicopter GB, but rest assured this advice goes onto the plastic tonight.
By way of a return favor here’s a Vietnam thread with pics I found incredibly valuable.
http://www.popasmoke.com/visions/index.php?page=view&category=19
Got my Eduard goods yesterday, so I started on the front office. I opted out of the resin for the Eduard color IP and added a bunch of wires and crap to the forward area that, I think, will be visible through the canopy.


![]()
WOW FERMIS !!! What an awesome build, the detail is stunning to say the least. Now I know why I havent seen you much lately [:D] I am sure your friend is gonna be beside himself with this CH-46. Just over the top man !!!
Really great work! Is that the Eduard color PE for the instrument panel? Also, do you paint on the bundlers on the wire yourself, or is it pre-colored comm wire?
Again, great job. I check this thread about twice a day just for updates on your bird.
Thanks V-man & Heloguy.
Yes, the IP is Eduard color, the wire is all me though. I took the wire from an old guitar cable, about 6/7 strands and just twisted it together. Some of the other wires are single strands of wire and some stretshed sprue.
Will try to get the seats done tonight after hunting!!!
THANKS AGAIN
FERMIS
The hunt was a success and some progress has been made. The front seats are from the resin set, and I threw on just the buckles from the PE set.

For the rear seats, I just added some bent stretched sprue to the bottom for framing, still have to add seat belts and stow straps.
![]()

and from the hunt!!!
He came in, hot on the tail of a doe. He was very, large bodied, but had this little rack. Not very good genetics. Not the type of deer we want to be breeding out there.
![]()
Fermis Man the detail on your build is just sick !!! I hope some of it will be seen once you close it up. It would be a tradigity if it was all hidden from view. I am truly impressed with your work [bow][tup][tup]
Congrads on the hunt knew you would get one. I will be expecting my steak soon [:D]
Simply awesome detail!!! I hope to get even half that good some day [:)]
BTW I was at the local gas station the other day, a guy had 3 bucks in back of his truck. He said one was an 8 pointer, one 10, and one 12 pointer ![]() He was out all day, the day before, got the 10 & 12 pointer, and then the 8 pointer by afternoon the next day.
He was out all day, the day before, got the 10 & 12 pointer, and then the 8 pointer by afternoon the next day.
3 less deer for me to hit with my Jeep! [:D] I hope I didn’t just jinx myself and hit one on the way home from work tonight! I did hit a racoon about 2 weeks ago.
Anyway, AWESOME work!!!
Thank you gentlemen, for the ego stoke!!!
Swing on by tomorrow evening, bacon wraped backstraps will be comming off the charcoal!!!
My bro, ended up getting the doe that my buck was chasing!!! We had to go back out this morning to find her, after a hunched over 4 hour search of an almost nonexistant blood trail.
![]()
Alright, back to the model.
Finished off the detail for the seats. Seat belts are tamiya tape, and some of the buckles are left over PE and some bits of styrene. I think I’ve crammed in enough stuff to call the interior done.
right side;
![]()
and the left;

I will be adding the seat supports, once I get the left side and floor installed.
Awesome work so far, fermis. I’m bookmarking this one for future reference.
Off topic, where to I sign up for deer jerky?
Thanks Viper, do you have some property there? That is huntable? I’ll deliver some jerky!!! Iowa has some monsters!!!
I’m to the point of installing the interior, but was kinda held up, trying to figure out how to go about masking the windows, which get sandwiched between. Then I remembered that I had this circle cutter, YAAAAY!!!
It is made by OLFA, I got it at Michaels for around $5.

It took a bit of trail-n-error to get the right size.
![]()
Perfect!!!
![]()
I had to make an extra set for the pic, so it’s just laying around, not to be used by me. Bondo??? You want them for your project?
Before joining the halves together, I replicated the canvas(?) sheets just above the ramp.

I started with a piece of styrene, covered with masking tape, for texture, and poked a couple ritets in it.
![]()
I also had to add the supports for the seats. Just bits of stretched sprue.
![]()
I also had to thin the front end of the roof section for it to fit against the resin bulkhead. All that detail on the resin sits a bit high.
Here’s she is, all buttoned up.


Now, things should progress pretty quick, over the weekend.
Sadly I dont have huntable property down here. I usually go up north with friends because I dont like to bow hunt. I prefer my good ol’ 1914 Lee Enfield No1. MkIII. But due to injury I wasn’t able to go this year. But I do love me some jerky.
Hey, if Bondo doesnt need the masks, I would love 'em. I haven’t started my -46 yet.
Hey Viper, I haven’t changed the setting yet on my cutter, I can make more, PM me your particulars, I can get em out to you.
Anybody else? They will be just the round windows, the rest, I’ll just be pieceing bits of tape over.
Thanks, that’s kind of you, but I used an old airliner trick. I’ve painted the halves before gluing it all together. When I do that I’ll do a simple mask between the panel lines nearest above and below the ports and just repaint any fill work along the spine.
So pass em on. And stop posting pics of the real thing! I’m on this full time now that the Weekend GB is over. Very nice work on the litters- I’m copying. I’m pulling up short of the marvelous work you did on the IP, and simpler interior too. You rock!
If I had to do this again I would have passed on the resin AM stuff and spent the money on the brass, but no big deal.
I have a dog that looks like yours.
Fermis;
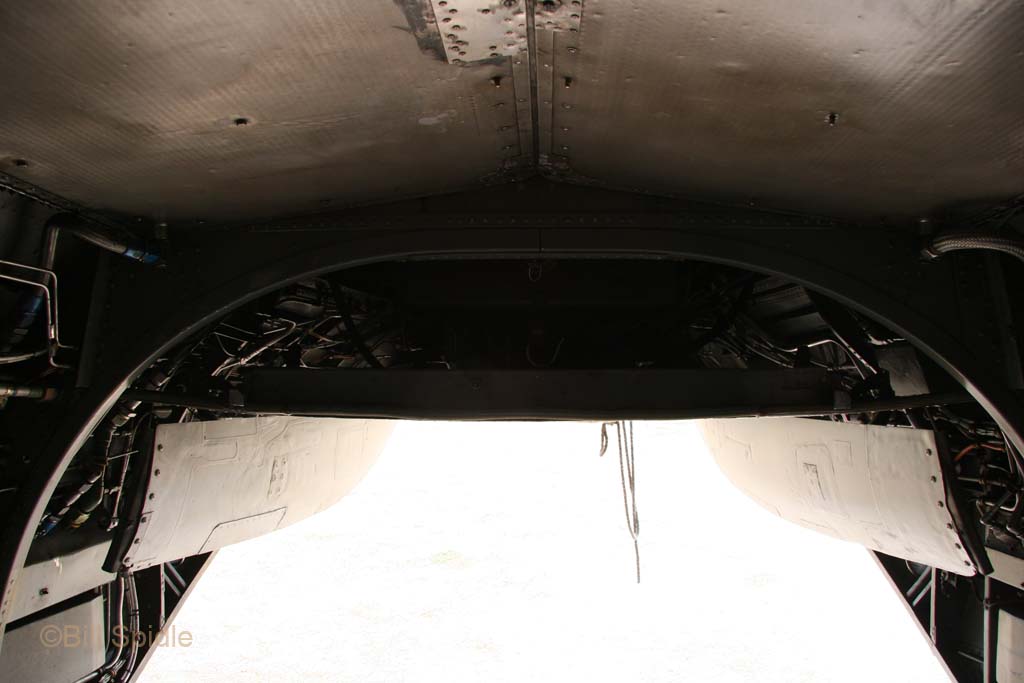
The panels you replicated are actually constructed of stainless steel/titanium and are in fact the access panels for each engine.
It looks as if you even replicated a repair on the right hand (#2 ) engine bay door.
This is a very good set up as it allows for the crew chief to check for any problems with the engines while in flight.
We used to use this area as an oven…I once put a c-ration can of spaghetti and meatballs in there and forgot about it, after the flight I spent a bunch of time cleaning up the resulting mess…
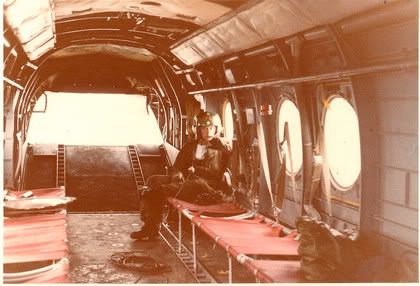
Here’s one for your files, a photo of yours truly, circa May 1978…CH-46D 154831, HMM-164 MCAS Futenma, Okinawa
