B-36 Peacemaker Group Build

I had to relieve the fuel tank/spar to clear the inlet trunking I have put in the wings. I didn’t like the open look the kit has, the real thing looks sculptured and without something behind the leading edge it didn’t look right to me.

I think it will be fine, the spar in the kit ties the wing together pretty well.

Here is a picture of the wing ducting. It is Milliput and plasticard.

That`s a rather interesting idea John, I just might have to incorporate that into my builds

There was a question about the difference in bombays & what all that means. Here it is in summary

On the left is the stock bomb bay wich is an early RB-36 configuration. On the right is a modified fuselage with all bomb bays to make the build a B-36 bomber version. Note: The lower fwd radome has been removed in that build because the plane it is modeling had that featured removed. All other B-36 Bombers had a lower fwd radome.

Even building the model as a stock RB causes multiple inaccuracies which is best described in detail on p. 65 of B-36 Peacemaker in Detail & Scale by Wayne Wachsmuth. There is a USAF drawing there used to show the difference in RB models:

The top shows the oringinal RB bombay & rear ECM radomes, the bottom shows the modified RB with bomb bays and relocated ECMs when they were modified to carry standard and atomic munitions once they were replaced by U-2s, RB-47s, & RB-52s for font line reconnaissance duties.

Here is a picture of a RB-36D`s ( the early design as molded ) on the assembly line

Here is a picture of the later design ( which is correct for an H/F model ). This photo is of the YB-36 which was modified into an RB incorporating the new updates

Another inaccuracy is that of Bombay usage in the RB. The instructions call for this:

However, the older RB bomb bay configuation design was this:

Bomb Bay #2 carried the flash bombs & Bomb Bay #3 carried extra aviation fuel to extend the patrol range of the RB-36.

In summary, you have an RB36H/F which is really an RB36D which isnt fully accurate and requires “modifications” to make it a true D model or H/F model RB.

Thus the builder is left with 3 options:

  1. Live with it
  2. Modify it
  3. Build it with closed bomb bay doors

When chosing # 3 one is immediately confronted with the usual Revell/Monogram challenge – The parts dont quite fit.

For that situation Click2detail.com offers a nice fitting aftermarket closed doors solution for those building in 1/72 scale for $25.99 that I find useful:

http://click2detail.com/products-details.php?pro_id=54

That takes care of the RBs.... Ill go over the bomber version conversion in another post with links to others whom have done it.

Good thing you shot this, got the last set @ SB’s. [;)]

I see that!

It looks like the surge from the builders here combined with their normal business wiped them out quickly.

But to those whom missed out… Dont worry, I`m in negotiation with Warbirds directly to sell to the members here at the $14.99/$3.50 ship price for both the 72002 & 72003 sheets… Buyers outside the US will probably have to pay more in shipping though. They did mention they would do a combined shipping price on multiple sheets. In my dealings with them they have only charged me the shipping charge once when I purchased multiple sheets

Hope to have that squared away and announced on here how to do it in a couple of days.

If anyone cant wait that long, Warbirds will sell direct to the public at their current prices:

http://warbirddecals.com/component/virtuemart/?page=shop.product_details&category_id=13&flypage=flypage.tpl&product_id=44&vmcchk=1

http://warbirddecals.com/component/virtuemart/?page=shop.product_details&category_id=13&flypage=flypage.tpl&product_id=28&vmcchk=1

While I am waiting to hear back from Warbirds if they can sell to us at a group build price, I thought I would post the application instructions and go over the sheets ( 72002 & 72003 ) in case anyone loses theirs, finds a great ebay buy on a sheet that is missing them, or wants to see a good picture of what they would be buying before purchasing, etc

First Sheet # 72002

Building Options:

B-36A, City of Ft Worth 44-92015, 7thBG(H). 8th AF, Carswell AFB, 1948

RB-36E, 44-92020, 72nd BS, 15th AF, Travis AFB

B-36B, 44-92028, 7th BG(H), 8th AF, Carswell AFB, 1949

B-36D, 44-92605, 326th BS(H), 42nd BW, Loring AFB

Sheet # 72003 of course is the walkway stripes with common markings and many details not found on a stock decal sheet for the general details

Well now that you mention it, what can I build with the OTB decals and sheet 72003?

not having done any B-36 research yet

this kit

OK, sit down and take a “deep breath”

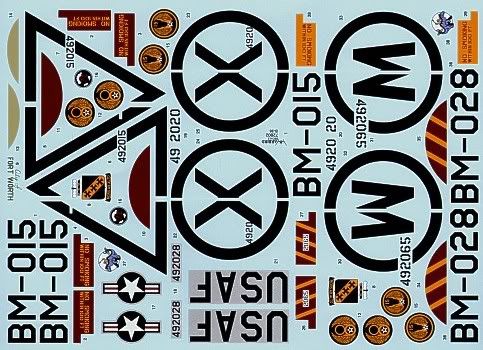
Here is your stock decals:

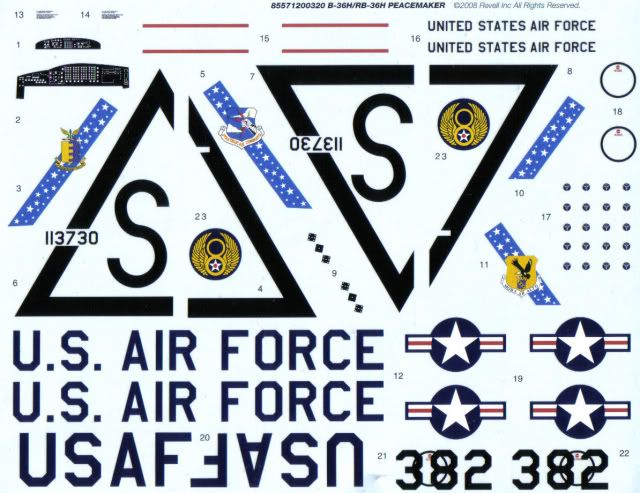
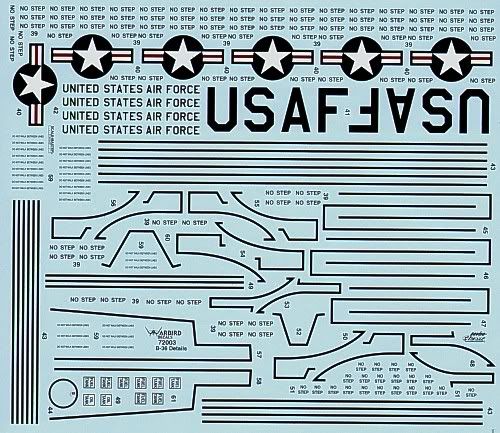
The first thing you should do with that sheet is ANYTHING which says: USAF, U.S. AIR FORCE, or small script UNITED STATES AIR FORCE that is colored insignia blue & not black should be removed for another build ( or trashed ) . The good news is that Warbirds #72003 which you purchased has the USAF & small script UNITED STATES AIR FORCE in the proper black coloring.

That being said, the model kit allows two builds:

  1. RB-36H, 28th Strategic Reconnaissance Wing, Ellsworth AFB, Weaver South Dakota - The Triangle S build

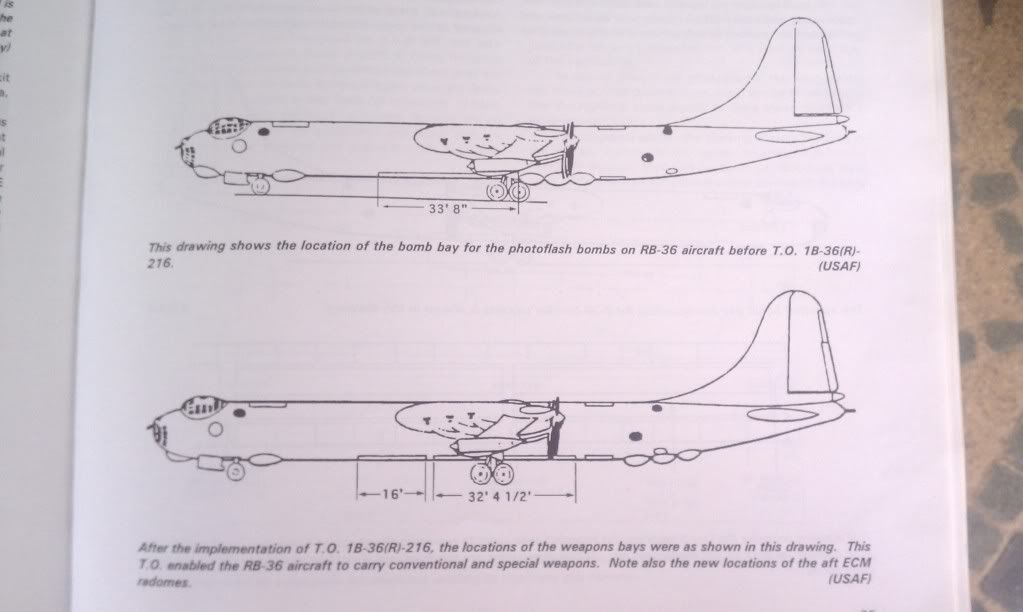
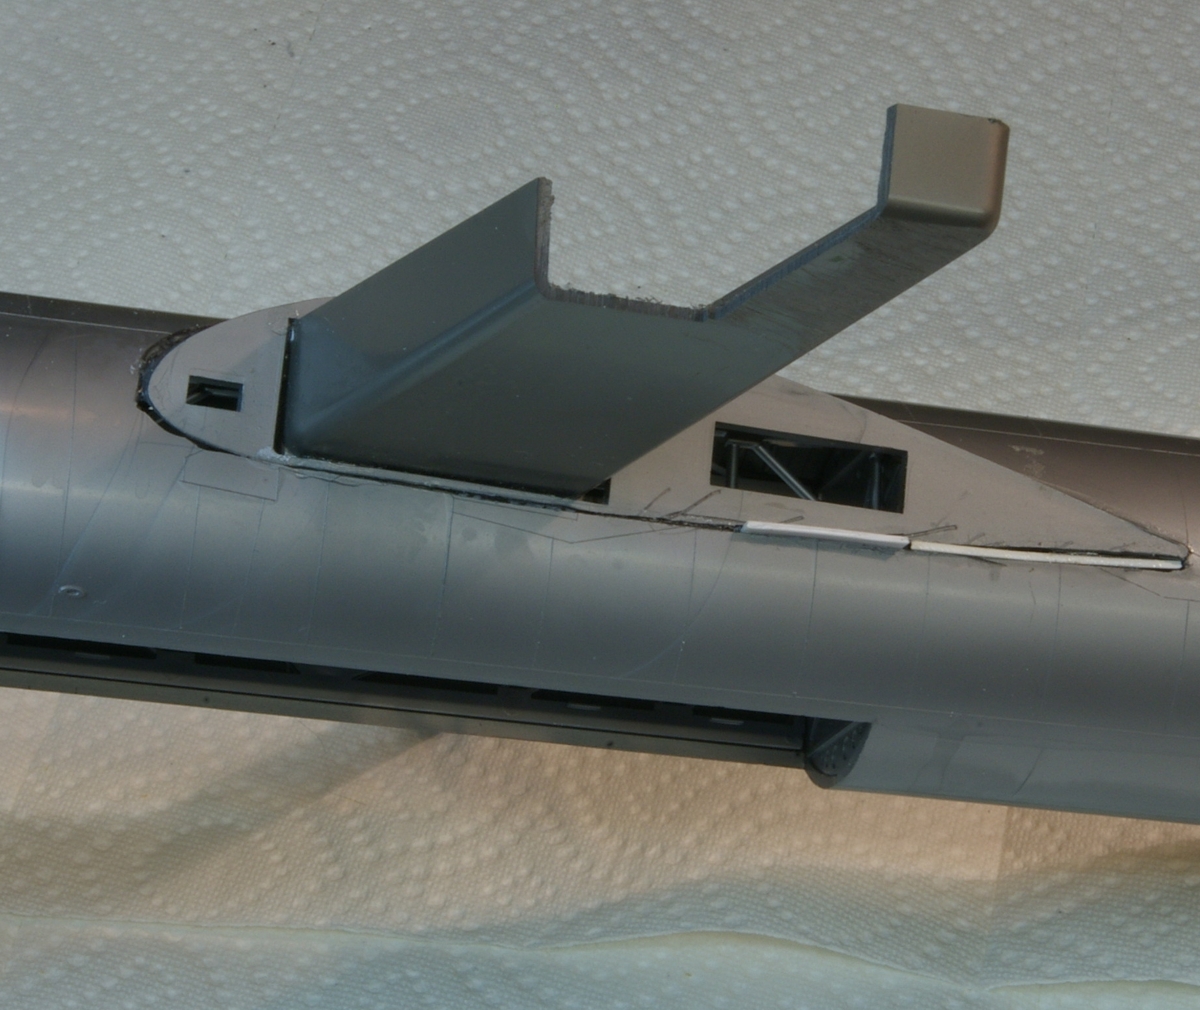
EDIT: Upon further review this plane did indeed have the smaller old style RB bomb bay and was never upgraded to what was the newer RB configuration. Goes to show that there are always exceptions to everything! This particular build allows one to build the current RB on display at Castle Air Museum.

http://castleairmuseum.org/convair_rb36h.html

The downside to this build is as instructed it would be built historically inacurate due to the model being molded as an RB-36D as discussed in my earlier thread. This leaves you with the following options: 1. Build “as is” if something like that doesnt bother you, 2. rescribe/redo the bombays & position the aft lower ECMs in their correct place, or 3. Do a closed bombay build and rescribe the bomb bay door lines and position the aft lower ECMs in their correct place.

  1. B-36H, 7th BW (H) Carswell AFB

This is the one on the box art. Its already a major fail due to this being a “bomber” and the artist has it drawn as an RB… with historically inacurate Isignia Blue - “U.S AIR FORCE” markings. - though the build instructions have the bomber version with the lower ECMs being deleted

This one is already a major fail out of the box due to the script being the wrong color, the fuselage is an RB- 36D, and not a bomber. You would either have to reconstruct the bomb bay - or do a closed door build and rescribe the lines. Even then you still have the wrong color on the lettering

A good color drawing of this particular plane can be found at on page 27 at:

http://www.scribd.com/doc/51639302/Squadron-Signal-Aircraft-No-42-B-36-in-Action

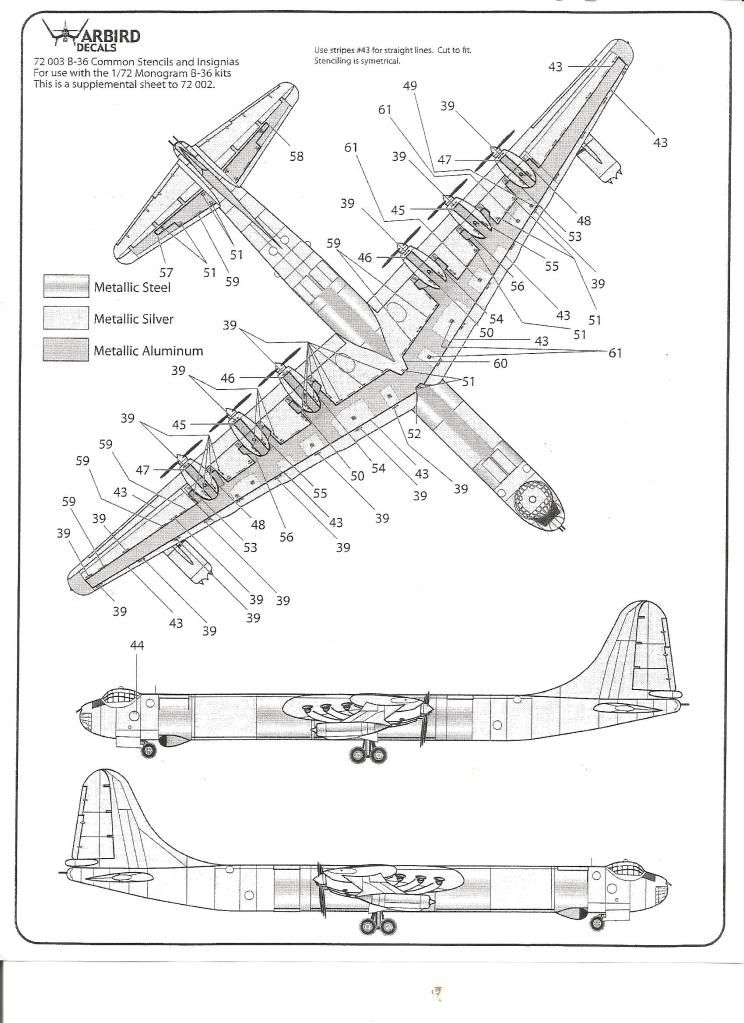
also, see page 32 for the correct tail gun radome for each specific B-36 model

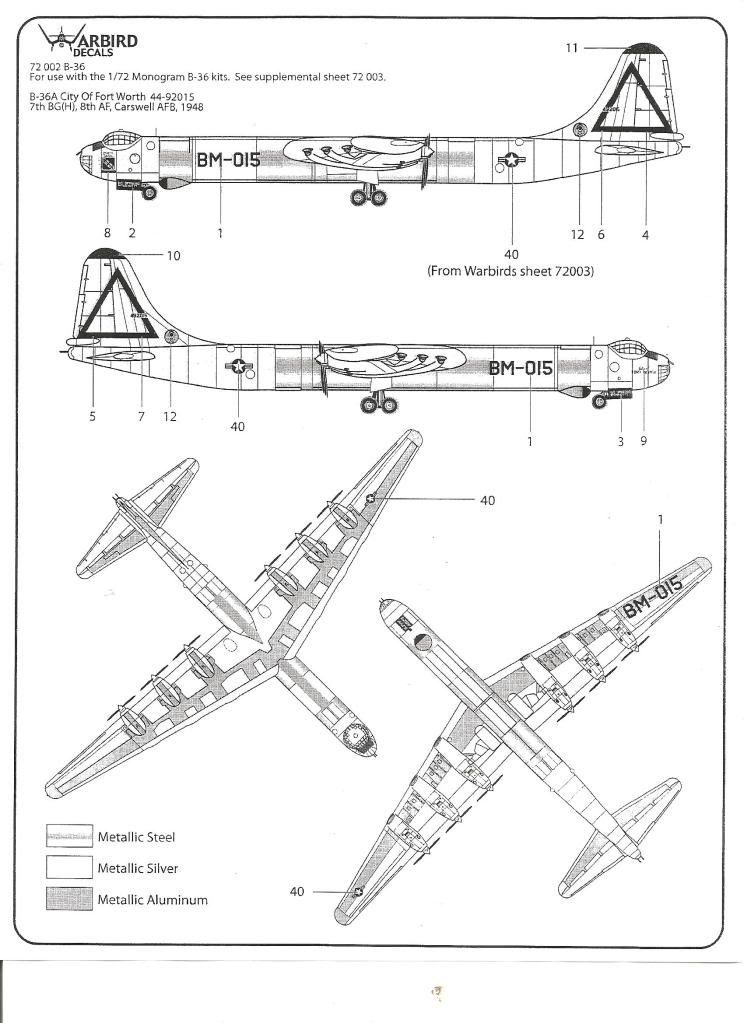
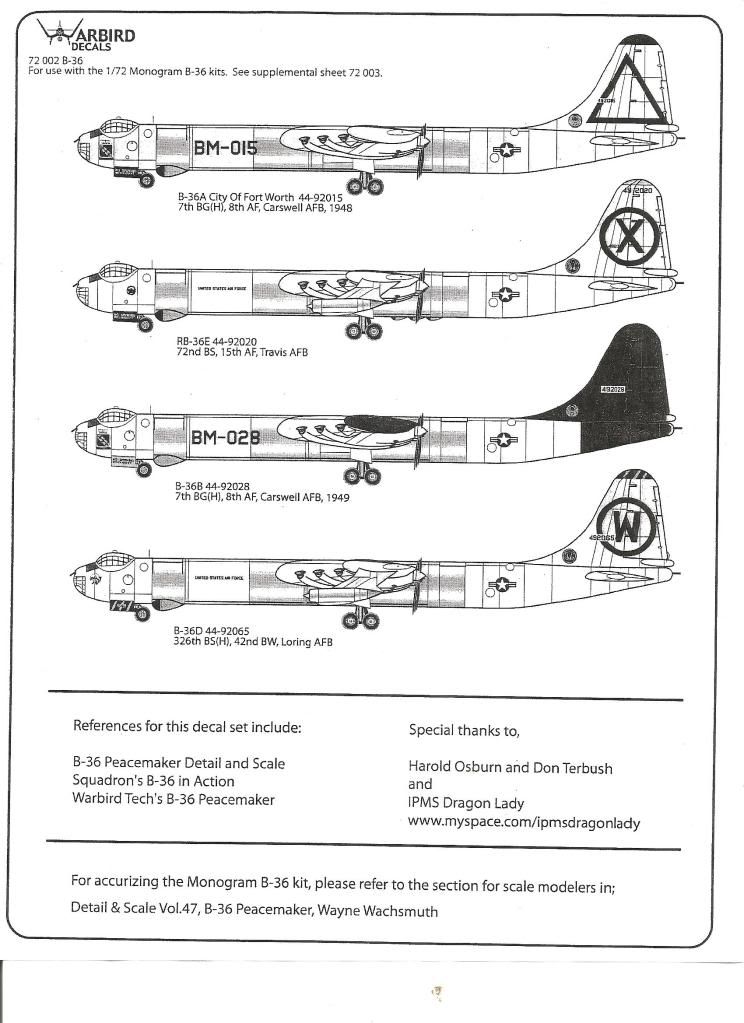
The best option if you didnt want to do very many mods is to get Sheet #72002 and do it as the 2nd build with the Circle X on the vertical stabilizer. A good color drawing of this plane is also on p.27 on the above referenced book at the top if the page.

RB-36E, 44-92020, 72nd BS, 15th AF, Travis AFB

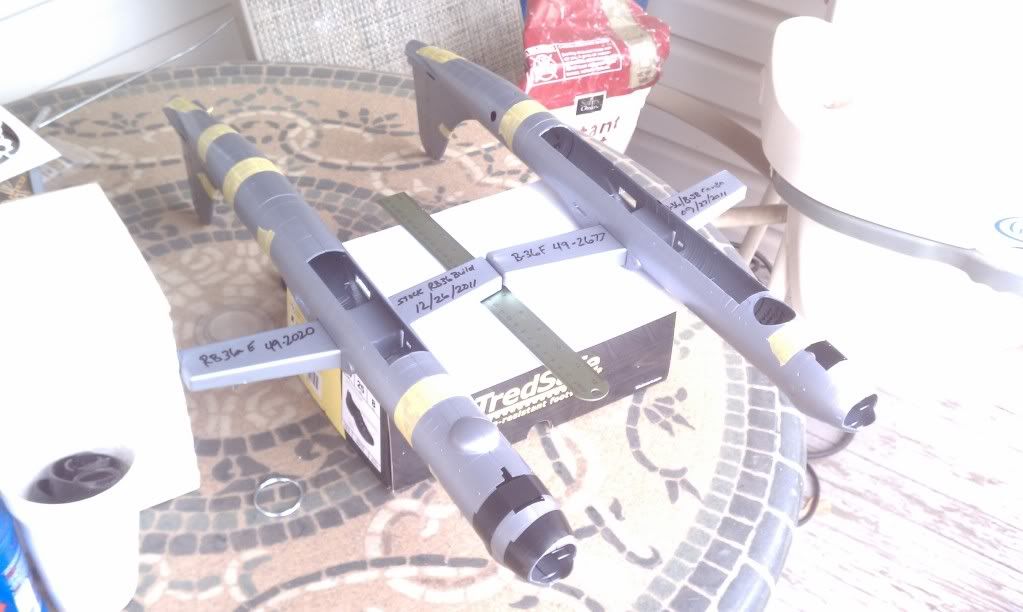
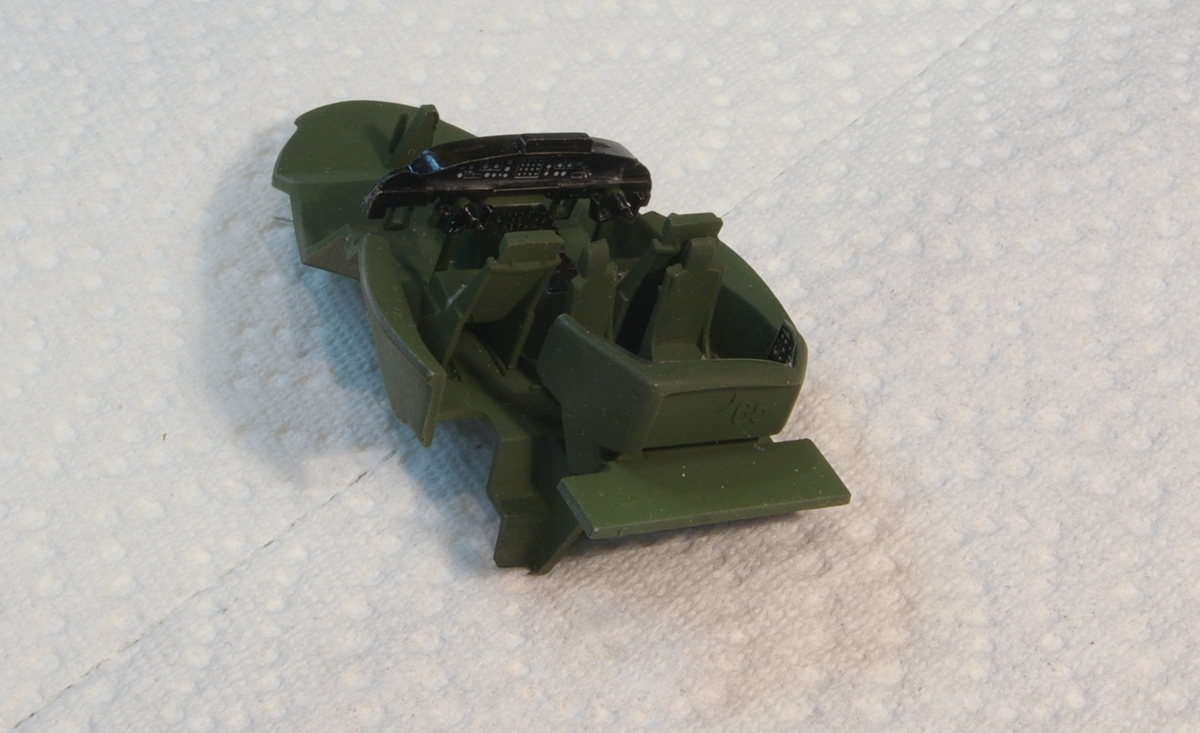
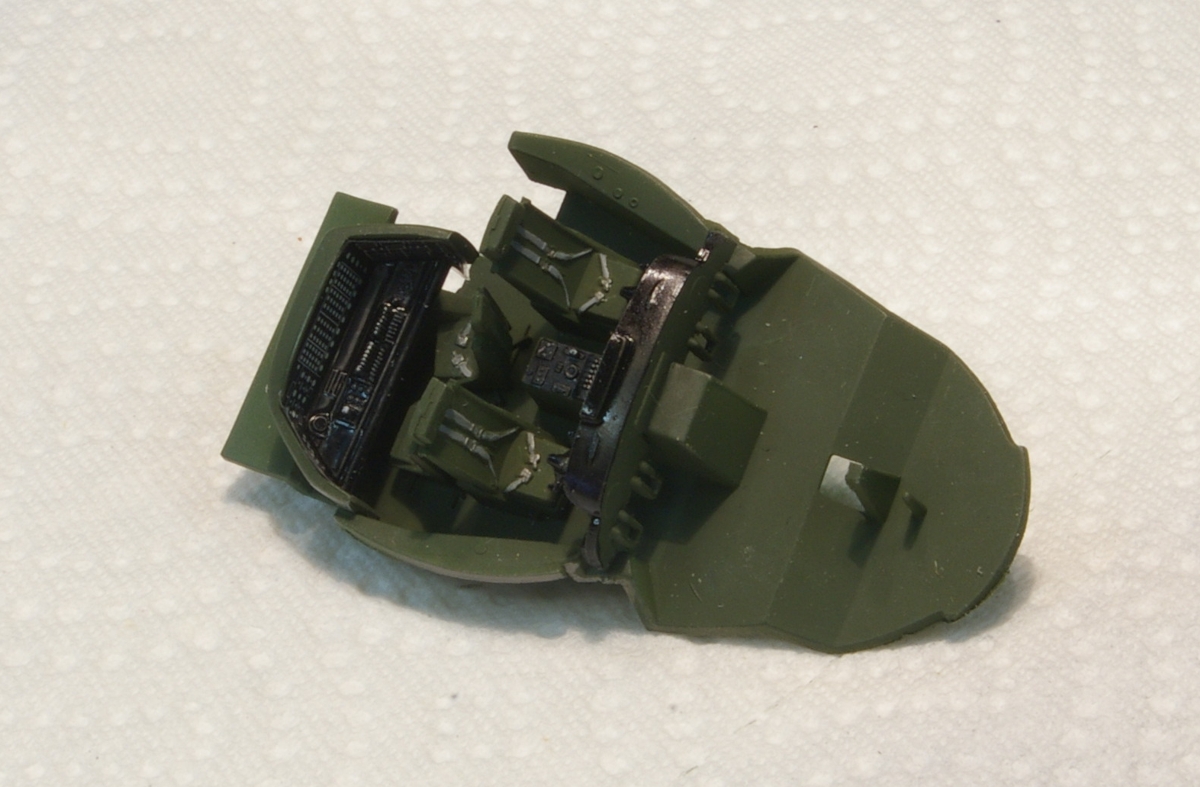
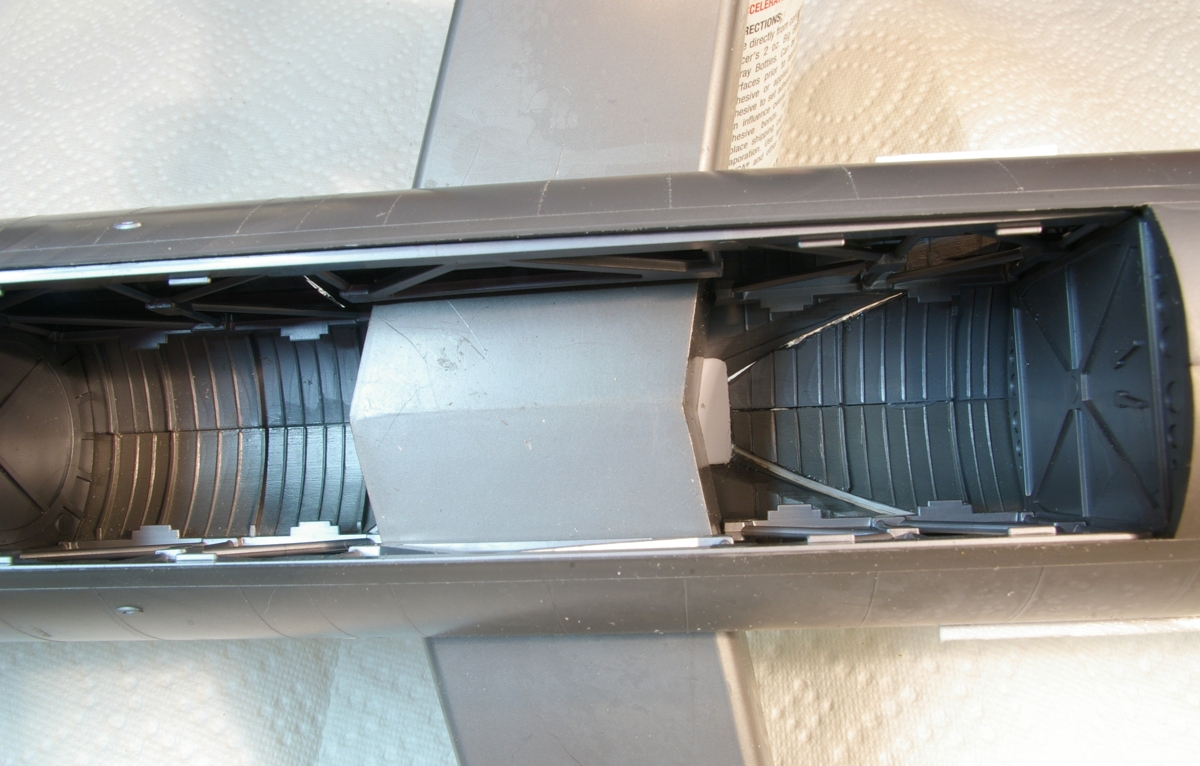
In short summary, the things that would have to be addressed to make it historically accurate are: 1. Removing one of the flight engineer stations/seats in the cockpit and doing some mods to the flight engineer panel. 2 The bomb bay should only have photo flash bombs in BB#2 and an auxiliary fuel tank in BB#3. However the lower ECMs should stay closer to the bomb bay as described in the instructions.The tank details can be seen in the youtube video below being dropped in a drop test over the ocean. 3. Build the correct tail radome 4. the two clear windows just under the small script UNITED STATES AIR FORCE ( see book drawing ). 5. The UHF antenna on the nose ( see book drawing & p.12 ). 6. the radio compass sensing antenna on the undercarriage ( see book drawing ) is mounted on the left bomb bay door just to the left of the bomb bay center line. 7. the stick ecms on the side as displayed in the drawing

http://www.youtube.com/watch?v=ethVLMyxA7M

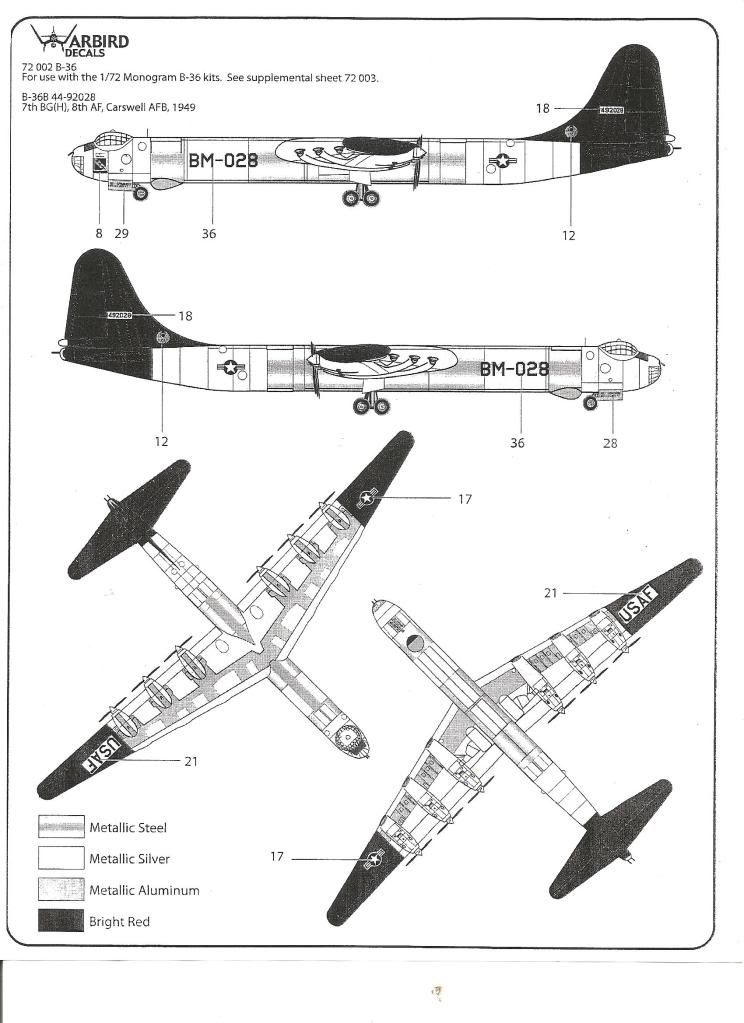
The other option on sheet #72002 that is " kid cool" due to wing emblem of a caveman riding a purple dinosaur ( that`s not Barney )carrying a bomb coiled in its tail. Last one with the circle W. This is also in the same above book as the others on P.26. Dinosaur is purple on the decal sheet, but an aqua blue in the book

B-36D, 44-92065, 326th BS(H), 42nd BW, Loring AFB.

The things that would have to be addressed to make it historically accurate are: 1. Removing one of the flight engineer stations/seats in the cockpit and doing some mods to the flight engineer panel. 2 The bomb bay should be redone as a bomber or have the lines rescribed on a closed build to show this. 3. Build the correct tail radome. 4. The UHF nose antenna as described above. 5. the stick ecm`s on the side as displayed in the drawing

That should be a good reference place to " just get started" LOL!

[:|]Thanks for the great info la! Wow, I’m not looking to do much in the way of surgery on this thing, pretty much OTB since it will be hung from my youngest son’s BR ceiling but somewhat accurate will work for me. So I guess opt #1 with bomb doors wrong and ecm’s wrong

You`re luckier than you think! - In more ways that one – and I was a little off on that one too in reguards to the bomb bay configuration

  1. That plane actually still exists and is the one currently on display at Castle Air Museum

  2. It still has the old style RB bomb bay

  3. The lower ecms were closer in like a D, but they are no longer on the craft due to being lost during the transfer from Illinois

http://www.castleairmuseum.org/convair_rb36h.html

http://www.air-and-space.com/castlb36.htm

http://www.youtube.com/watch?v=X6C22EYfSg0

http://www.flickr.com/photos/gord99/6068355088/

http://www.youtube.com/watch?v=K3bFbiV-Nx4

You could even take your son to see the plane if you wanted.

Looks like Jeaton is your new best friend [;)]

Fantastic! You are Da Peacemaker Man! [;)]

I wouldn’t go that far with it. I just live in an area where these were built so I have access to a lot of info from documents & people, have working relations with many of the book authors, have made contact with many of the model component producers, etc

And to think it was an undergraduate history project that go me started in this because it had to be something that was " World historic with local ties". lol

BTW- If you cant take your family to California to see the plane, you could always have some time with your younger son by watching " Strategic Air Command"… Or you could just show him this clip…

http://www.youtube.com/watch?v=VGjyH2ulsCk

SInce we are on the subject of B-36 building, has anyone seen decals for the 72nd Bomb Wing at Ramey? I’ve seen virtually about every other base other than Ramey.

Hopefully I`m wrong, but I think both you and I are in the same boat, and need to find someone with an ALPS printer that can print some professional grade decals.

http://www.strategic-air-command.com/aircraft/b-36/b36-deployment.htm

One of the builds I am going to do ( someday ) is the last Peacemaker which is currently on display at PIMA and was assigned to the 95th BW at Biggs AFB in ElPaso.

http://www.cowtown.net/proweb/last_one.htm

http://pimaair.org/collection-detail.php?cid=58

Ive seen the 95th decal in every possible scale but 1/72 & the size in which I need it.

I took this hi res picture:

and made this:

The only thing I need do now is find that elusive ALPS printer owner whom can print me a sheet of those in about the size of a US Dime. If anyone knows such a person please have them contact me: johntrago@gmail.com

Thanks!

Last night while working on Reasoned `s questions concerning the 2008 Monogram kit, I took mine out of the closet that I will be using on my upcoming YB-36 build in which I plan to backdate it to what it looked like when it came fresh out of the factory using the 1/72 YB-36 Conversion kit with original 110" landing gear form Click2detail.com

http://click2detail.com/products-details.php?pro_id=243

Anyways I noticed the fuselage seemed to have a little more warpage than one would come to expect - esp on the upper part. It probably was just my kit and the way it was handled/transported/stored, but anyone with an `08 kit might want to take the fuselage halves out and ensure they dry fit resonably well . Also the left upper left wing where it would connect to the fuselage had noticable warpage on my kit.

I went ahead and dry fit mine and tightly taped together the areas needing counter pressure with electrical tape. Hopefully being stored in this fashion will eliminate most of the warpage when it comes time to build.

Here are a few pics:

[^o)]

[whstl]

Ouch!

If you think that hurt, try this one:

The Tornado that made the flight line at Carswell AFB ground zero on 01 SEP 52

http://www.cowtown.net/proweb/tornado/tornado.htm

excerpt:

" On Labor Day, Monday, September 1, 1952, the 7th and 11th Bomb Wing’s fleets of bombers were parked at Carswell AFB. At 6:42 P.M. a tornado made a direct hit on the base and scattered the huge planes like they were empty milk cartons. Thankfully, most base personnel were off-base for the long Labor Day weekend and those who reported for work the next day were turned away by base security due to fear of a major fire from thousands of gallons of avgas spilled from ruptured fuel tanks. Flight operations were hurriedly transferred to other military bases and to nearby Meacham Field.

Approximately two-thirds of our bomber fleet was incapacitated that day, not by enemy action, but by a windstorm. Most of the planes were repaired and flying again in less than five weeks. "

Some pictures from my collection and others of the aftermath:

Yeah, that was a bad day for the Air Force, wasn’t it!

More work on my B-36. I wasn’t happy with having to install the prop hubs so early in the build so I modified them. I first assembled the hubs and the attaching parts. Then I ground off the flanges on the inner non-turning axle. I did it in that order to make sure I got the axles glued to the retaining bulkheads at the correct depth. Next I drilled the centers of the axles and made plastic washers so I could install screws to replace the flanges I had ground off. This allows me to install the prop hubs at the final assembly point and I can detail paint the aft cowl area and hubs at that time.

I did the cockpit assembly and painting, which I find is also best done in a different order. The seats and instrument panel can be installed after the fuselage is closed up, which will prevent knocking them loose as they stick up a bit. I don’t like to assemble the canopy to the airplane at this point, there is still too much opportunity to get dust and plastic particles in to that area, and fitting the nose cannon parts will be done later in my build order, in order to refine its shape and fit. The instrument panel really can not be fit properly until the fuselage is together anyway. The cockpit is for the H and J versions, the flight engineers station would have to be placed to face the right side of the cockpit on earlier types instead of to the rear as on the H and J. In order to get the best fit, I placed the lower floor assembly in to the fuselage halves and then glued it only to the left side, and then I did the same for the upper cockpit section. Some sanding of various edges was necessary to get everything to fit, but after a few iterations I was able to get everything arranged nicely and the fuselage halves closed up without any interference or undue force. I hate it when seams pop two weeks after you think all is well on a finished build!

I think the stock cockpit with decal panels is fine for the scale. I may do a little more weathering later on but this thing is so big it will be difficult to get close enough to it to see in there through the transparencies.

I closed up the fuselage after installing the tail turret, sighting parts and interior bulkheads. I spent several sessions gluing all the seams. There was slight warping so I used various clamps to keep things in shape as the glue dried. The silver plastic is rather hard and I did the first pass of cleanup with the back side of a #11 blade, scraping fore and aft to level the seams. After sanding with 320, 600, and 800 sanding sticks I could see some areas that needed some fill, and I used thin CA to fill those, and re-sanded. One area on the nose needed an application of cement to get rid of the last evidence, I don’t want to see a seam right in front of the cockpit!

I made a sanding bar from a piece of 1 1/2 inch black plastic pipe and sanded the inside faces of the loose wing roots to the contour of the fuselage, and fit them to the spar , with the wing panels assembled to the center section, upside down over over a wing plan view scaled up from the kit painting instructions to keep everything straight and to establish the proper dihedral.

I reinstalled the wing roots. The truss fits fine with the wing spar in the lower position, no trimming was needed there. Super glue and thin Testors glue, as well as plasticard shims were used here, taking care to keep things as clean as possible in the bomb bay area. The next adventure will be filling and sanding the wing fuselage intersection area.

Great job Jeaton!

You bring up an interesting point with the build error on the props by the manufacturer calling for installing them before attaching them to the fuselage. Chalk it up to making the kit easy for the less enthused. In order to get them in properly ( and able to spin ) you have to have the sub assemblies built into the wing before gluing the two halves together… which unfortunately means putting them together before attaching the wing to the fuselage and setting the builder up for the high probability of breaking the blades and causing uneeded interference/masking when it comes time to paint and apply decals later in the build.

In addition to Jeaton`s method there are several different other ideas around on the net on how to address this issue. They all offer different approaches to the method offered by Wayne Wachsmuth in B-36 Peacmaker in Detail & Scale on p.68

I noticed on your build that you didnt paint the bomb bay green. Does that mean you are going to do a closed door build?