Great stuff! It is a serious pleasure to see your most recent project.
This is absolutely museum/gallery quality work. I strongly recommend that you see if you can find a venue for exhibition for all of the dioramas that you have shown. I believe you would be very well appreciated.
pretty awesome stuff there vespa,as far as railings and such,check out your local welding supply you might be able to use a brazing rod and avoid the kinking altogether. cant wait to see more.those rods come in all sorts of dia. just gotta dig for it.
Things in life have been busy, but I have managed a few hours at the bench. These are update (and crappy) photos, but they give an idea of how this is coming along. I have finished construction on the three landings, got them fitted into the wall and started weathering the bricks. All comments and thoughts welcome.
Wow!! I thought for a moment I was looking at ref shots until I saw the raw brass- I love the weathering job- especially on the concrete facing (I think that’s what it is?) type work
It will be a real shame to see all of that gorgeous brass gone to the scabrous sort of paint jobs they always seem to have. Or even an honest rusting.
REally looking forward to the collections of tuving, elctrical conduit, plumbing connections, roof drains all snaked in through there. Ought to be really fun with cable/telco/electical wiring in place, too.
Handy thing about the “viewport” window, most motels use “public domain” prints, so you should have no trouble finding an example ro put on the wall
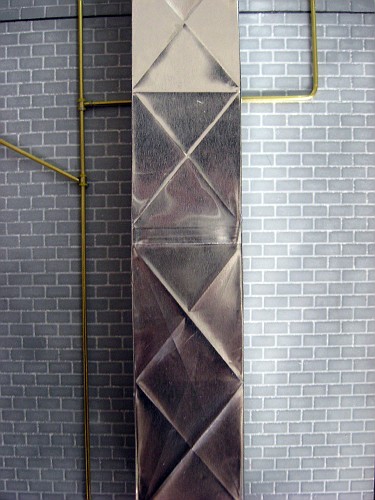
I’ve been messing around with the side wall…this will be at a right angle to the fire escapes. I’ve been trying to work out how to do ducting and this is the result of some experiments with take-out food containers. I’m getting there but not the final result. Its very much WIP.
Oh my God, Narayan–I actually sat here, and just shook my head and had to laugh–you’re like a modeling God, shrinking real items down to scale works of perfection! Really, just stupendous dedication to detail and fidelity.
IMO, this is your most impressive piece of work so far…shadow boxes is the major leauge of dioramas–not many are done well…incredible work…the strengthening ribs on the duct-work is incredible…your work is sublime…
That’s the craziest thing of all! If I had taken food containers and they wound up looking half as good as the duct work you came up with, I’d leave them be before I messed them up, yours look great- can’t wait to see their final appearance. What else did you have to do to them? Perhaps mounting brackets to the brick?
Brizio: I have a 1:1 1963 Vespa which I have had for 23 years now. No need to model one!
Doog: High praise indeed from you. I think God is in the details. When you scratchbuild, it really makes you look very hard at something and understand why it looks like it does.
Manny: Thanks v. much. I have wanted to build a box diorama since seeing the scale dinosaur ones in the Museum in Sydney when I was a kid. I think the trickiest part is going to be the lighting…will there be enough through glazing on the top, or will I need to supplement it with some LEDs. With fire escapes, the shadow on the wall is a big part of the effect. I’ll have to wait until I am almost finished before I decide.
Thanks Stern0, redleg and razor. I am glad it works for you.
PO: I need to get the corners a little neater. You can also see where I tried having a longer X in the lower two segments and pressed it flat again, but its still visible. I want to work on evening out the centre of the X in the ducting. I do also have to add horizontal T beams around the joins and wall brackets. So you can see there is still a lot of work to do.
Captain Mac: rust and peeling paint are what I want on these. Its been fun working with brass, as it gives a lot of structural integrity to what could be delicate elements.
Jim Barton: I want to hotel room look a little used and stained with pale pastel colours and water stains around the air conditioner, like you find in those chain hotel rooms.
Thanks for checking in Jim. I’ve been working on a community build with some friends, which has taken me off track (not to mention distractions in my 1:1 life). I’ve got a good head of steam up and there will be some more work in the next week or so. I’ll post pics when I have some progress.
I finally found a bit of spare time to get back to the bench and make some progress on this project (and also got my computer back from the repair shop)
I painted each of the landings and made all the ladders (railings still to come). I am going to add some glass tile windows and piping to the right side of the wall to look like the outside of a bathroom
detail of the steps
I used rattle cans from the art supply store and the wet salt masking technique which gave some nice results
I got the ductwork all together with joins between each section
And when the two walls are placed together this gives an impression of what the dio will look like. I think it is starting to take shape.
Note that the weathering is in an early stage and certainly needs work. Its still very much a WIP. Thanks for looking
“some nice results” ? More like photo realism!! [bow] Very well done- this could have been a ref. picture! Looking really nice, glad you got time to keep working on this one [tup]