7.5cm Pak 40 ~ How to Operate ~COMPLETED

<–Well, that would certainly give you fire control from the Ele. wheel in that configuration. Meaning, it probably wasn’t the same on each varriant, and the varriant i’m interested in for my build is the earliest fielded example, which{if I borrow these photos from the aformentioned source} shows a simple lanyard hanging right where I was sayin :

Here a U.S. serviceman demo’s a captured gun in Tunisia(note cacti)

Probably not going to fire it with all those rations sitting in the recoil tray, but you can see the little noose on that cord, and you can see it in that whole series of pictures in your A&A

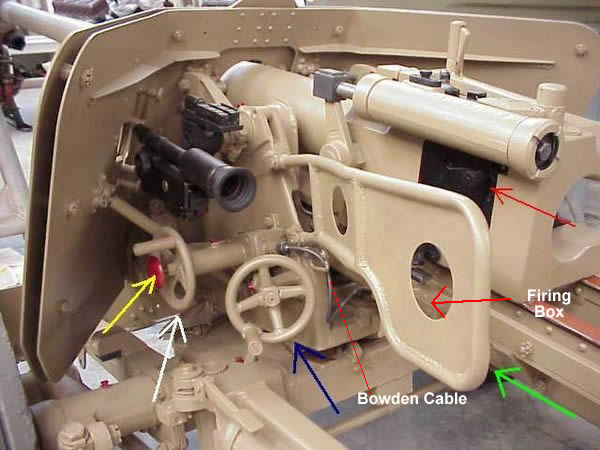
At least we agree which is the firing lever, right? It doesn’t look like a safe place to have your hand while firing the piece in anger, does it? Its my best guess that crews used a lanyard early on , and later the Pak40 came with the Bowden cable from the factory.

~And Manny…no reason that big guard can’t be both a recoil guard AND a trigger guard…right?

I really believe that little tube is the gunsight storage for 3 reasons ~ 1. It’s exactly the correct size it would need to be & 2. The process of elimination leaves only that tube. 3. Look at it’s location~~right where it can be reached to deploy.

As far as these guns left to France here~ You got me, I didn’t notice the 1st readthrough that the tube(and cap DML omits) are on these guns. Of course, thats 1945, & they are the late model Pak40, and so I’ve never seen it on any shots of early ones still, so have to guess it was later added after it became appearent it was needed,and so does’nt belong on my piece, as far as I know. ~What gets me about this photo, is the caption says the guns are being refurbished for French use, but they look like they we’re destroyed as the breeches look burnt-out. Do you suppose that damage is in the process of being reversed? Does’nt seem like it would be possible in the field to me.

~Anyway, those are my best guesses, in most cases, based on the noted sources, and plenty of others( but is yet incomplete) . I hope you find my reasoning mostly sound, but I wouldn’t be opposed to additional Info sources if someone has them.

~Brumbles ~That site seems to have a few things to check out. The Pak40 page looked suspect right off the bat ,though, as they claim that gun is a model 1940( maybe if it’s a prototype–unlikely–and they would certainly mention that !)it has the late-model wheels(sure it could be cobled together(not a good reference if so) and most of all it’s got a Pak38 type muzzle break, so I’m not sure what it is. I will maybe take another look. See what you guys think of it.

Ok…Indy Out!

Hi Indy: I still assert that the string on the Tunisian captured Pak is just an errant piece of detrius. Look at the photos carefully. They don’t connect to anything on the breech itself. In my exam of the photo, the one end is just frayed and sits near the breech block’s left plate. It’s certainly not attached. And this noosed string is ONLY in the pictures that single Tunisian gun – not with any of the other dozen or so pics in the article (nor in any other pic of a Pak 40 I have on my hard drive or in other books I have).

And if it did, the recoil of the breech would yank the taught lanyard out of the gunner’s hand, right? Remember, on other arty pieces that did use a lanyard (think heavy artillery like the 15cm Howitzer), the lanyard attached to a key that was actually pulled out to fire the round and replaced to fire it again.

No lanyards exist on the 3.7cm Pak 36/37 or 5cm Pak 38, both pieces which were fielded before the 7.5cm Pak 40.

Logic would dictate this. A PAK is almost like firing a rifle at a moving target. The gunner must have precise gun traverse, elevation and triggering. Remember that the sights would allow the gunner to place the shell into turret rings, view ports, specific areas of the engine, etc.

Best of luck on your ongoing project!

The arrangement of the firing control was standard on all Pak 40s. They didn’t change just because it was mounted on the Marder. When the Pak 40 was mounted into different vehicles the /2, /3, /4 etc. designation was used only in regards to the mount base they were fitted to…but the gun itself remained unchanged. I agree with Roy, the rope that you see in those pics isn’t a lanyard…in fact, if you examine it closely the piece of rope is tied to the recoil guard, but isn’t tied to the exposed breech…it isn’t tied to anything else in fact. The 2nd pic on p. 63 also shows a piece of rope, but it too doesn’t connect up in the way it should to fit the pull lanyard theory.

No, I don’t think we do agree on where the firing lever is. You want to place it on the portion of the breech block that extends out and that’s not where it’s actually located. The firing lever is located on the recoil tray itself and is what the Bowden cable connects up to from the elevation wheel. As Roy points out, this is a long-standing design in German Pak guns throughout WW2 and there’s no evidence that I’m aware of that it changed on the Pak 40.

Not disputing this one with you at all. [;)]

I think it’s entirely plausible that it wasn’t present on earlier Pak 40s and got added as a feature later. Many things changed over the life of the production from the muzzle brakes to the wheel types so adding a container/case to that side of the gun shield could equally have come into use at some point. Regarding your question about the guns on p. 69, if you re-read the caption it says “These guns, pictured on Feb. 1, 1945, have been cleaned and repaired in anticipation of their turnover to the French near St. Nazaire. The French, as well as other nations, used the PaK 40 well beyond the end of WWII.” The breeches aren’t burnt out, they are in fact just really clean…these areas weren’t painted and were bare metal and the angle of the lighting relative to the camera puts them in shadow…making them look dark instead of bright. There’s nothing to suggest that the guns are damaged, they actually look to be in very good condition especially the tires which have hardly any wear on them.

So far you’ve only noted one source. I’m not trying to be dogmatic or argumentative here as sources can be wrong depending and the last thing I want to do is continue to perpetuate potentially false information. Can you share what other sources you’re drawing on for the lanyard and firing lever theory? I don’t think any of your other conclusions are in disupte at this time. [:)]

~ Guys, thanks for the continued debate . The reason I posed the question “where is the firing mechanism on the Pak 40” was because even though I’ve seen many examples of what the Pak40 looks like, I needed to know this one thing, related to how I am going to model the gun. Honestly I’m not an expert on these, or any other cannons you wanna name, You guys know lots more about all of them , I’m sure… but when I see the picture on the top right page 72 of that A&A issue, it indicates :

“Beneath the spring cylinder of the ejector mechanism on the right side of the breech can be seen the safe and fire levers.”(actually it doesn’t say which is which) but my red arrow points to the spot they indicate

So is The “right” side on a gun is the right side when looking down the muzzle? Or is this the left side were looking at? Any way you slice it it looks alot different than the “fire lever” inticated for the Marder in Nuts & Bolts

That is like ya say, Bill, down on the recoil tray, and no doubt cable controlled, but it’s different than what is shown on page 72 of that A&A, so that’s why I brought this all up. No I don’t have another source regarding the lanyard, and it’s plain to see that cord isn’t tied to the fire lever ~ but it would be simple to place that loop on the lever (especially if the Bowden cable was indeed a later developement.)

~I’d like to take you guys at your word… but I’d rather see one of these things fired( preferably an early one ), and see the gunners technique. I did see one fired in a Utube vid, but these details weren’t decernable. New info still welcome…and Thanks

all photos for discussion purposes only

OK…it’s time for a real artillery person to step in…

First, the right and left of a weapon is looking from the muzzle to the rear thus your sight and handwheels are on the RIGHT side.

Second, the infamous question of the lanyard. All artillery is NOT the same. Real artillery most times, especially in larger size has a lanyard. On the other hand…AT Artillery is a Direct Fire Weapon. The elbow telscope (or sight to non-artillery people) would be put on the target by the gunner using the elevating and travarsing hand wheels. Next he would fire…in the case of most AT weapons they would have a firing handle or button. He would then quickly look through the sight and if the shot missed, use the retical pattern in the telescope to make an adjustment.

Sooo…from what I have seen AT artillery DO Not nomally have lanyards.

In the picture above the red button on the elevating handwheel is most likely the firing button. The silver hose coming from the stem of the elevating handwheel and going to the recoil sled is most lilke a hydraluic tube to “rod or stem” which would actuate the trigger in the breech block.

The safe lever is actually on the breech block and would directly lock the firing pin so even if the firing button were pressed…nothing would happen

Now the lever you are showing in the other photo may be a slightly different configuration of the same thing. The same rod or stem might be manually actuated by pushing up or down on the lever. The hole may have been where a handle should reside.

Now…why not a lanyard…The main purpose of the lanyard is to allow the crew to be away from the firing weapon. In Field Artillery…when you are firing a 100 pound projectile with 60 lbs of powder 30 km…you don’t want to be near the recoil.

For AT artillery they are smaller projos and the crew need to be near the tube for quick loading and sighting the target. They tend to use the same firing mechanism as a tank gun.

Lastly the storage tube…this would make sense for sight storage as when the weapon is towed, normally the sights are off the gun in a safe place as the are delicate. Having on carrige storage near the gunners position makes sense. You will see many towed artillery weapons with on carriage sight storage chests.

SOOOOOOO…In conclusion…we now know our right from our left…and somewhat understand the difference between AT Artillery and Field Artillery.

Hopefully that helps you Indy?? If not…PM me

Rounds Complete!!

Indy,

You don’t have to take us at our word…the evidence speaks for itself. The arrangement of the Bowden cable, firing box, etc. was a standard layout on the Pak 40 throughout it’s lifespan. It wasn’t something that was introduced later on…it was always there, just like it was on its predecessors the Pak 35/36 and the Pak 38. [;)] See below…while I know it’s a line drawing, it’s the clearest way to see what I’m talking about.

You can see the same box peeking through the lightening hole in the recoil guard in the pic you posted earlier. That also clearly shows the Bowden cable connection which in turn leads to the button on the elevation gear. This was a standard arrrangement on EVERY Pak 40, regardless of whether it was towed, self-propelled, etc.

Sometimes captions aren’t so clear…and terminology can often get confused. For example, in this photo and caption from Nuts & Bolts #18 on the Marder III H…they call it the “ignition box” and the “ignition button”…but that’s more a factor of the captions were first written in German and then translated to English. Also, this pic is much better than the one I first posted as it actually shows the Bowden cable connected up and my first attempt at labels wasn’t quite accurate in terms of their actual position…my apologies for that error.

As for seeing one of these fired…look around on YouTube, you might be able to locate a video of a re-enacting group operating one if you hunt hard enough. In-action film from WW2 invariably shows the gunner in position (as Mike mentions, he had to be able to watch the round going downfield to adjust fire) when the gun is being fired and he also obscures that whole side of the gun…but you won’t see the dramatic lanyard pull of Hollywood because that’s just not how the gun was fired. [;)]

~Redleg ~ Thanks for your imput. You are truely a (mostly post WWII) artillery guy, Yes? All good info there, although nothing exactly specific to the 75mm Pak40.

Well, I must agree the Pak 40 was a natural progression of, and very similar to the Pak38. It’s easy to see that, and although this is the Pak38 here…it’s the most definitive thing I’ve found…

| [Figure 64. 5-cm Pak 38.] |
| - |
| Figure 64.-5-cm Pak 38. |

(2) c. How to Operate

(1) Safety.-There are three mechanical arrangements which operate as safety devices: (1) unless the breechblock is properly closed, the safety plunger will not enter its recess and the gun cannot be fired; (2) the safety plunger must be in its recess in the lower face of the breech ring before the firing shaft can be rotated; (3) the breech cannot be opened if the striker is not cocked, because the firing shaft is engaged with the safety plunger, which is in its recess.

(2) To load and fire.-To open the breech by hand, recock the firing mechanism by turning the safe-and-fire lever to sicher (“safe”) (fig. 66) and pushing it forward again; then turn the breech-mechanism lever in a clockwise direction. The breech will then be held in the open position by the extractors.

To load the gun, insert a round smartly. The round will then release the extractors, and the breech will close automatically.

To fire the gun,(1) press the push button in the middle of the elevating handwheel . If this fails, (2)pull the firing lever backward or (3)lift the plunger. *

A semi-automatic action operates when the plunger in the center of the front end of the spring case is pressed in and turned so that the word ein (“in”) shows upward. When the plunger is set in this position, the breech is opened automatically during the counterrecoil. The gun is always recocked automatically during recoil. The breech is ready to close automatically when a round is slammed in.

  • ok, I believe the evidence now, thanks for sticking with it(& me). designed to be fired by that button on the elevation wheel(you were right) FAILING that, it’s fired by that lever my red arrow pointed at(I was right about that part).OR lift up on the plunger it says here. (nothing about a lanyard(I got that wrong)I noticed that fire lever your photo points at has a steel loop on it(making me wonder if a cord could be tied there if the Bowden cable wore out/ failed,ect… but nevermind…speculation again. Thanks again guys"

[Figure 69. Breechblock of 5-cm Pak.]Very good details of the use of the Pak 38 at this site

http://www.lonesentry.com/manuals/german-infantry-weapons/index.html

In fact ~~great Intel. to be found there on lots of weapons–Bookmarked!

Yes , I’ve seen a number of videos, but none reveal the details of triggering of the round. Put Pak 40 in the YouTube search to find a few

http://www.youtube.com/watch?v=1UxDMU1iZUI

Thnx for your persistence Indy. You’ve added to my knowledge about the finer details of the firing mechanisms. Nice find with the lonesentry info.

Probably one of the best descriptions of the semi-automatic functioning of the AT breech and block that I’ve seen in a while Indy, lonesentry is indeed a great site and I’ve added this particular page to my bookmarks as well in the event this discussion pops up again in the near future. The info on the Pak 35/36 was also very interesting! [tup] [tup]

~You are welcome & again, thank you. This was one of stiffer research challenges of my current build ~ That’s why I came here.

Bill wrote :~Probably one of the best descriptions of the semi-automatic functioning of the AT breech and block that I’ve seen in a while Indy, lonesentry is indeed a great site and I’ve added this particular page to my bookmarks as well in the event this discussion pops up again in the near future. The info on the Pak 35/36 was also very interesting!

~ Yes~ Top-Notch website~ Anyone building anything with vintage weapons has got to have that site bookmarked! It might keep us from scratching eachothers eyes out over the details nexttime![8D]

~ROUNDS COMPLETE~

No scratching unless you have an itch for detail…this is a great example of the group working togeather and everyone getting something out if it. Very nice site and nice job sharing

Rounds Complete!!..[tup]

Mark as target 101…German Weapons

But with research for details on models…it is never EOM (End of Mission)…[;)]

~Yeah, we’ll consider this one a success ! Ok back to the bench…Cya~

I just tripped over this, what an amazing display of dogged determination, civility, and cooperation to arrive at the answer to a question. I have not read every word yet, but this is a pretty convincing testimonial to the fact that I could have struggled ofr 10 lifetimes in the pre-internet world and NEVER would be able to learn what I have learned in about a year online regarding every aspect of modeling.

Nice workm Redleg, Bill, Indy and everyone who contributed to this thread, which I hereby move to be designated “epic.”

Thank you greatly for that Bill—and for seeing that though the process is sometimes dicey, there’s plenty to be gained by it. I was proud to part of an effort in strength, focused on target, and devoid of fluff.

I’m just now putting together the elements of this Dio, still a current W.i.P. here—> ~“Clash in Tunisia”~

Painting The 7.5 cm Pak 40

~Yes… it’s been a while…
~Not wanting to worry about the finish on the fieldgun as I moved it around quite alot during the base-build, I saved painting and weathering it until now.

http://www.militarymodelling.com/sites/1/images/member_albums/41116/aapak1.jpg

I had it completely assembled, base-coated with Tamiya TS-46 Light Sand & a few coats of Future applied.

To get some interesting camoflage into the scene, I’m going to portray a Tropin two-color Camo of a gun likely headed originally to the nearby Mediterranean, that was diverted to defend a not-quite-overwith Axis presence in Tunisia.

!http://www.militarymodelling.com/sites/1/images/member_albums/41116/aapak2.jpg
Above I’ve masked-off the sand-coloured stripes using the Liquetex Liuid masking Fluid again(I was considering using the popular silly putty method, but with all the delicate little parts on this piece I wasn’t sure about that stuff, I just have more experience / confidence in the latex. To continue with my norm( of trying to show how to do some common things a bit differently ) I began by spraying a much lighter, brighter color 1st, This color was a mix of Tamiya XF-58 Olive Green, XF-57 Buff & alcohol

!http://www.militarymodelling.com/sites/1/images/member_albums/41116/aapak3.jpg

~~And then misted on a darker blue-green like that seen in my reference, made of a mix of Tamiya XF-18 Medium Blue &XF-52 Olive green

!http://www.militarymodelling.com/sites/1/images/member_albums/41116/aapak4.jpg

The paints we’re lightly applied to avoid build-up along the mask

!http://www.militarymodelling.com/sites/1/images/member_albums/41116/aapak5.jpg

~Although the green is a pretty close match–the sand color I used is alot more lively than seen in the reference shot–(which shows more of a grey-biege, but it looked a bit sickly with my groundwork colours in trials and I took some liberties to tweek it a bit–)-still, it does get a bit closer after weathering.

http://www.militarymodelling.com/sites/1/images/member_albums/41116/aapak6.jpg

Weathering included first and over-all glaze of Pollyscale clear gloss mixed with a small amount of both Tamiya Buff & Deck Tan to unify the camo and represent some old road dust too. After drying several hours this was followed with a gritty-looking dark wash of Floquil Engine Black & Tuscan. This brought out some small details and imparted a grimy look.

http://www.militarymodelling.com/sites/1/images/member_albums/41116/aaapak406.jpg

Above It’s very close, I’m just applying some final touches with pigment powders, and picking-out some detail items with Tamiya paints. The Tires(painted seperately) where drybrushed with Floquil paints in the same way you saw on the Kubelwagon, and the treads loaded with sand by way of a sludge-wash. A few other details we’re dealt with in ways consistaint with those earlier in my blog.
Since this fieldpiece is supposed to be only around a month old in the story my Dio tells, there is minimal scratches, no rust or missing parts,(like most of what I build [:P]) but there is a great deal of dust & grime.

~More pictures to follow~~~~

[http://www.militarymodelling.com/sites/1/images/member_albums/41116/aaapak401.jpg

](http://www.militarymodelling.com/sites/1/images/member_albums/41116/aaapak401.jpg)

Some more images of the completed Pak 40

[http://www.militarymodelling.com/sites/1/images/member_albums/41116/aaapak402.jpg

](http://www.militarymodelling.com/sites/1/images/member_albums/41116/aaapak402.jpg)

[http://www.militarymodelling.com/sites/1/images/member_albums/41116/aaapak403.jpg

](http://www.militarymodelling.com/sites/1/images/member_albums/41116/aaapak403.jpg)

Bare steel areas depicted with my old favorite mixes of Testors Enamels, Steel, Bright Silver, & Black thinned with white spirits

[http://www.militarymodelling.com/sites/1/images/member_albums/41116/aaapak404.jpg

](http://www.militarymodelling.com/sites/1/images/member_albums/41116/aaapak404.jpg)

Very minimal paint scratches hand painted with Vallejo Camo Black Brown and a very fine liner brush.

[http://www.militarymodelling.com/sites/1/images/member_albums/41116/aaapak405.jpg

](http://www.militarymodelling.com/sites/1/images/member_albums/41116/aaapak405.jpg)

A light misting with Tamiya TS-80 Flat Clear and it’s finished.

[http://www.militarymodelling.com/sites/1/images/member_albums/41116/aaapak406.jpg

](http://www.militarymodelling.com/sites/1/images/member_albums/41116/aaapak406.jpg)

I did take some liberties with the colors as seen here, but I think the over-all look is still right, considering I’m dipicting frairly fresh paint-plastered with dust–and the look on the Dio (not showing yet !http://www.militarymodelling.com/CuteEditor_Files/Images/emsad.gif) seems to be very good

!http://www.militarymodelling.com/sites/1/images/member_albums/41116/pak401.jpg

This Pak 40 was completed for my current W.I.P. , a larger Dio project, and for anyone not already following the build, here’s a link to it ~ ! Clash in Tunisia ! ~

Looks really cool Indy. Always liked the Pak 40.

Very cool, that looks great Indy!

Nice job overall. I especially like the wear work on the recoil sled and around the breech.

Rounds Complete!!

Guys

Thanks, I appreciate you letting me know I’m on target!

Click to get more.

That;s a nice looking piece, Indy–quite a ling way from the old Testor’s kit! The detailing looks incredible.

Nice paint on it, too!