I’ve been itching to build the Tamiya P-51 B for quite some time and I have the kit in the RAF Mustang III boxing. I’ve been looking for Bill Overstreet’s 357th FG mount, named “Berlin Express” for even longer. I’ve always been captivated by this story where Overstreet reportedly chased an ME 109 under the Eiffel Tower and then shot it down. This is how Overstreet tells the story:
“I had followed this 109 from the bombers when most of the German fighters left. We had a running dogfight and I got some hits about 1500 feet, He then led me over Paris where Many guns were aimed at me. As soon as he was disabled, I ducked down just over the river (smaller target for the Germans ). Followed the river until I was away from Paris.” - Bill
This incident has never been confirmed and since Overstreet’s only ME 109 claim reportedly came on July 29th, 1944, it’s believed it likely took place on that date. Anyways, I recently found Aeromaster sheet #48-288 “Mustangs Forever Pt. II” on E-bay and armed with a Verlinden cockpit set, I’m ready to dive in. I may add some Ultracast goodies as well.
Now I have to figure out how to paint white wall tires…ugh!
I have been using a circle template to paint them on the small tail wheel of the 190’s I am working on. I usually paint the tire color, the the white wall color, then the hub color. Seems to work pretty good, hardest part is getting the template centered. Can’t wait to see how this one turns out!
I hope someone can verify this for me but I could have sworn that there was an aftermarket set of decals that actually had the white sidewalls on them for those Mustang tires. Does this sound familiar to anyone else?
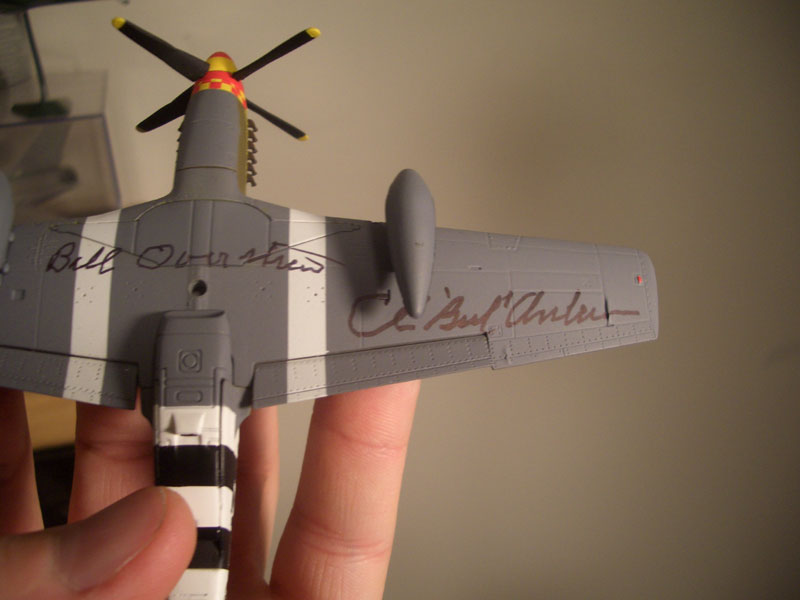
I met Mr. Overstreet at an airshow about 5 years ago, and he confirmed the Eiffel Tower story to me personally. He and Bud Anderson signed a metal 1/72 357th P-51B that I had bought early that day.
Awesome IL!.. I have one of Anderson’s “Old Crow” mounts too. Of the Mustang groups, I’d have to say the 357th is my favorite with the 4th taking a close second. Anyways, I got some cockpit work in last night. The Verlinden set is nicely detailed, especially the sidewalls and the seat. I ground down the sidewalls, both kit and resin, and superglued the resin in.
Everything was painted XF-1 Flat Black for a shadow effect then I came up with my own version of Interior Green. I cut XF-4 Yellow Green with XF-58 Olive Green. I then added a drop of XF-49 Khaki to brown it up slightly and dusted it on. The fuel tank on the P-51 had a rubber coating, so I simulated this with XF-63 German Gray. The small details were hand painted in. After a Testor’s Gloss Coat, all got a Detailer Wash then the Testor’s Dull Coat. This is one night’s worth of work (the IP still needs a dull coat and I may add expoxy lenses).
A few words about the floor. Like the kit part, the Verlinden floor is incorrect. Merlin powered P-51s had a flat wooden floor. I was going to add a flat floor, but the Verlinden floor was very nicely detailed. I ultimately decided to use “smoke and mirrors” (my term for artist licensing) and just paint it to look like wood. I reasoned that nobody would notice or much less care anyways. At any rate, I mixed XF-49 Khaki and XF-64 Red Brown. I used a flat brush and painted it from front to back to sort of simulate the wood grain. It was moot and you can’t really tell. I have since read that the floor was usually covered in a black non-slip surface…Doh! Well, at least this looks better
Next I have to figure out how to get all of this tucked into the fuselage. Stay tuned…
Very nice looking office! Glad to see the Verlinden cockpit set is good as I have this in my stash as well. I like the look of the wood grain better than black even if it might not be correct.
Joe, with that curved wing floor (which is wrong for the B) you have the opportunity to make a very accurate floor. You would just need to take some sheet styrene, shape it to fit, sand it for a wood grain, paint the verlinden floor chromate yellow or green, and over lay the wing with the wood just like a real plane.
Thanks for the kind words. Yes…practice does help, however, its also a matter of finding a technique(s) that works for you. I have a lengthy turorial in here somewhere on how I do my cockpits. I think its in one of the group builds. I’ll see if I can find it and post the link. Shipwreck, thanks for the suggestion, but as I said, I decided to fudge it on this build. Maybe next time if I get some good reference pics of the B floor. Anyhoo, I was able to get the Verlinden pit shoe-horned in without too much difficulty. I decided to use the kit fuel tank, radio deck which I glue in place first. Verlinden provided a strand on copper wire which I assume is for the radio wiring. I painted it black and used pieces of it to spruce it up a bit.
A test fit of the fuselage did not reveal any issues since I thinned down the resin considerably.
As we can see, you can’t tell the floor is curved because the seat is in the way, so adding another floor seemed like a moot point, at least to me.
Preliminary test fit of the airframe was flawless. I built one of these about 10 years ago and I guess I forgot how painless it was.
Thanks for the compliments. Steve, I use a Thayer Chandler Omni 4000 which is a double action gravity fed airbrush. I like it because it has a nice sized cup with lid and it only needs one needle for everything. I need the lid…trust me…
My compressor is a Silentaire Scorpion II which is an extremely touchy subject with me, but since you asked (LOL). Its nice when it’s working properly, but that is getting rare. I’m on my second one. My first one just stopped working one day and I chalked it up to age. This new one is now starting to have problems with the auto shut off. It just runs and runs and I usually have to manually shut it off. Of course the problems with the new one started just outside of the warranty period and Silentaire is unfortunately lacking in the customer service area. They told me to ship it back (on my dime) for repairs, but cautioned that any further damage I would have to be responsible for…well laddy friggin’ da!. I even told them this was the second one I’ve had problems with. I don’t know, since I’ve dumped almost $500.00 into their company you would think they would comp me a new one…thats a big negative. Silentaire got their last dime from me… Thanks but no thanks. I will perhaps look at other brands with similar features now.
Now that I’m done ranting, I got some more work done last night. One of the weaknesses of the Tamiya P-51, both B and D (IMO) is the radiator intake/exhaust fuselage seam. I hate it. It goes right through the detail in this area so it requires alot of sanding and rescribing…(I know…cry me river…real modeling skill required). Anyways, I have a way to sort of deal with it and get acceptable results. I tape off around the seam to save as much detail as possible then sand the seam out. I then rescribe the lost panel lines. Here’s were I change it up a bit. I always lose two engraved panels (boxes) in this process, a square with a circle in the middle and triangle with 4 rivet holes ). My solution? I merely go back and replace them with thin Evergreen sheet styrene glued onto the surface to replicate the lost detail (see pic below). It’s obviously not that accurate but it looks a heck of alot better than before. Also, the little vent at the back got a styrere blanking plate to hide the seam which is hard to sand out.
Now after primer (I’m please with how this area looks now)…
Overstreet’s P-51 was apparently Olive Drab or maybe RAF Dark Green over Natural metal. I want to portray it at the time of the Eiffel tower incident which was likely at the end of June, therefore, its reasonable to think it only had partial invasion stripes at that point. I also remember reading that the plane was eventually fitted with the Malcomb hood, but I don’t know when. I suppose I have some decisions to make. I did find the following information over at Bud Anderson’s website which I will use as a partial roadmap. I have a feeling this turkey will be getting a healthy dose of artistic licensing but I will keep digging.
Other than what I already mentioned, the frame was a breeze. I did however find that upper engine panel was a tad undersized and left slight step on top. i decided not to mess with it. I’m ready for primer.
It was primed with Alclad Grey Micro filler and the seams were checked. This is my go-to primer for just about everything. I did drill out the 50 cals instead of replacing them on this one. i guess I was being lazy.
I then gave the frame a coat of Alclad Duraluminum as the base shade. Here’s where I left off until I can figure out what i’m going to do reference the invasion stripes and such…
Thanks for the info on your airbrush/compressor set up. My compressor died in the middle of painting the other night. It seems to work today, but now I’m worried it won’t last. I’m definitely looking to upgrade both the AB and compressor. The Thayer & Chandler looks like a nice litte AB - right now I’m using a Badger 150 and old Testors compressor.
Sorry to hear about your compressor issue with Silentaire and their lack of customer service - I’ll stay away from them. I know what you need about needing a lid on your color cup - my Badger doesn’t have a lid so I end up partially covering it with a piece of tape.
I like your P-51 and your solution to the radiator intake area - very simple and looks great! The Alclad looks really good too - can’t wait to see more.
No problem Steve. You should look into the Omni 4000. Its a nice brush for a shade under $90.00 at DixieArt.com. I’ve seen them on E-bay even cheaper. Reference the compressor, I’ve been eyeing this (the one on the left) http://dixieart.com/Sparmax_Compressors.html because I like the dettached trap/regulator as on my Scorpion II. I’ve also been looking at Passche compressors too. Also, thanks for the kind words.
Brief update. I had a taping marathon earlier today. I decided to paint in the red and yellow 357th FG checkered nose instead of using the supplied decals. I did this on my two previous 357th FG P-51s and I liked the results. I started by painting the section ahead of the exhaust XF-3 Flat Yellow with a smidgen of XF-7 Flat Red thusly…
:
I cut out one of the squares (checkers) on the decal to use as a guide and I used Tamiya tape around the nose. Some were tapered slightly to fit the contour of the nose. This was easier than it looks.
The nose and prop hub were then sprayed XF-7.
Tape removed…viola. Decals?..we don’t need no stinkin’ decals!
I have a tried to paint in the prop stripe in the past without success. It always comes out lopsided and crooked. Fortunately I have an old Aeromaster sheet that supplies prop stripe as a decal. I’ll add that at the decaling stage.
I sprayed XF-2 Flat White on the wings and fuselage then taped off the invasion stripes, which are 3/8th of an inch wide in 1/48 scale. I still don’t know if I will duplicate the plane on D-day or later. Right now I’m leaning towards a D-Day plane.
Sweet looking paint! Definitely like the checkers and invasion stripes painted in place of the decals! That Sparmax compressor is the same one that I’ve been looking at.
Thanks Steve and Reasoned. Steve, perhaps you can get that compressor and then tell me how you like it.
I’m in for another update. I had some free time today so I got some painting in. The profie on the Aeromaster decal sheet and on Bud Anderson’s website both call for an upper surface in “Dark Olive Drab”. I’m not sure if they mean normal Olive Drab or possibly RAF Dark Green, since alot of 357th planes had this color field applied to their NMF birds. My research revealed nothing. Actually, I’ve found very little about this plane. I ultimately went with Gunze Olive Drab and sprayed the upper fuselage and wings. I cut it with XF-57 and did some streaking.
The OD was then taped off and I re-sprayed Alclad Duraluminum on the lower surface and sides. I used a dusting coat until it was covered. I then taped off some of the fuselage panels and sprayed some Dark Aluminum and Matte Aluminum. Man this thing took alot of Tamiya tape…