Mark - Glad you are enjoying and learning. Part of doing a blog is teaching. Enjoy and always feel free to ask questions
Bill - Thanks, I will admit it was the most comfortable vehicle in the field. With all the gear on you did not fit real well in a “bucket” seat. It was an oddity.
No that I think about it I think our Chief had one of those bucket seats in our M998. Don’t ask me how or where he got it from. It always did look funny compared to the other seats Mark
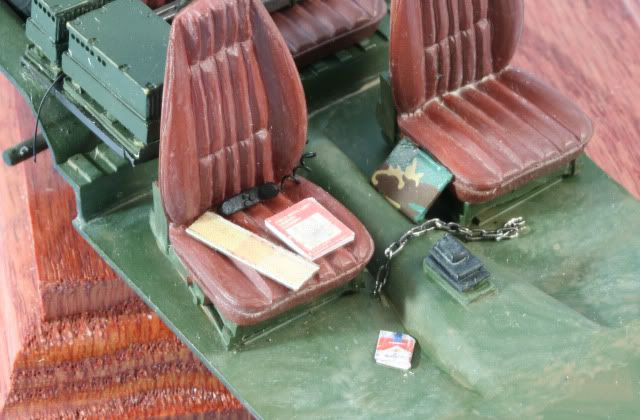
Ok, I was able to get some details done over the holiday. First, you cannot go anywhere with a military vehicle without your vehicle logbook. The logbook is on the floor next to the driver seat. The logbook is .020 styrene covered with Sungumini BDU camouflage decal.
Next is the chain welded to the floor to lock the steering wheel. I used chain from Michaels painted with Alclad Steel.
On the passenger seat is the “pork chop” or radio microphone. This is from the Pro Art radio set. The microphone wire is 26 gauge SS wire, coiled and painted flat black. Now as the Assistant S-3 of an artillery battalion, I was the Fire Direction Officer, responsible for coordination all of the battalion firing. The manual that covers all artillery fire direction is FM-6-40. A copy of the early 1980s version is on the front seat. Photo of the real manual shrunk down to 1/35, printed and glued to .020 styrene. Next to the manual is a Graphical Firing Table, which is like a slide ruler to calculate firing data. Produced the same way as the manual except I used .010 styrene (yes….I do have the real items to photo). Lastly, the sign of the times, the empty pack of Marlboro on the floor….long day.
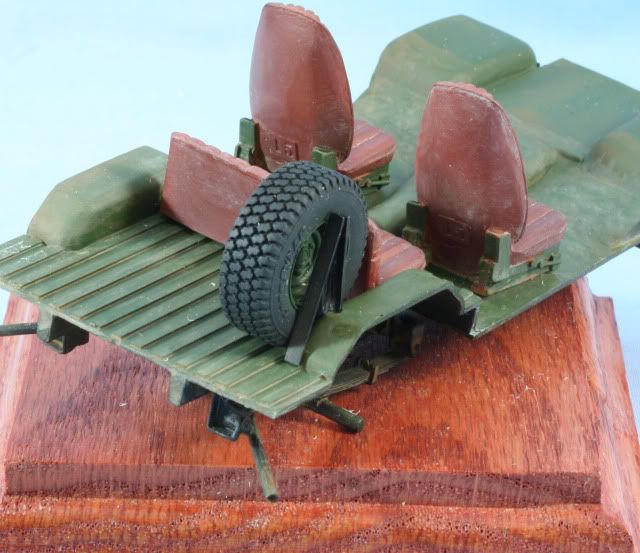
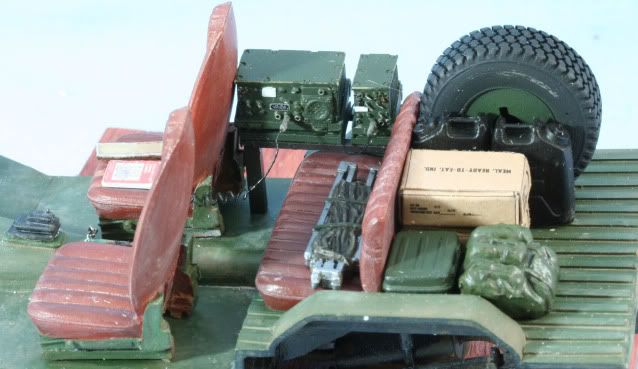
I had a buddy make me a copy of the rear tire, as the kit does not come with a spare, (thanks S.R.) which on the M1009 has a spare stored in the rear. The tire is painted with tire mix of 50/50 Flat and NATO black, the rim is NATO Green. The mount is made from .030 styrene angle painted flat black.
The back seat has the radio mounted. The mount is supported by .030 angle painted with Alclad Steel. The radio connecting jacks are .020 styrene rod painted with Alclad Aluminum. The speaker and microphone wires are 26 gauge SS painted flat black. Then on the seat, there is my army cot (hopefully at some point I got to use it if only for an hour). The cot frame is Alclad Aluminum and the canvas is Tamiya Drab Green.
In the back are two water cans from Real Models painted flat black. Also two cases of MREs made from Verlinden set. The box is a resin box, which would be a FDC plotting kit. The box is painted with Tamiya Olive Green and edges worn with a #2 pencil. Lastly is my pack painted NATO Green and faded with AK dust effects.
Well that is it for the interior, now it is time to start working on the body.
As always feel free to leave a comment either positive or negative
Rob - Thanks for the comments. My time with the CUCV was that interim time between the 1/4 ton and the HMMWV. That time when we turned in all the 1/4 ton & doghouses and then waited for particular models of the HMMWV to be delivered…Even after delivery the CUCV hung around as a go for vehicle until the supply system caught up.
The interior is really shaping up nicely. A chain to lock the steering wheel ? Doesn’t the Army trust the Chrysler locking wheel column ? You don’t have to answer that one LOL [;)]
Tread - Happy New Year to you and your wife. Now to answer the question…when the Army ordered the CUCV series, they ordered them ALL keyed alike. Anyone who had access to a CUCV key could make a copy and start any CUCV in the inventory. Soooooo…thus the chains to lock the steering column.
Chevrolet, not Chrysler, provided door locks & steering wheels all keyed exactly alike. Therefore, the only way to ensure unauthorized use of the 1008/1009 series was to have a lock & chain on the steering wheel.
Every CUCV key would open every door and every ignition key would start every truck.
That way, a lost vehicle key did not require re-keying of the vehicle. A lost padlock normally had a second key in the motor pool, or if in the field, a pair of bolt cutters and another padlock and you were on your way.
Sorry about the Chevy /Chrysler confusion… I’m easily confused during the holidays LOL .
Very interesting about all the keys and ignitions being the same [:O] . I can easily understand the need of the chain, padlock and responsibility of the padlock key bearer now !
Mike, thanks also for the explanation…still trying to figure out how I got Chrysler/ Chevrolet mixed up…
You and Rob posted about 3 minutes apart and originally I missed yours … dam…I need some sleep…made it all the way to midnight just like the big kids last night ! …LOL
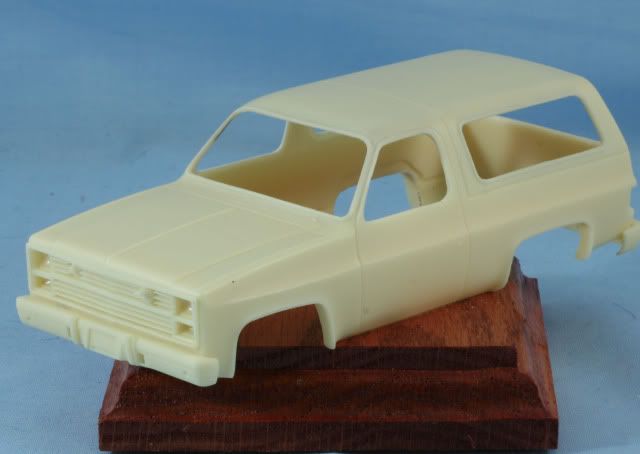
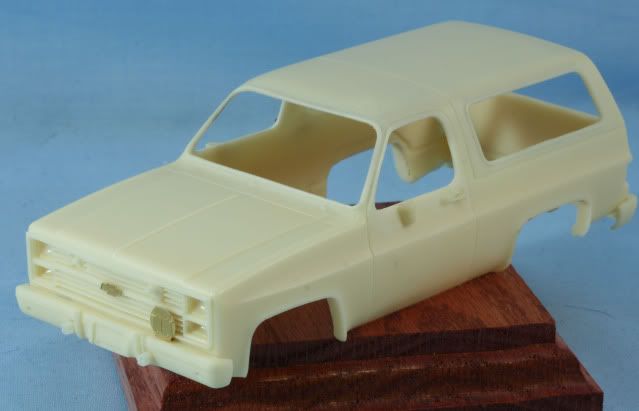
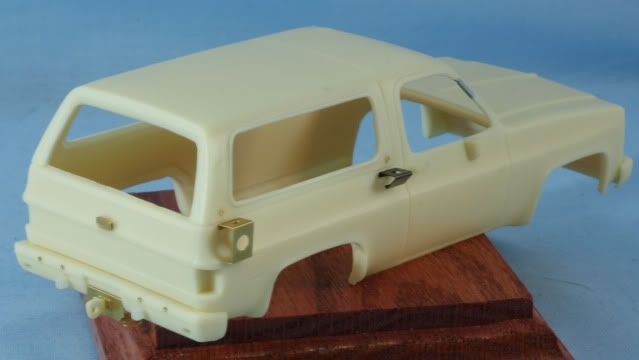
Moving on to the body. Before any assembly on the body, which is a one piece cast, has to be cleaned up including cutting out the excess resin from all the window areas. The first assembly to the body is to glue in the front grille in place.
Next is to complete the front adding the bumper, tow hook holders the PE Chevy logo and the PE bridge marker plate. On each side the base for the rear view mirrors and the door handles. Let me just say the door handles are a PITA to remove from the pour block without breaking
In the rear, the bumper and tow hook holders. Also the PE rear window handle and license plate cover. With the PE cover added, the PE bolt plate and resin tow hook can be added.
The rear bumper on the M1009 has 4 bolt heads, which are not on the kit bumper. I used some PE rivet heads to add these to the bumper.
The kit includes an antenna mounting bracket in PE. This bracket is for a full size antenna for the RT-524, which I mounted in the rear. I went into my PE spare parts to find the PE to fabricate the smaller bracket for the short antenna used on the R-442. With the antenna brackets in place, the kit includes PE antenna wire grommets. One is mounted above each antenna mount on the body.
That’s it for now. The body is off to the paint shop.
As always feel free to leave a comment either positive or negative
Wow! This is an interesting build Mike! Not your typical plastic kit, but a full multimedia one! I love all the detail you’re putting into it, based on your real life experiences! I’m keeping an eye on this one!
Looking nice with the small details being added…reminds me of way back to about 6th grade building the AMT cars with the one piece bodies ! … Ah …memories [;)]