Very impressive. Who makes the barrel, Aber?
My Dad ordered it from www.akkuramodels.com on eBay. He didn’t realize they are in Poland. It took 3 weeks to arrive, but for $18 with shipping that’s not bad. Lol Aside from modifying the mantlet it fit like a glove. Makes the stock gun tube look puny.
Wow, I can imagine it would be heavy! I’m tempted now to order one for my kit.
Yeah it balances the turret nicely. The thing turns like it on ball bearings now. Solid turned aluminum with the brass bore evacuator and lug. Its 20mm longer and 3mm larger in diameter
I didn’t realize the stock plastic gin tube looked so puny and small till I set them beside each other. The new gun tube fits the with the turret much better for the "huge monster beast " look. I don’t know if its true to scale, but it seriously looks the business of a large AA gun stuffed into a tank. Anyone familiar with Kenneth W. Estes?
Nice work on the beastie, Mike.
There’s a guy over on the Big A doing a serious re-build of this same kit, thread’s called “Polishing a [rhymes with word]” and it’s pretty good. I keep thinking I’d like to have one of these things on the shelf, but every time I poke into somebody’s blog, I think maybe not.
Link please. Google didn’t find it for me. lol
If I were building this thing for myself I would be adding a lot more to it for sure. There are some small things I’d like to make happen. One of them being that loader’s hatch being molded closed.
It really needs some crew with it too. But the dio I’m building has them all closed up on a firing range.
The next big armor project I build has to have crew and all the attention I’m giving this build. ![]()
Try this:
I read the entire thing. Thank you! I won’t be doing anything like that with this build. I was only commissioned to build the kit. But wow, Dragon really didn’t get this kit right in a lot of ways.
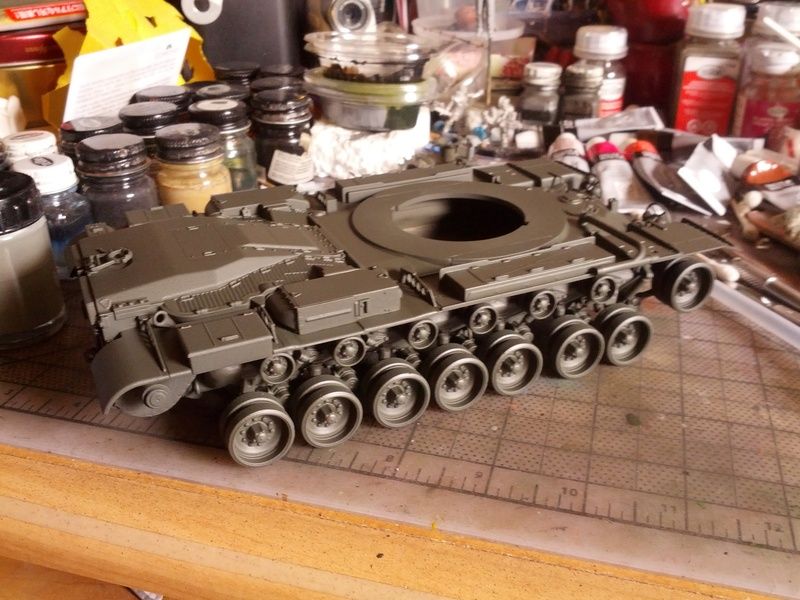
Very interesting WIP, I didnt realize how big this tank is, seems the turret is bigger than the body…just weird.
So much details and the casting is looking real good.
Way to go.
Yeah, lots of flubs. It still looks the part OOB, but I expect that a lot of potential buyers are passing, which means I should be able to pick one up at a very fair price in the near future.
Well aside from Dragon taking some obvious cost saving short cuts, the kit is pretty good.
Current progress minus the fenders I began to put on last night.
(http://smg.photobucket.com/user/DJMikeOz/media/DSCN0761.jpg.html)]
(http://smg.photobucket.com/user/DJMikeOz/media/DSCN0762.jpg.html)]
(http://smg.photobucket.com/user/DJMikeOz/media/DSCN0763.jpg.html)]
(http://smg.photobucket.com/user/DJMikeOz/media/DSCN0765.jpg.html)]
(http://smg.photobucket.com/user/DJMikeOz/media/DSCN0767.jpg.html)]
(http://smg.photobucket.com/user/DJMikeOz/media/DSCN0768.jpg.html)]
(http://smg.photobucket.com/user/DJMikeOz/media/DSCN0771.jpg.html)]
(http://smg.photobucket.com/user/DJMikeOz/media/DSCN0772.jpg.html)]
So I have a few minor corrections to make with the mantlet cover, but aside from the recoil part of the gun tube shroud. I need a really big bendy straw to make that part. Otherwise I’ll end up with the A1 recoil shroud which looks like a saggy diaper, but was present on the very early A2’s. The shower curtain materiel has worked superbly to all of my expectations. It has taken the paint fabulously and is still very flexible. If I had made the gun tube moveable somehow I could still depress and elevate the gun tube with it on and it would be fully functional. As it is, its still soft and movable and it lends the model a nice realistic feel even though the gun tube doesn’t move.
Now I’ll have to make a removable search light cover. ![]()
That Mantlet cover ! [Y]
Yeah? Do you think I did it justice? I know its not perfect, but its fully functional and that would’ve been a bonus if the gun tube still moved up and down.
There were no references I could find as to how they were put together so I went with what would make sense if I had to make one for the real tank based on the pictures I have in Kenneth Estes book.
I hope it stands up to criticism. I know where the flaws are, and I was really careful when I glued it together in very small sections at a time. The super glue just instantly grabs this stuff so I had to go slow or I’d have to do it all over again and I’m low on the material.
After a few minor adjustments it will probably look fine. ![]()
Mike, tell us how you did the mantlet cover, please. That’s why we’re all here!
Looks great, but don’t get into the habit of lazy photo-posting with those bare links. I guarantee it will cut down your responses. Take the extra 2 seconds to post each picture. ![]()
Sorry doog, I’m still trying to get that to work right. I’ll put more effort into posting in the future. This site isn’t as user friendly as the one I’m more accustomed to. So tell you how I did that mantlet cover? But I didn’t do anything new. This is the old tissue paper trick. Only the material is different. Im not on my laptop tonight, but I can write up a tutorial if you guys think it will be of help. I thought everyone knew of this technique though. So I’m a bit confused. I’ll draw up some diagrams and start writing something up. And , God be good, I’ll not goof it up with bad pic links. Apologies for any vague references I’ve made gentlemen. ![]()
I just advised that because I know that personally, I generally don’t bother to hit “links” if people post them; I don’t actually know why, I guess I’m just used to seeing the posts with photos right ion the page here, so I"m assuming other people feel the same. I may be wrong though.
That material used looks almost heat-formed? Especially how it clings so nicely to the “ears” on tip of the mantlet. What is it, exactly? I’ve never seen anything like it.
Funny thing is Karl, I do the same thing half the time. I’m lazy enough to not click on more than one or two. Then I move on. So I fully understand.
I did not heat form the material at all. It’s just trimmed very carefully to fit and then super glued in place. What I used is some saved scraps of an old vinyl shower curtain. A cheap one we bought at Wal-Mart some years ago. It had some mildew growing on it and the Mrs. decided we had to chuck it. I noticed the texture and cut a square of it out for later use.
I didn’t even think of using it for this application till I was brain storming what materials I had at hand that would be flexible. When I pulled this out I thought “That should be perfect”. And it has worked perfectly. It takes paint and doesn’t crack after it has dried. It has reamained flexible even after a few cotes of Rustoleum Camo.
I had to be very careful when attaching it because the super glue grabs almost instantly and if you get it attached wrong there is no going back. That’s why there are a few spots I need to adjust. They are a little off and not to my liking. But this is a trick I’m sure you are very familiar with.
I cut the pieces out after a lot of fore thought and template making (and template adjusting or remaking). Making sure I had plenty of over lapping material so I could get the material to fold like it should. It was my intention that it would be moving after all. So I had to have extra material for that purpose. Just like the real thing. The Mantlet and then the area surrounding the mantlet where it should attach are the only places where the glue mounts it in place.
So the material you are wanting to look for is easily and readily available in almost every home bathroom supply section of any retail store. All you need is a vinyl bathroom shower curtain. It should last you for decades before you ever run out of it. ![]()
If you need any clarification or if I’ve not been clear enough just let me know. Words do not serve me very well sometimes.
Edit: CORRECTION!! It was not a shower curtain. It was a plastic protective mattress cover. I am extremely sorry for this mistake and if it were not for my wife I would not have caught this error.
Time for an update.
Okay, I got back on it today and made some good progress with the painting.
There was nothing much to note of the rest of the assembly. Pretty standard and nothing gave me any issues.
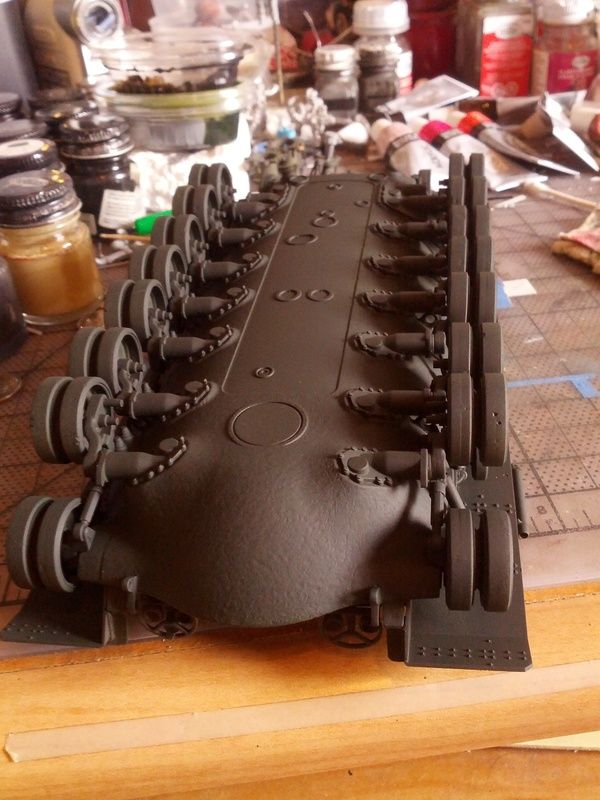
So I started by spraying a shadow color of black/green acrylic to all of the bottom surfaces. no need for anything fancy here. Just deep dark shadow.
It doesn’t look like much yet, but just wait. It gets better.
I apologize for the plethora of posting I’m about to do. I’m doing my best with a phone here.
Okay. Next I sprayed the main color (MM Marine Corps Green FS34052) over all of the upper surfaces and made that all uniform. Looks pretty good. Seems my AB loves enamel.